
When using Photoshop, your main weapon is going to be the pencil tool (shortcut "B"), which is the alternate for the brush tool. The pencil lets you color individual pixels, without any anti-aliasing.


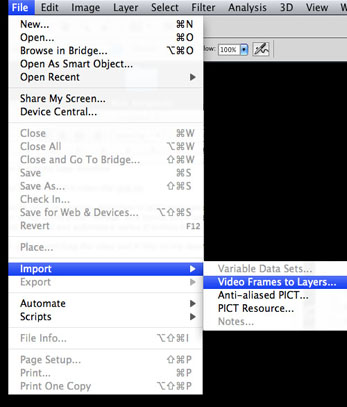


When using Photoshop, your main weapon is going to be the pencil tool (shortcut "B"), which is the alternate for the brush tool. The pencil lets you color individual pixels, without any anti-aliasing.
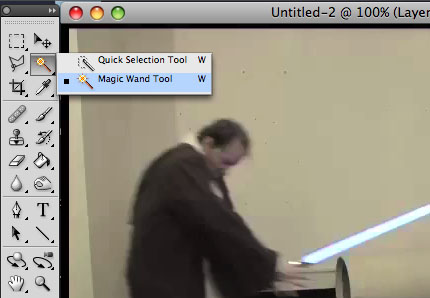
Two other tools that will come in handy are the marquee tool ![]() (shortcut "M") and the magic wand
(shortcut "M") and the magic wand  (shortcut "W") for selecting and dragging or copying and pasting. Remember that by holding "Shift" or "Alt" while you make your selection you can add or subtract from your current selection. This comes in handy when trying to grab areas that aren't perfectly square.
You'll also use the eyedropper ![]() (shortcut "I") to grab colors. Color conservation is important in pixel art for a number of reasons, so you will want to grab the same colors and reuse them.
(shortcut "I") to grab colors. Color conservation is important in pixel art for a number of reasons, so you will want to grab the same colors and reuse them.
Finally, make sure you learn the shortcuts. They can save you a lot of time and energy. A good one to know is "X", which switches your primary and secondary colors.
Pixels are essentially little blocks of color. The first thing you need to learn is how to use these blocks effectively to make any kind of line that you want. We'll discuss the two most basic types of lines; straight and curved.I know what you're thinking - this seems too easy to even bother with! But with these 8-bit graphics-style pixels, even straight lines can be problematic. What we want to avoid are "jaggies" - little breaks in the line that make the line look uneven. Jaggies pop up when one piece of the line is larger or smaller than the surrounding pieces.

For curvature, make sure that the decline or incline is consistent all the way through. In this next example, the clean-looking curve goes 6 > 3 > 2 > 1, whereas the curve with the jaggy goes 3 > 1 < 3.

Being comfortable making any line in pixels is crucial to doing pixel art. Later on, we'll learn how to use anti-aliasing to make our lines look more smooth.
For this assignment, we will be creating a Sprite.1. What will the sprite be used for? Is this for a website, or a game? Will I have to animate this later, or is this it? If the sprite will be animated later on, you may want to keep it smaller and less detailed. Conversely, you can pack as much detail into a static sprite that you will never have to deal with again. But think about where the sprite is going to go, and what will work best.
2. What constraints are being placed on me? Earlier, I had said that color conservation is important. One of the reasons is that, especially if you are working on a game, your palette of colors may be limited. Also consider the dimensions of your sprite and how it will fit with its surroundings.

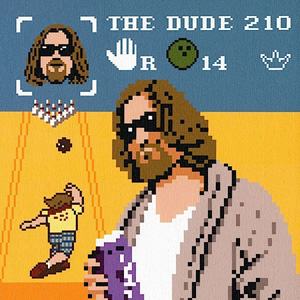
For this tutorial, I wanted to make sure the sprite was rather large so that you could clearly see what was happening with each step. To that end, I decided to use the Lucha Lawyer, the ass-kickin'est wrestling attorney around, as my model! You can create any object, character or creature you wish.
A black outline will provide a good, basic structure to your sprite, so it's the perfect place to start. The reason we choose black is that it's nice and dark. Later on, I'll show you how you can change the color of the outline for more realism.There are two ways to approach the outline. You can draw the outline freehand and then clean it up, or you can start by placing the pixels as you want them from the start. You know, like "click, click, click".
I think which approach you should use depends on the size of the sprite and your skill at pixelling. If a sprite is very large, it's much easier to sketch the outline freehand to get the general shape and then clean it up later than to try and get it right the first time through.
In this tutorial, we're creating a fairly large sprite, so I'll demonstrate the first method. It's also easier to illustrate with text and pictures.
Load the default Square Brushes from the Library that comes with Photoshop, this will give you that hard-edge small square pixel line you want.
![]()
![]()
Even large sprites never usually exceed 200 by 200 pixels. The phrase "doing more with less" never rings more true than when pixelling. And you will soon find that one pixel can make all the difference.
Using your mouse or tablet, sketch out a crude outline for your sprite. You can use one of your own sketches as a rough guide, or use a graphic or image to trace over from the internet, make a new layer and start drawing over top of your rough drawing or image. Make sure it's not TOO crude, though - it should resemble more or less the final product that you want. Either way, keep it simple.
In this case, I'm basing my outline almost entirely on my sketch.
First, crank up the zoom to around 6x or 8x magnification so that we can see each pixel clearly. Then clean up that outline! In particular, you want to trim away stray pixels (the outline should only be one pixel thick all the way through), get rid of any jaggies, and add any small details that were passed over in Step 1.

Keep your outline simple. The details will emerge later on, but for now, concentrate on defining the "big pieces", like muscle segmentation, for instance. It may not look like much now, but be patient.
With the outline done, we have a coloring book of sorts that we can fill in. Paint buckets and other fill tools will make it even easier for us. Picking colors can be a little more difficult, however, and color theory is a topic that is beyond the scope of the tutorial. However, here are a few basic concepts that are good to know.
HSB stands for (H)ue, (S)aturation, and (B)rightness. It's one of a number of computer color models (i.e. numerical representations of color). Other examples are RGB and CMYK, which you have probably heard of. Most paint programs use HSB for color-picking, so let's break it down:
Hue - What you understand "color" to be. You know, like "red", "orange", "blue", etc.
Saturation - How intense the color is, or how intense the color is. 100% saturation gives you the brightest color, and as saturation decreases, the color becomes more gray.
Brightness (or "luminosity") - Lightness of a color. 0% brightness is black.
What colors you choose is ultimately up to you, but here are a few things to keep in mind:
1. Less saturated and less bright colors tend to look more "earthy" and less cartoony.
2. Think about the color wheel - the further away two colors are from one another, the more they will separate. On the other hand, colors like red and orange, which have close proximity on the color wheel, look good together.

3. The more colors you use, the more distracted your sprite will look. To make a sprite stand out, use only two or three main colors. (Think about what just red and brown did for Super Mario back in the day!)
The actual application of color is pretty easy. You want to first select the area you're going to fill with the magic wand (shortcut "W") and then fill by pressing "G" for the paint bucket and switch between your foreground color and background color with "X".

First, we have to pick a light source. If your sprite is part of a larger scene, there might be all kinds of local light sources (like lamps, fire, lamps on fire, etc.) shining on it. These can mix in very complex ways on the sprite. For most cases, however, picking a distant light source (like the sun) is a better idea. For games especially, you will want to create a sprite that is as generally lit as possible so that it can be used anywhere.
I usually choose a distant light source that is somewhere above the sprite and slightly in front of it, so that anything that is on top or in front is well-lit and the rest is shaded. This lighting looks the most natural for a sprite.

Once we have defined a light source, we start shading areas that are farthest from the light source with a darker color. Our "up and to the front" lighting model dictates that the undersides of the head, the arms, the legs, etc., should be shaded.
Remember that the play between light and shadow defines things that are not flat. Crumple up a piece of white paper into a ball and then unroll it and lay it on a table - how can you tell that it's not flat anymore? It's because you can see the little shadows around the crinkles. Use shading to bring out the folds in clothing, and to define musculature, hair, fur, cracks, etc.

A second shade, lighter than the first, should be used for soft shadows. These are areas that are indirectly lit. It can also be used to transition from the dark to the light, especially on curved surfaces.

Places that are being hit directly by the light source can have highlights applied onto them. Highlights should be used in moderation (much less than shadows), because they are distracting.
Always apply highlights after shadows, and you will save yourself some headache. Without the shadows already in place, you will be inclined to make the highlights too large.

Shading is where most beginners get tripped up. Here are some rules you should always follow when shading:
1. Don't use gradients. The ultimate newb shading mistake. Gradients look dreadful, and don't even begin to approximate the way light really plays off a surface.
2. Don't use "pillow-shading". Pillow shading is when one shades from the outline inward. It's called "pillow-shading" because it looks pillowy and undefined.
3. Don't use too many shades. It's easy to think that "more colors equals more realistic". In the real world, however, we tend to see things in big patches of light and dark - our brains filter out everything in between. Use at most two shades of dark (dark and really dark), and two shades of light (light and really light) on top of your foundation color.
4. Don't use colors that are too similar. There's no reason to use two colors that are very similar to one another. Unless you want really blurry-looking sprites!
Color conservation is something that pixel artists have to worry about a lot. One way to get more shades without using more colors is to use a technique called "dithering". Similar to "cross-hatching" or "stippling" in the traditional art world, you take two colors and interlace them to get, for all intents and purposes, an average of the two colors.Here's a simple example of using two colors to create four different shades using dithering:


Compare the top picture, which was made using the Photoshop gradient tool, and the bottom, which was created with just three colors using dithering. Notice the different patterns that were used to create the intermediary colors. Try experimenting with different patterns to create new textures.
Dithering can give your sprite that nice retro feel, since a lot of old video games relied heavily on dithering to get the most out of their limited palettes (look to the Sega Genesis for lots of examples of dithering). It's not something that I use very often, but for learning's sake, here it is applied (possibly over-applied) to our sprite.

You can use dithering as much or as little as you want. Honestly, it's a technique that I've only seen a few people use really well.
Up until this point, we've kept the outline black. And there's nothing wrong with that, really, since it looks pretty good and it keeps the sprite well-separated from its surroundings. But by using black, we are sacrificing more realism than we might like to, since it gives the sprite a "cartoony" look. Selout is a great way to get around that:

You'll notice I also used selout to soften the folds of his muscles. Finally, the sprite begins to look like a coherent whole rather than a whole bunch of separate pieces.
Compare this to the original:
Generally, you want to add your intermediary colors at the kinks, since that's where the line breaks and looks uneven. If it still looks too uneven, add another, lighter layer of pixels. Have your intermediary layers flow in the direction of the curve.
I don't think I can explain it any better than that without complicating things. Just look at the pictures, and I think you will understand what I mean:


Now let's anti-alias our sprite. Keep in mind that if you want your sprite to look good on any color background, do not anti-alias on it's outer edge. Otherwise, you will see an unfortunate-looking "halo" of your in-between colors around your sprite and it will look nasty as hell.

The effect, as you can see, is subtle, but it makes a big difference.
You may ask why we don't just apply a filter from our paint program to the sprite if we want to make it look smoother? The answer is that no filter is going to make your sprite as clean-looking as if you did it by hand. You have total control, not only over the number of colors you use, but where they get used. And you know better than any filter what areas need to be smoothened out, and what areas are going to lose their pixelly quality if you anti-alias them.
This last part is what separates an ethusiastic amateur from a hardened professional.Step back and take a good long look at your sprite. Chances are, it's still a little rough. Take the time to refine it and make sure that everything is perfect. Give or take how tired you are, this can actually be the most fun part. Add little details to make your sprite more interesting. Your skill and experience with pixelling will show through here.

You may have been wondering why the Lucha Lawyer's eyes have been missing this whole time, or why the supoena he was holding was blank. Well, it's because those were small details that I wanted to save until the end. Also take notice of the trim I added to his armbands, the fly I added to his pants, and�Ķ well, what would a man be without his nipples? I also darkened the lower half of his torso so that his left hand would stand out more against his body.
You're finally done! The Lucha Lawyer weighs in at an impressively light 45 colors (or perhaps ultra-heavyweight, depending on your palette restrictions) and has dimensions of approximately 150 by 115 pixels. Now you can have that beer!
Here's an animated .gif that shows the evolution of our sprite:

1. Keep learning the fundamentals of art and practice with traditional mediums. All the skills and knowledge involved in drawing and painting will apply to pixelling as well.
2. Start with small sprites. The hard part is learning how to cram a lot of detail into a few pixels, not making huge sprites (that just takes time).
3. Study the work of the artists whom you admire and don't be afraid of being unoriginal. Biting off other people's work is the best way to learn. It takes time to find your own style.
4. If you don't have a tablet, get one. Repetitive stress injuries from clicking the mouse are no fun and will not impress the ladies (or dudes).
5. Share your artwork with others and get feedback. And who knows, you might just meet some new, geeky friends!
More samples:

You could easily go to DAFont.com and get a cool, broken font. However breaking the text manually is way more rewarding and you get to make it exactly how you want.
This tutorial will teach you how to create some text, manipulate it and break it up. After that we will make it look fresh!
First, let's examine the anatomy of type.
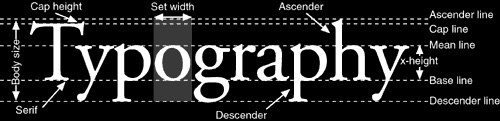
Being familar with all the different elements of typography will help you in knowing how to manipulate the structure of type to create interesting designs.
Start out by creating a new Photoshop document. Make the size 800 x 600 pixels.
Using the Horizontal Type Tool, type the word metropolis.

Now you will need to break the text up. To do this you must rasterize the layer. Choose Layer > Rasterize > Type
Select the Polygonal Lasso Tool and select the top portion of the metropolis text layer. When you are going over the the middle of the text, make slight spikes by going up an down. When you are done connect back to the beginning to make it a selection.


Go to Menu and choose Edit > Free Transform to bring up the transformation box.
Hold down the Ctrl key and move the top right of the box over to the right and then release Control key.

While the top portion is still selected, move the text up and over to the right with your arrow keys. This will break the text up.

Now Deselect the selection by pressing Ctrl + D
Now we'll extend the ascenders and descenders of our text. Use the Marquee Selection Tool and select a small part of the bottom of the 'p' and go to Edit > Free Transform

Drag the Middle-Bottom box downwards, all the way to the bottom. This will extend the p.
Do the same with the 'l' letter except drag it upwards. You should end up with this:

Now deselect everything and go to Edit > Free Transform. In the Options toolbar, change the rotation to -30 degrees and click on the check mark to confirm.

Create a New Layer and name it gradient. With the Gradient Tool selected change the gradient to Copper and make it a Radial Gradient

Now drag across the screen to make a gradient like this:

With the Gradient layer selected, choose Layer > Create Clipping Mask. Now set the layer mode to Lighten.

Create a New Layer and name it bg gradient. Put it just above the background layer. Set the Opacity to 19%. Fill this layer with a black to white Linear Gradient

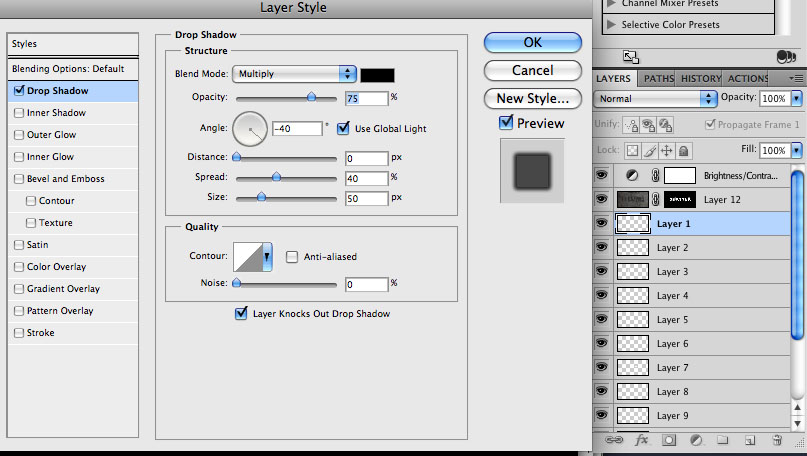
Double click on the metropolis text layer to bring up the Layer Styles. Check the Drop Shadow and enter the settings as follows:
Opacity: 86% | Angle: 120 Global Light | Distance: 5px | Spread 58% | Size: 5px | Contour: Ring - Anti Aliased | Noise 0%

With the Marquee Select Tool, select everything just above where the l line ends. Now go to Image > Crop.

Once you downloaded the Zip file, extract & open "4.jpg" inside of Photoshop.
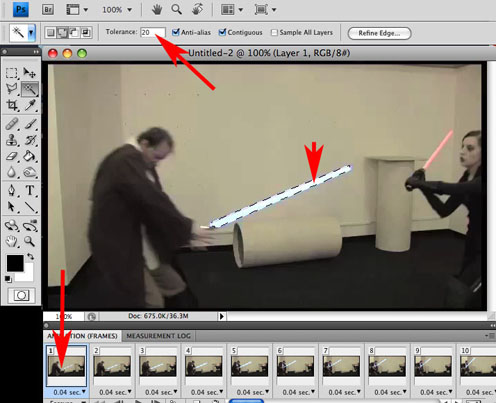
Using the Magic Wand Tool change the Options to the following:
Tolerance: 10 | Anti-Alias:Checked | Contiguous: Unchecked

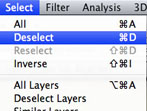
Click on any white part of this image to select all the white. Now go to Select > Inverse. This will select everything but the white.
Go to Edit > Copy and go back to our main document and Edit > Paste this into the document. Name this new layer Spray paint.
Go to Edit > Transform > Scale. Bring it down to 15% and Rotate it like this:

Now double click on the spray paint layer, to bring up the Layer Styles. Check Color Overlay and change the color to #8b756b

Step 24
Go back to the spray paint image and copy and paste it again into your main document. Keep it at 100% scale and put it where you feel fit. Now put a Color Overlay with the same color as in the last step (#8b756b). Your done!

Load these custom Tree Brushes and Tree Brushes 2.
Create a document of the size you want, staying near to 1600 pixels by 1200 pixels, 72 dpi resolution. Set the Foreground color to black #000000 and then press Alt + Delete to fill the "Background" layer with a black color.
Now choose #ff0000 as our Foreground color and type some text with the Horizontal Type Tool (T) using the settings shown below and choose a very very bold font to type out the text with. I'm using a red color just to create some contrast with the black background and the white effects that will come next.
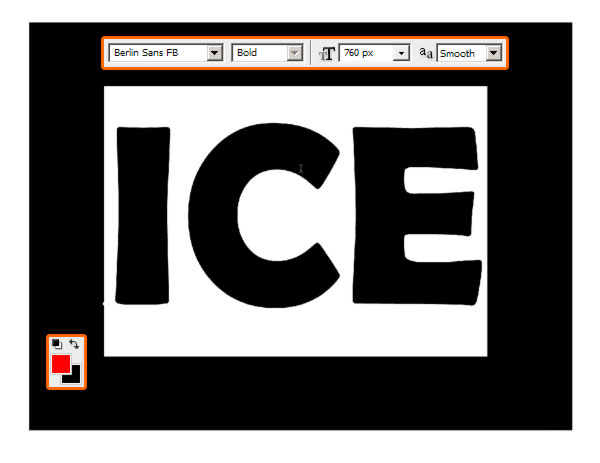
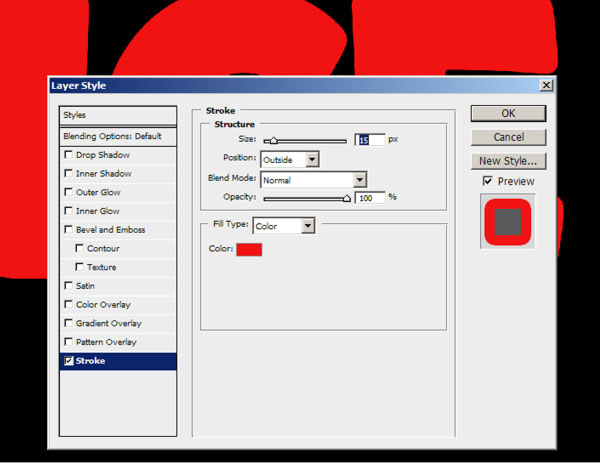
Now double-click on the Layer thumbnail (or go to Layer > Layer Style > Stroke...) and choose #ff0000 for the color and set the Stroke at 15 pixels. This way we're making the text more rounded and fatty to avoid rough edges.
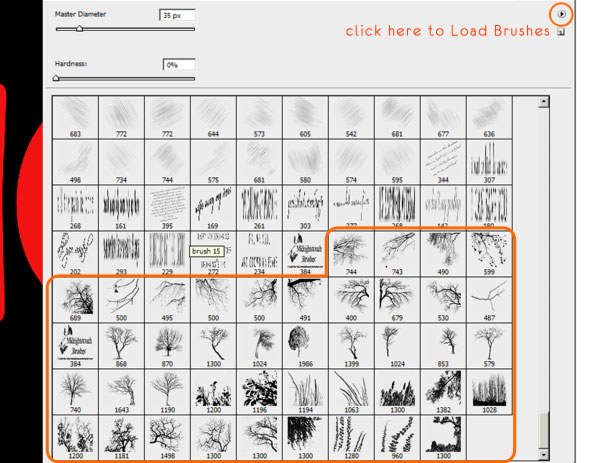
Create a New Layer by clicking Ctrl + Shift + N, then pick the Brush Tool (B), right-click with your mouse and finally load the new sets of Brushes by clicking on the little black arrow (look below). After choosing Load Brushes... browse to your Presets folder and then to the Brushes folder to load the Brushes. Load the two sets we previously downloaded, as we're going to need some variety to create the ice effect.
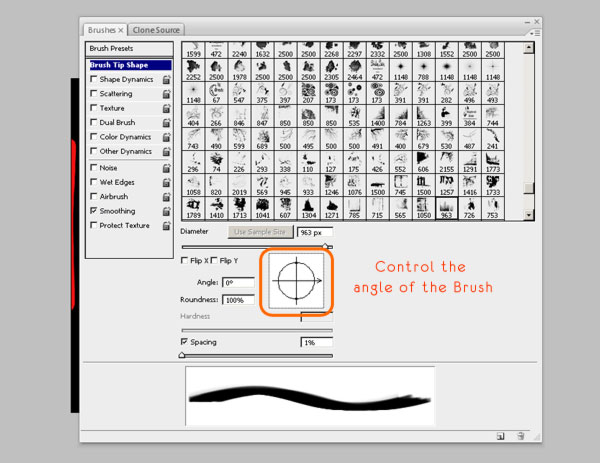
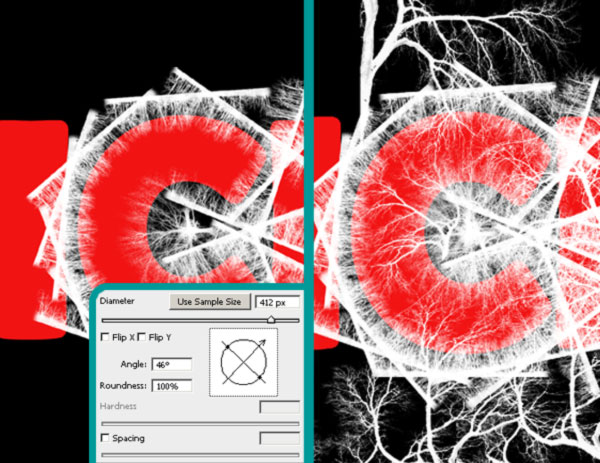
Before beginning the work with Brushes, let's see how to modify the Angle of the Brush selected because it's essential for the next steps. Press F5 to open the Brushes Window: using the Angle option you can rotate the Brush you're using. Allow the Smoothing option for a softer Brush.
Now click near the red area of the letters, everything which happens outside of that area is not important, and we can erase it later. Use your creativity to make something which should look like cracks in the ice - you have a lot of Brushes available to work with.
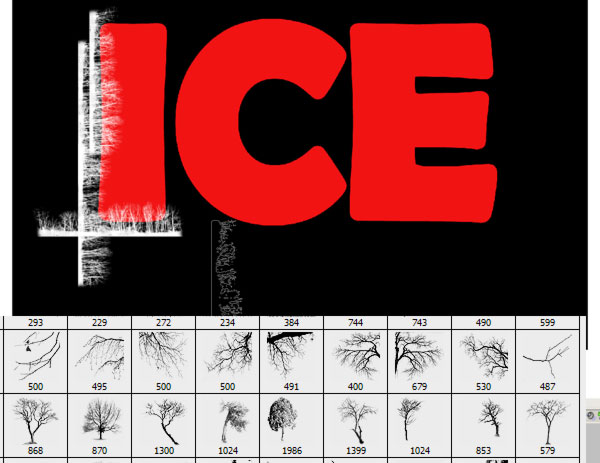
The Angle and Size settings allow you to set and rotate the Brushes; uncheck the Spacing box to have more control when you're painting the ice cracks. For every letter create a new Layer hiding the one you've already made, so it's easier to look at what's happening in the red area.
Always give a name to layers, as it's easier to keep them organized. During the making of the ice effect it's important to use more linear Brushes to create the main shape of the letters and some bigger ones for the deeper cracks.
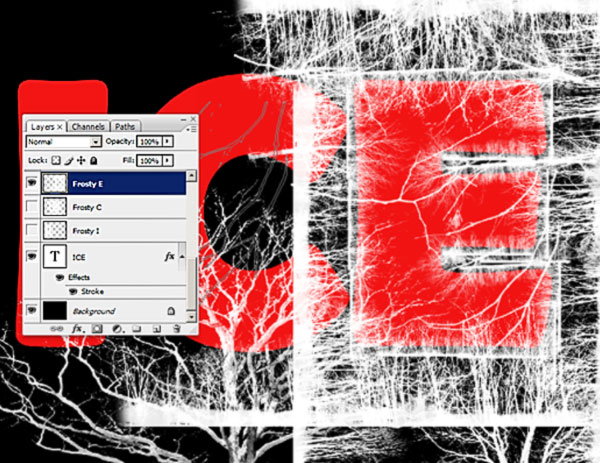
Convert the "ICE" Layer (the red one) into a Smart Object (Right-click > Convert to Smart Object). Then Ctrl-click on this Layer's thumbnail to select it completely and apply a Layer Mask to the other Layers.
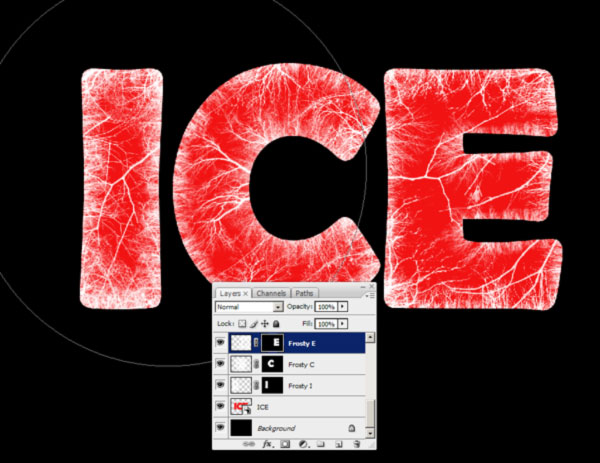
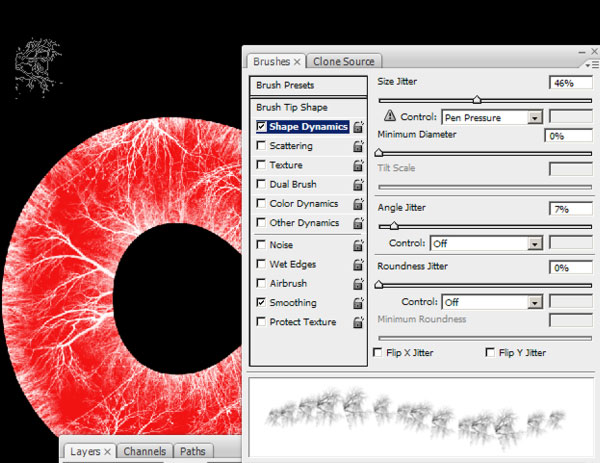
Create a New Layer, call it "extra" and with a tree brush draw some extra ice into the red letters using the settings below (F5).
Use the Brushes near the borders to make it look more three-dimensional. Help yourself by selecting the three letters so you can paint directly where you need to.
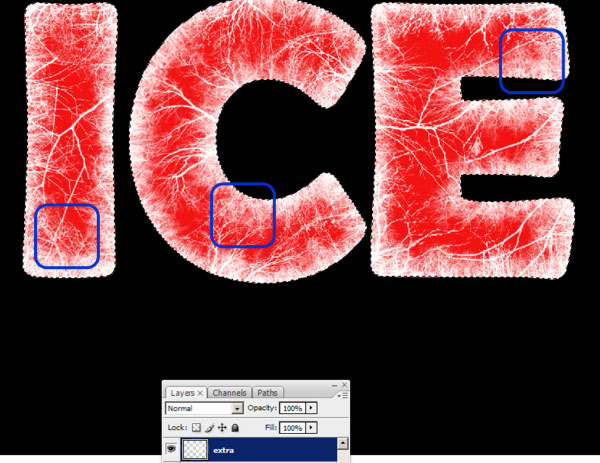
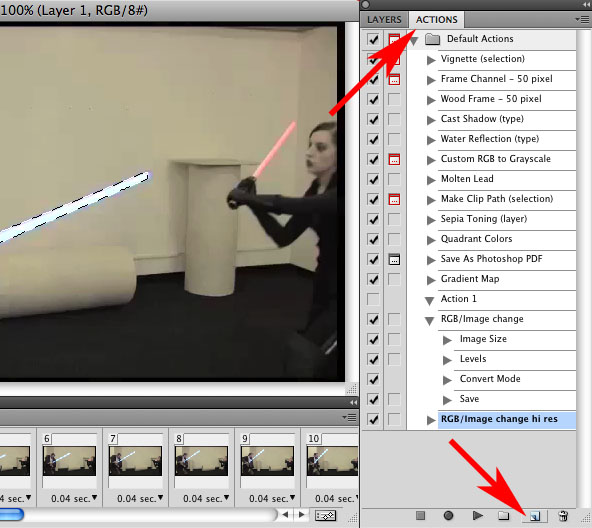
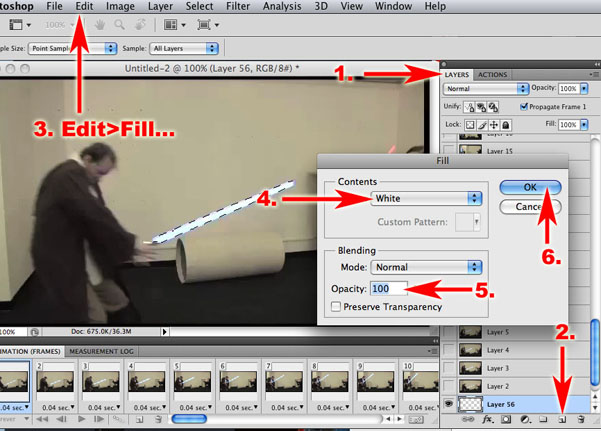
Make sure the original ICE text layer is moved under the layer with the tree branches (ice cracks). Select that ICE text layer, rasterize the text (right click on the layer) hit CTRL+A to 'select all', then grab the Arrow Tool. Click on the actual ICE text in your image document, then individually press the 'right' and the 'left' arrow keys on the keyboard, your ICE text is now selected. Go to Edit > Fill... Use: Color (Choose Black), click OK.
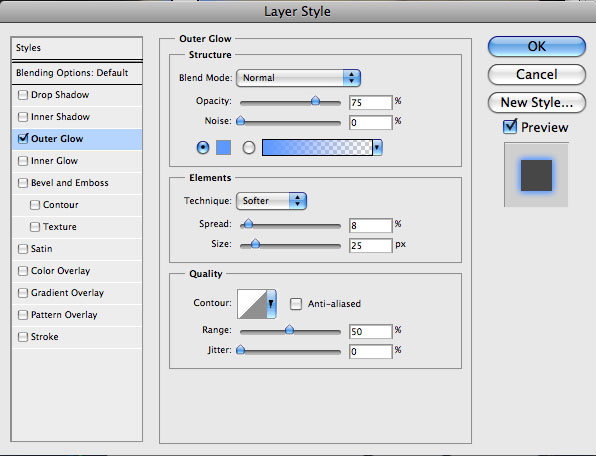
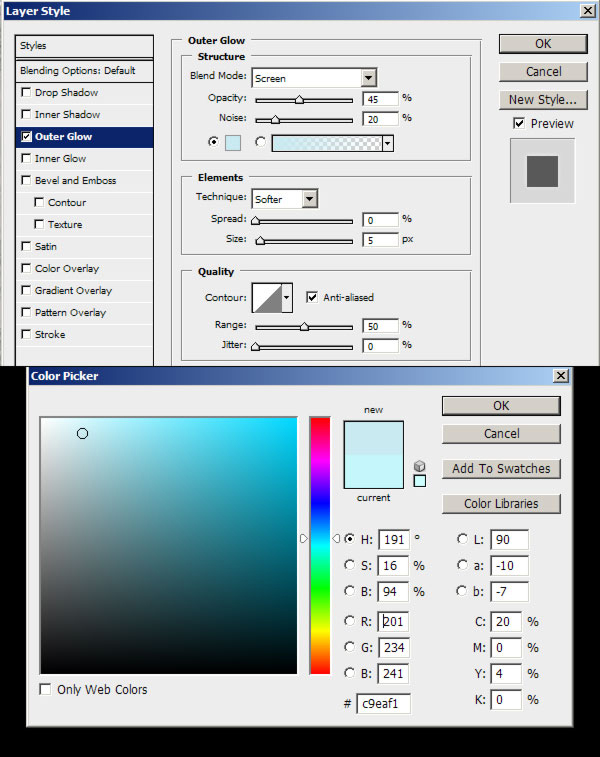
You now have the ice crack effects on top of the ICE text layers. Go to the Blending Options of the ICE crack layer (the white ones) and apply the settings shown below. These features are very useful also to colorize layers. We'll use a very light blue color (#c9eaf1) in the Outer Glow options to create some halo around the letters and inside to make it look frozen.
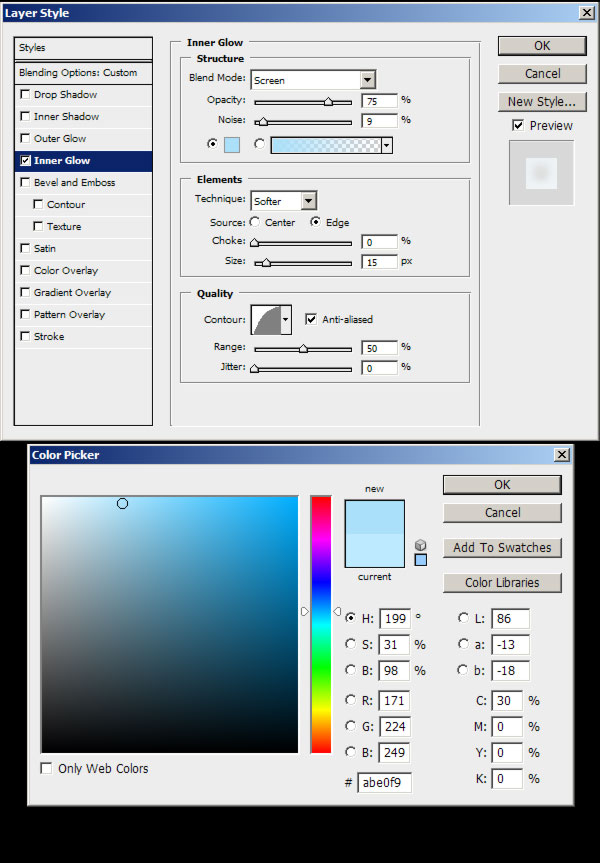
Using the Inner Glow option we'll create a glow effect. Apply a value around 10% of noise to make it look more crispy.
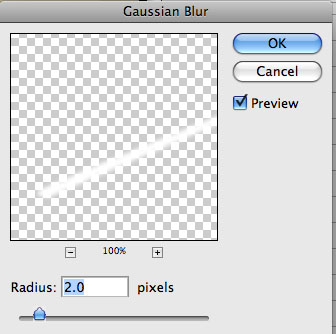
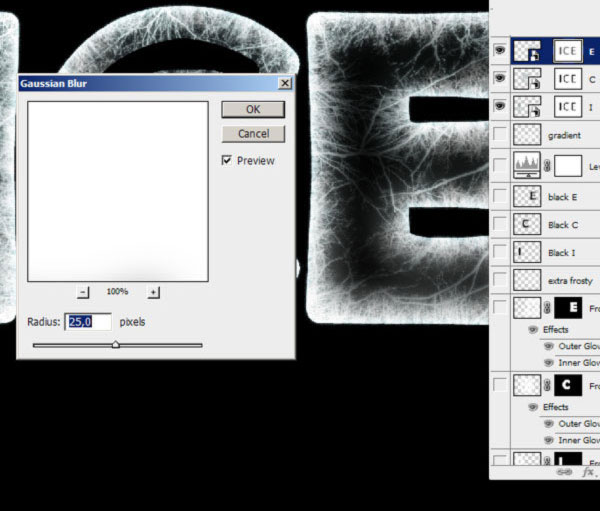
Select the "I" letter of the "ICE" layer, then go to Select > Modify > Contract... > 25 pixels. Then click OK. Create a new layer ("Layer 1") and press Alt + Delete to fill the selected area; use full black (#000000). Then Deselect and go to Filter > Blur >> Gaussian Blur... 15 pixels. Do the same for the other letters applying always the same Blur.
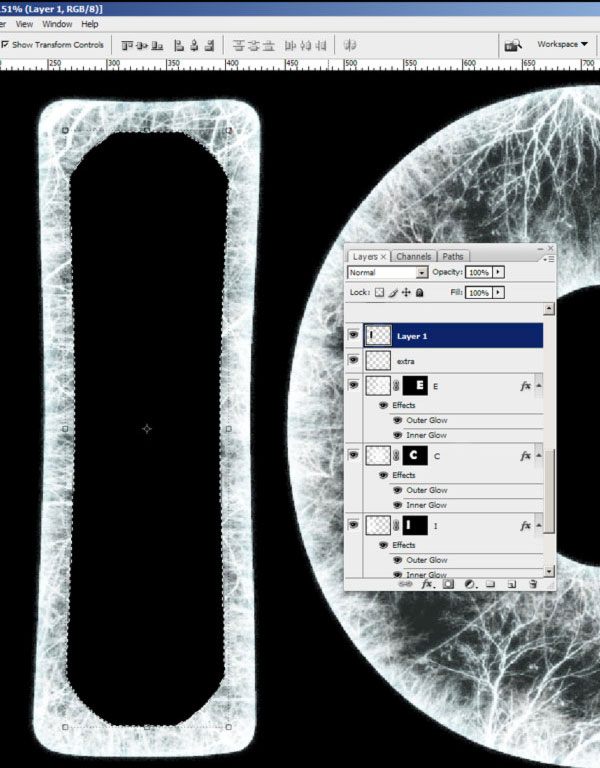
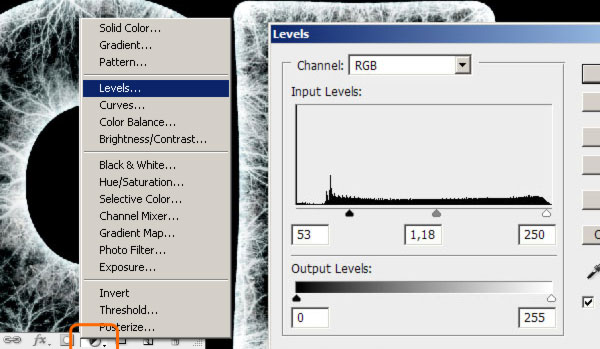
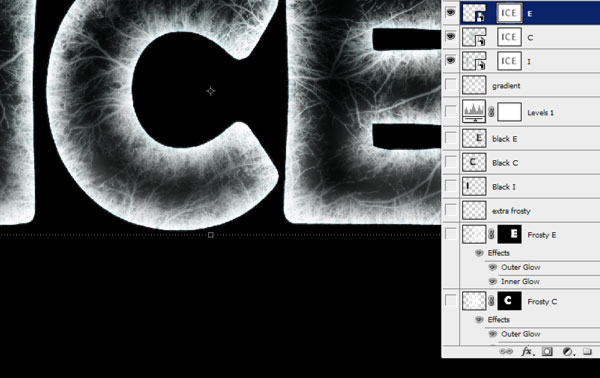
Name these black Layers with "black E, C, I" and set their Opacity to 40%. Then create a New Adjustments Layer and go to Levels. Applying the settings shown below, from here they will influence the whole image.
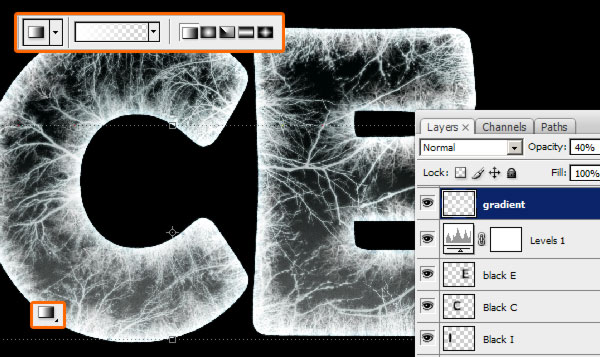
Ctrl-click on the "ICE" layer to select it and then create a new layer and call it "gradient." With a white to transparent gradient draw the bottom to the top. We're drawing some light from the bottom. Set the Opacity to 40%.
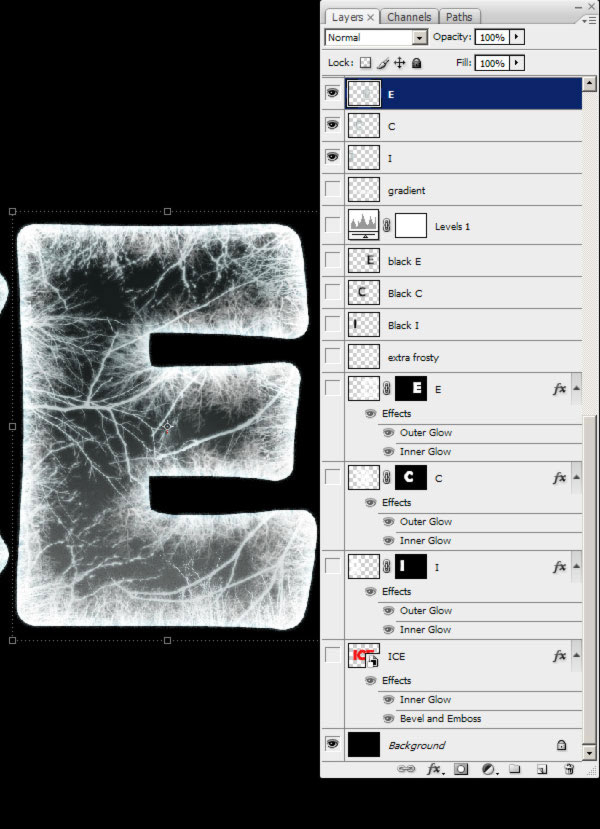
Hide the "Background" layer (which is black) and select one letter with the Rectangular Marquee Tool. Go to Edit > Copy Merged then Press Ctrl + V. Do the same also for the other two letters and name the layers with the corresponding letter. Then you can hide all the other layers because from now on we'll work on these new ones, but keep the old ones because they can always be useful.
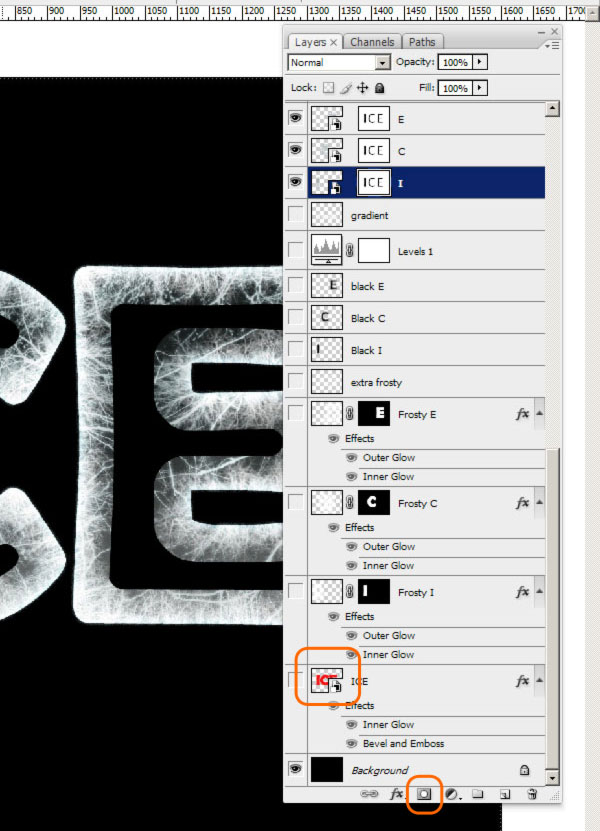
Right-click on the thumbnail layers and Covert them to Smart Objects. Now Ctrl-click on the "ICE" layer and go to Select > Modify > Contract... by 35 pixels. Apply this Selection as a Layer Mask to every letter. Don't worry if the masking is covering all three letters.
Select the Layer Mask thumbnail and go to Filter > Blur > Gaussian Blur... 25 pixels. Do this to all the "I," "C," and "E: layers. This process is useful to create some darker areas inside.
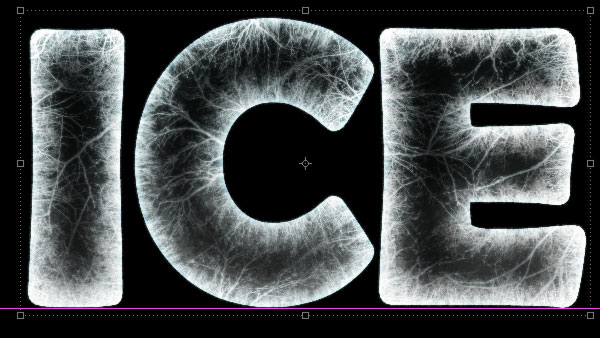
Below is how it should look like.
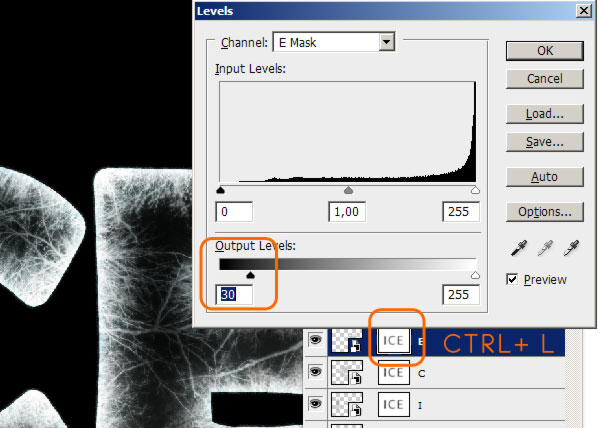
Press Ctrl + L on the Layer Mask to Open the Levels and reduce the darkness (value 30). This way the Layer Mask become lighter showing more of the ice inside.
Duplicate the "I," "C," and "E" Layers, Right-click on the Layer Mask > Apply Layer Mask. Finally Merge them. Hide all the rest and create a new layer. Let's start making the snow now.
Pick the Brush Tool (B) and choose a normal circle brush. Then apply the settings shown below in the Brush Windows (F5).
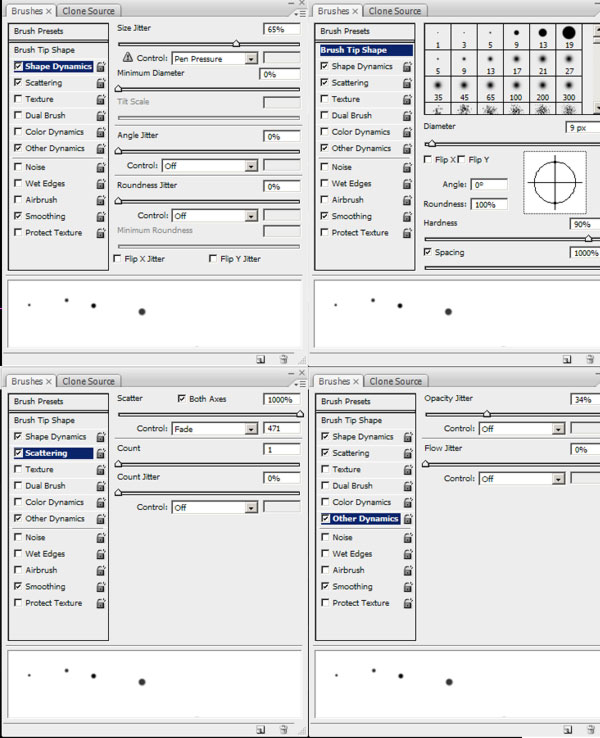
Create a new layer and paint the snow increasing and decreasing the brush size.

Select the "Ice" layer and press Ctrl + T. Then click on the Warp icon and choose the Shell Upper with Bend set to 11%.

Change the settings of the brush with these new ones. Start to paint the snow leaving some slightly darker areas.

Paint the snow on top of the letters. We can work on one single layer now.

After you've done this, retouch the corners and edges with the Eraser Tool (E) using a soft brush.

Create a new layer on top and begin to paint some snow near the base of the letters using the same brush, with the same settings as before.

Leave some little darker areas.

Clean the edges using the Eraser Tool (E) with a soft brush.

Create a New Layer above the snow on the letters and start painting with a black (#00000) Brush to create shadows. Let's suppose the light comes from the top.

Make some bigger shadows where there are humps.

Create a new layer on top and paint some shadows using the same brush. These are the shadows of the letters.

Apply this Inner Glow to the shadows just made.

Add some more falling snow on a new layer on top.

Now select the snow on the top and Duplicate it by dragging the thumbnail to the New Layer Icon.

Do the same with the letters and the snow on top of them. Merge these two layers to make the reflection. Press Ctrl + T, then Right-click > Flip Vertical.

With the Gradient Tool (G) draw on the Layer Mask a vertical black to transparent gradient. Hold the Shift key to keep it vertical. Then apply some Motion Blur: Angle 0 degrees and Distance 20 pixels.

Do the same as before for the falling snow layer: Duplicate, Flip Vertical, add a Gradient Mask, and apply a Motion Blur.

Create a new layer behind the letters and draw a horizontal white line with a brush (always holding the Shift key). Set the Size to 15 pixels and the Hardness to 80%. Set the Opacity of the layer to 90%.

Create a new layer behind the reflections and draw a white to transparent Gradient starting from the line drawn in the previous step. Also add 70% Gaussian Noise by going to Filter > Noise > Add Noise.

This is the actual situation: every effect on his own layer. Now Create a new layer, then go to Image > Apply Image... and click OK.

Call this new layer "ICE IMAGE" and Duplicate it. Now we can hide all the rest, we'll be working a bit on sharpening and increasing the definition.

Duplicate this layer again and apply a Gaussian Blur of 0,3 pixels just to smooth everything.

Then go to Filter > Other > High Pass and apply the following settings.

Again, create a new layer by going to Image > Apply Image... and click OK. Set it to Overlay and 30% for Opacity.

Draw a circle on a new layer with the Elliptical Marquee Tool. Go to Select > Inverse. Go to Edit > Fill: Black, then Deselect with Ctrl + D. Now go to Filter > Blur > Gaussian Blur, and set it to 25 pixels. This gives some sort of vignet effect.

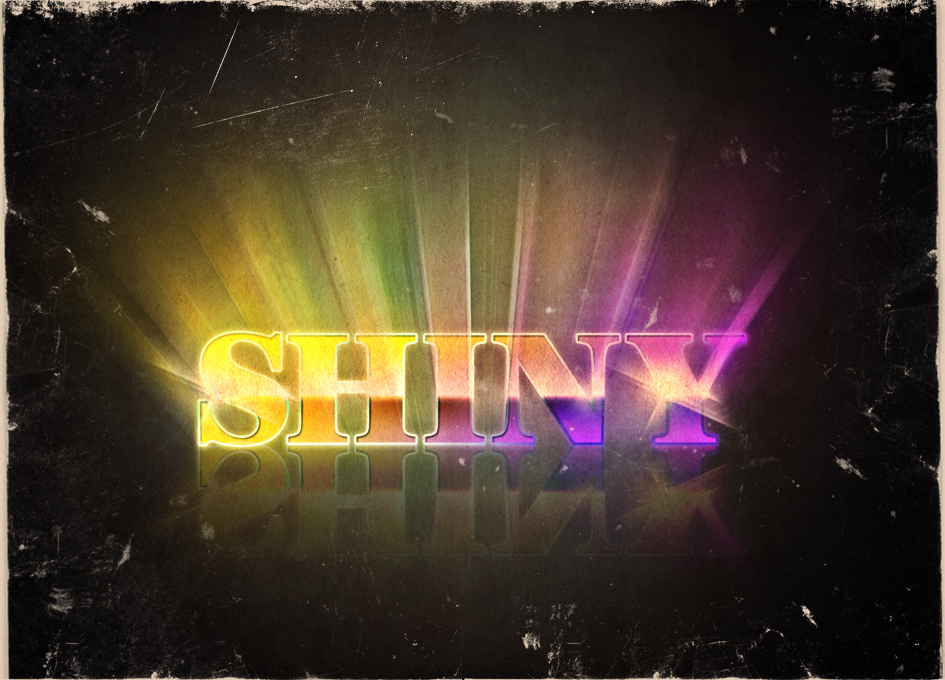
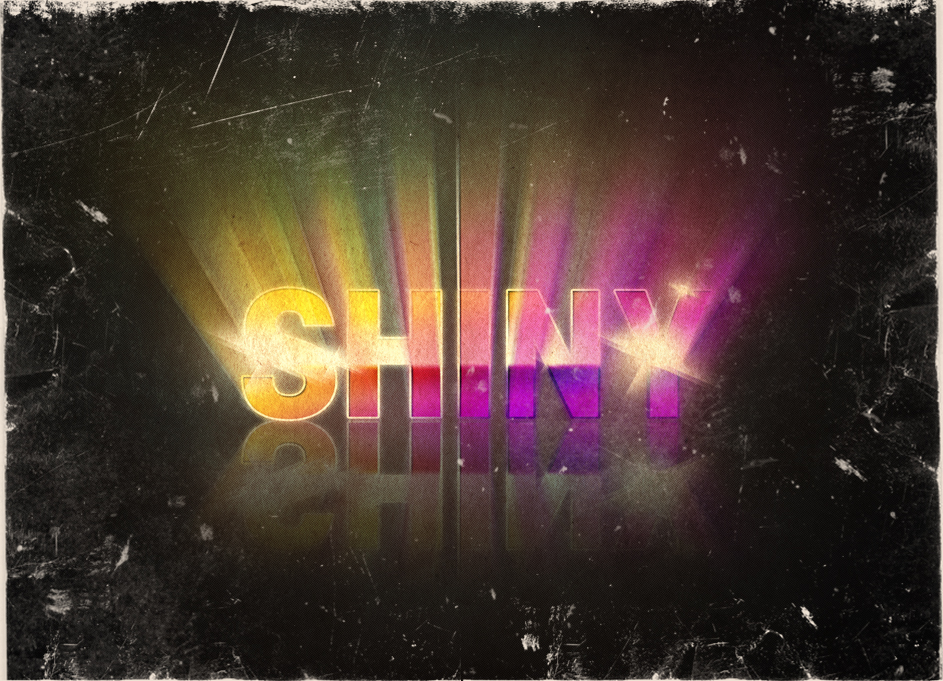
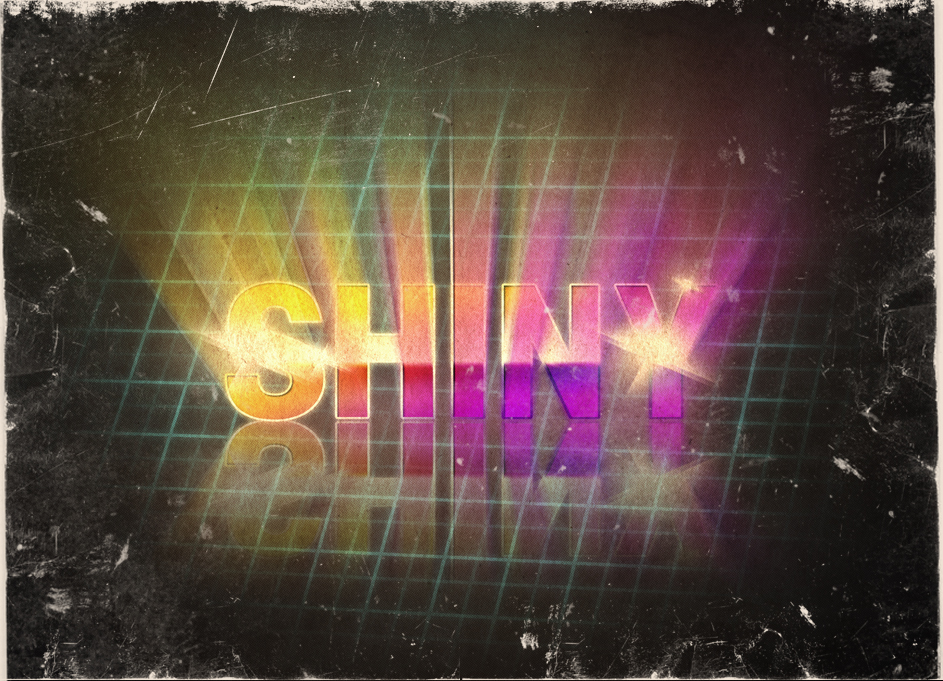
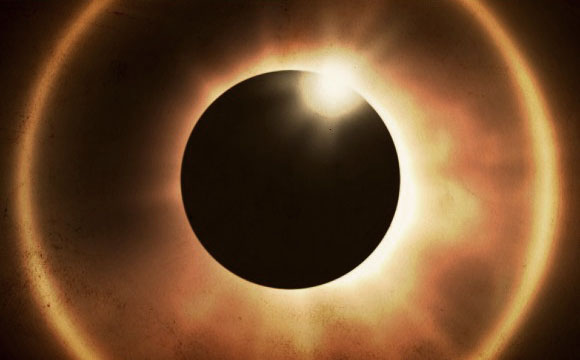
And here's the final outcome!

Here's what we'll be creating.
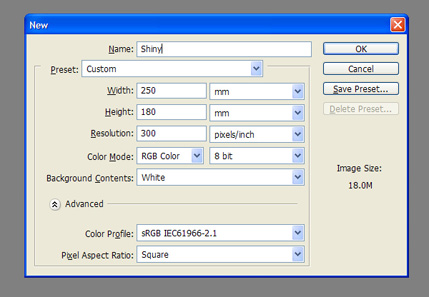
Create a new canvas in Photoshop, we'll be working on a 250 x 180 mm sized canvas in RGB mode at 300 dpi. This is important because the values for filters that work on pixel sizes will need to be amended if you're working on a different sized canvas.
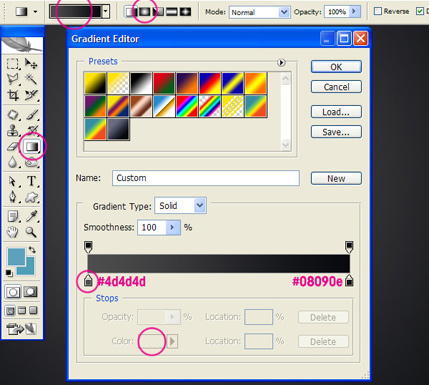
In Photoshop select the Gradient Tool (circled) and click the Gradient Editor (circled) on the Options Bar (Window > Options) to edit the gradient. Change the two colour values as in the screen grab, you'll need to click the little colour tab and the rectangle marked 'Color'. Enter the two values in the field marked '#' in the Color window that pops up. Change to a Radial gradient in the Options bar and draw from the center outwards.
Select the Horizontal Type Tool and a font you want to use. I've gone with a classic, if not overused, sans serif font called Avant Garde. I then did a version using Century (a serif font), which worked a lot better.
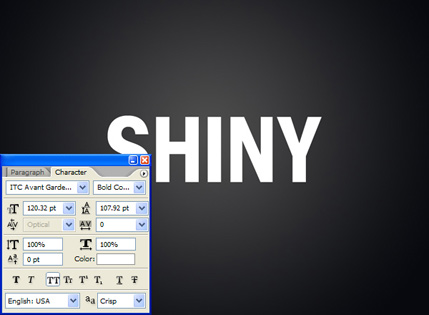
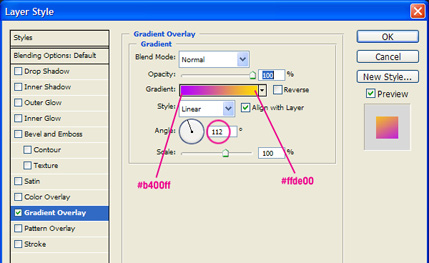
Type in SHINY and then go to Layer > Layer Style > Gradient Overlay and set up as in the Photoshop screen grab.
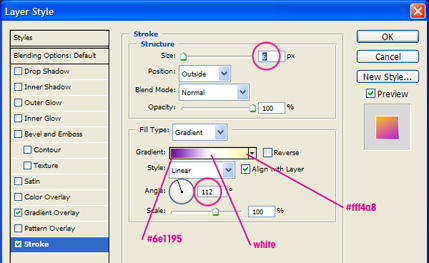
Then add a Stroke and an Inner Shadow layer style to the text using the screen grabs as guides.
It's also worth mentioning that I had to reduce the Kerning in the 'N' and the 'Y' to even out the spacing.
Create a new layer beneath SHINY, then select both SHINY and the new layer and go to Layer > Merge Layers. This will cause Photoshop to rasterize both the text and the Layer Styles so that we can build more Layer Styles on top. There's possibly a better way to do this though simply rasterizing the text layer will not do this, not in CS2 anyway.
Then add a Gradient Overlay Layer Style as shown in the screen grab.

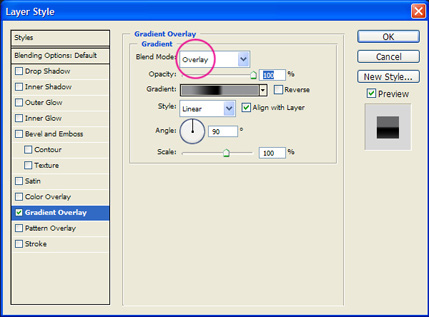
Repeat the layer merging process and add another Gradient Overlay (with the black and 50% black). Once again, repeat the merge process so there are no editable Layer Styles left on your text.
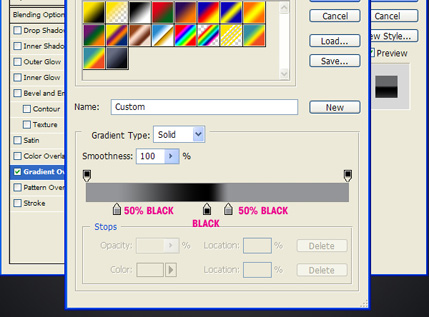
Your text should look something like the screen grab.

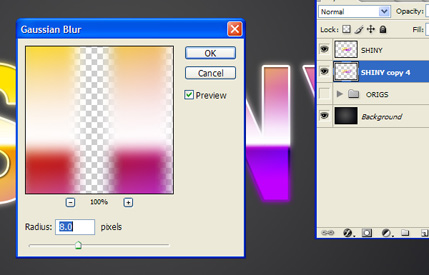
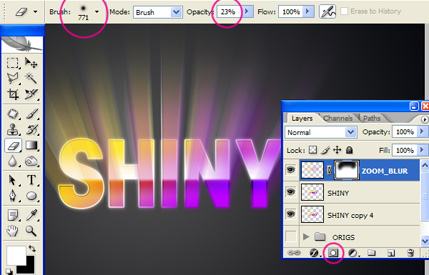
Duplicate SHINY (Layer > Duplicate Layer) and apply an 8 pixel Gaussian Blur filter (Filter > Blur > Gaussian Blur) to the copy. Make sure the original is above it in the Layers palette.
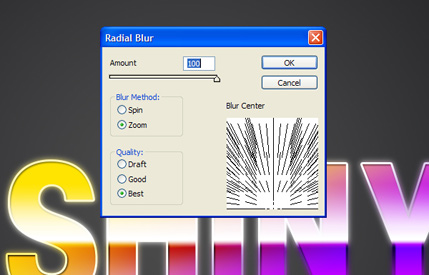
Duplicate SHINY (the un-blurred layer) and go to Filter Blur > Radial Blur. Set it to Zoom, Best quality and apply at 100%. Set start point to be centered at the bottom in relation to your text.
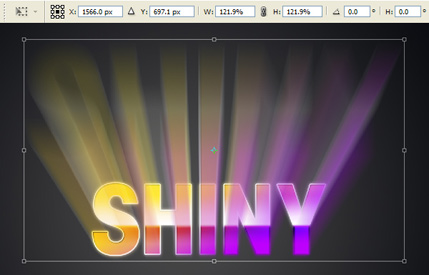
The zoom isn't quite the right size for our needs. Go to Edit > Free Transform to bring up the Free Transform bounding box. Hold shift whilst manipulating the corner points to constrain the aspect ratio.
Then add a Smart Sharpen (Filter > Sharpen > Smart Sharpen). Add a Layer Mask (Layer > Layer Mask > Reveal All) and erase the parts you don't need using the Eraser Tool as set up in the screen grab. Rename this layer ZOOM_BLUR.
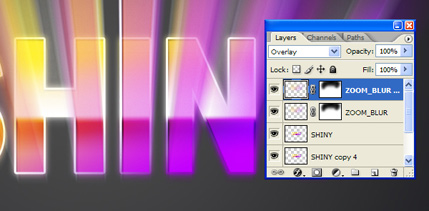
Duplicate ZOOM_BLUR and set the copy's Layer Blend Mode to Multiply.
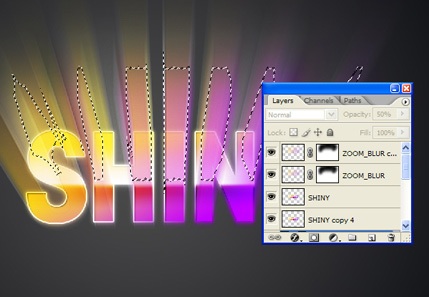
CTRL+Click on ZOOM_BLUR's Layer thumbnail (not the Mask thumbnail), this will create a selection from it. Then go to Select > Inverse Selection.
Create a new layer beneath ZOOM_BLUR and call it FILL_LIGHT and fill it with White.
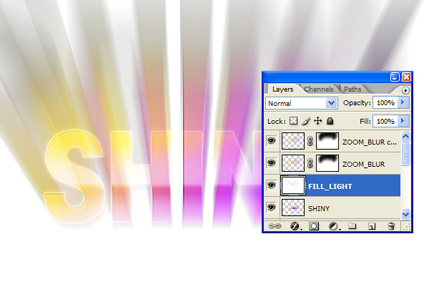
Apply the same Gradient Layer Style (don't do the Inner Shadow or Stroke) as you did for the text in Step 3.
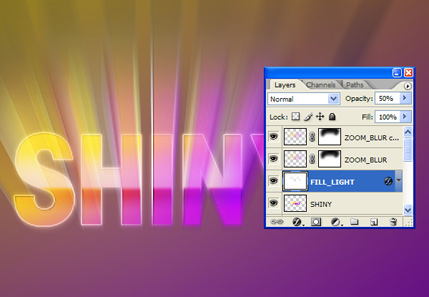
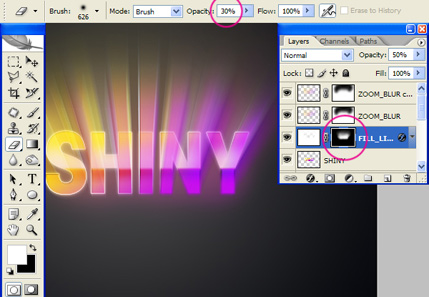
Create a Layer Mask and use the Eraser Tool to delete any unwanted areas. I find you get better results by reducing the Opacity of The Eraser Brush to around 30% and repeatedly chipping away at the mask so it blends. Use the screen grab as a guide.
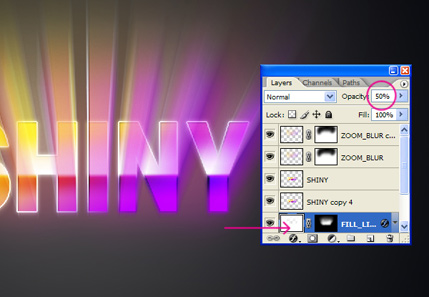
Finally, reduce the Layer's Opacity to 50% and move it below SHINY in the Layers Palette.
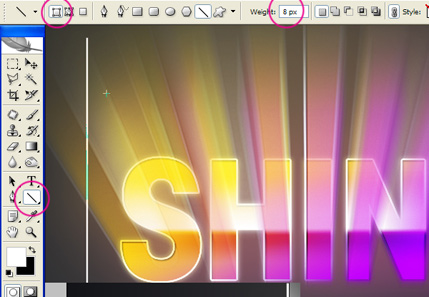
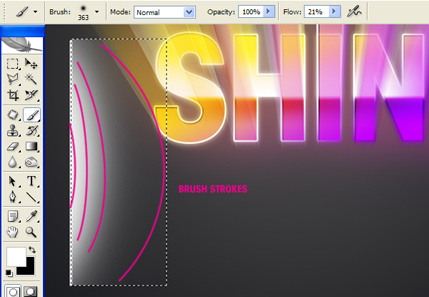
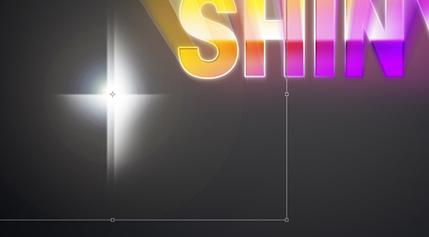
Select the Line Tool. Set it to Shape Layers on the Options Bar, with an 8 pixel Weight. Draw in a white Line. Use Rectangular Marquee Tool to mark off a rectangle spanning the length of the line you just made.
Select the Paintbrush Tool and set up a big soft-edged brush. Take the Flow down to 21 and start to draw in some glow, making more passes over the edge that connects with the line. Use the Screen Grab as a guide.
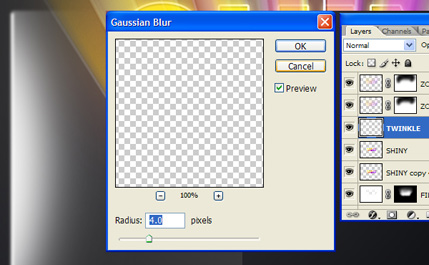
Select this layer and the line layer and merge them. Rename this layer TWINKLE and apply a Gaussian Blur (Filter > Blur > Gaussian Blur) as in the screen grab.
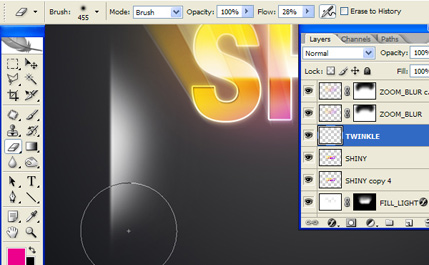
Use the Eraser Tool (set up as in the screen grab) to delete the hard edges.
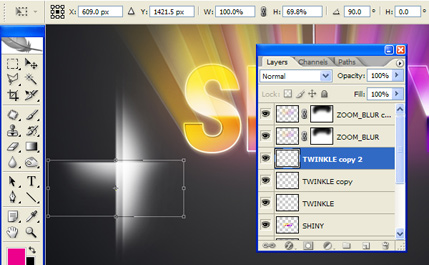
Duplicate TWINKLE and move it parallel. Duplicate it again and use the Free Transform Tool to rotate (90 degrees), resize and reposition.
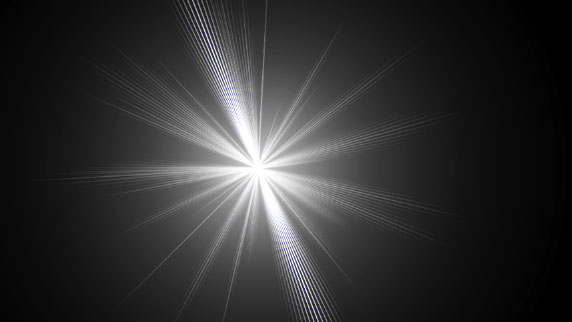
Create a new layer and fill it with black. Go to Filter > Render > Lens Flare and set up as in the grab.
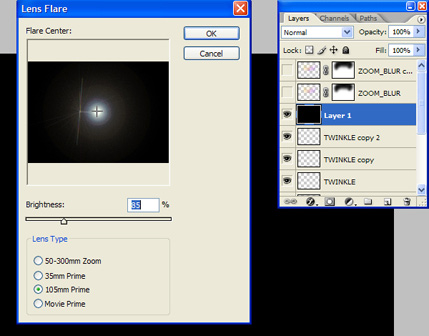
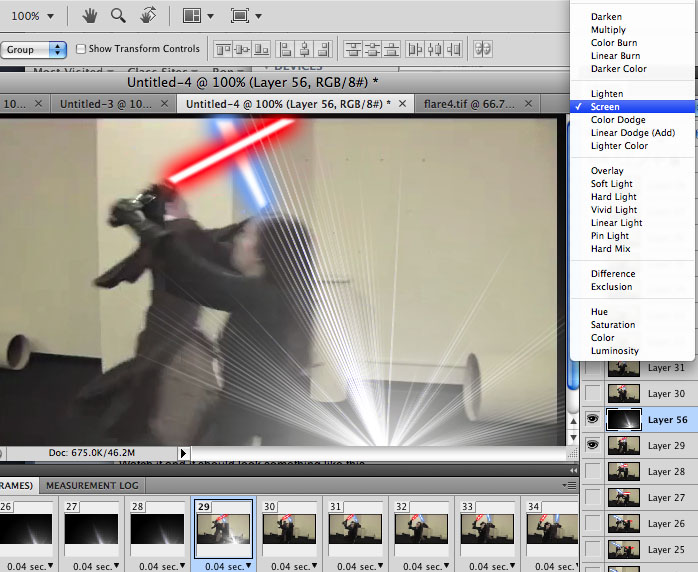
Set the layer's Blend Option to 'Screen' to make the black invisible.
Try and center the flare so all the elements line up on top of each other.
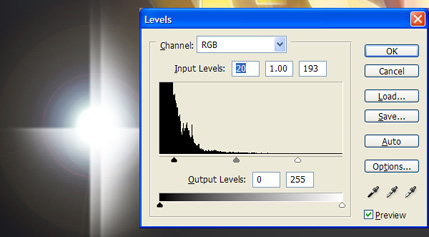
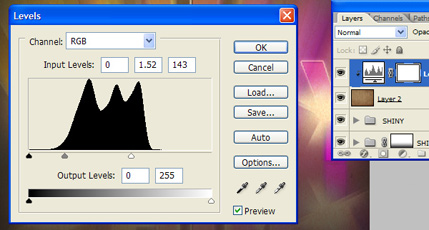
Adjust the Levels (Image > Adjustments > Levels) to knock out unwanted glow and increase the center. Then go to Image > Adjustments > Desaturate.
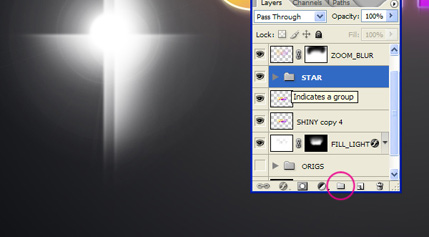
Select your four associated layers (TWINKLE and its duplicates and the lens flare) and group them, call the group STAR.
Use the Free Transform Tool to rotate, resize and reposition the star. Make duplicates of the STAR group and rotate, resize and reposition. As each element of the STAR group is on its own layer you can tweak each part of the star until you're happy.
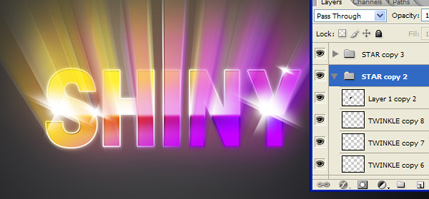
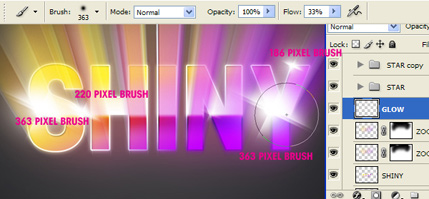
Create a new layer beneath all your STAR groups and call it GLOW. Select the Brush Tool and set up as in the screen grab, then draw some extra glow behind each star picking a brush size to match.
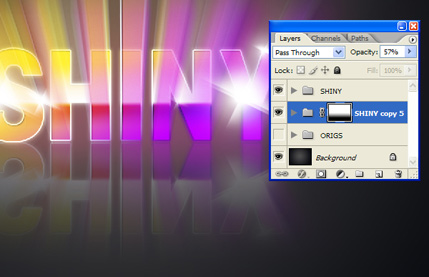
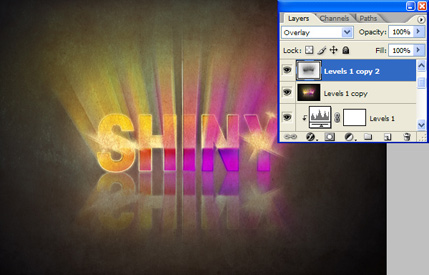
Group all your image layers (except the background) together and call it SHINY. Duplicate this group and go to Edit > Transform > Flip Vertical. Create a Layer Mask for the group (Select the Group and go to Layer > Layer Mask > Reveal All) and use the Gradient Tool, set to Linear with white and black colours to mask off the bottom, creating a reflect effect. Reduce the Layer Opacity to around 50%.
Now go grab your favourite old paper textures. These ones from bittbox are pretty good. I used paper2.jpg, pasted it into the document and moved it to the top of the layer palette. Change the Layer Blend Mode to Multiply.
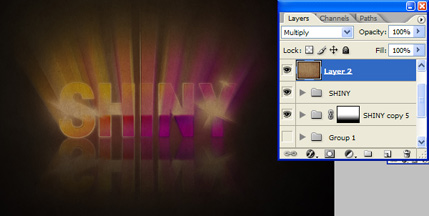
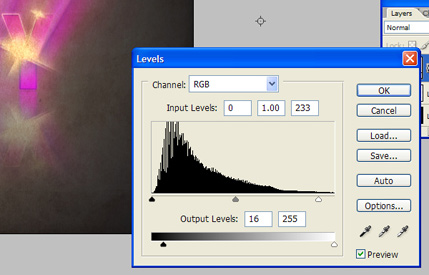
It looks too dark currently so go to Layer > New Adjustment Layer > Levels, check the box marked 'Use Previous Layer To Make Clipping Mask' and set up as in the screen grab. To increase the texture, duplicate the paper layer, desaturate and set it's layer Blend Mode to Hard Light. Drop the layers Opacity down to 58%.
Select ALL of your layers and merge them together. Put this new layer at the top of the layers palette (we'll keep the originals just in case). Duplicate this layer and desaturate it.
Then go to Image > Adjustments > Invert. Apply a 40 pixel Gaussian Blur, turn the layer Blend mode to Overlay. Add a Levels Adjustment Layer (Layer > New Adjustment Layer >Levels) as in the screen grab.
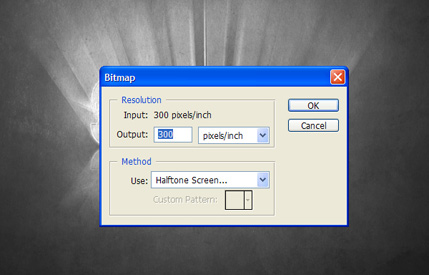
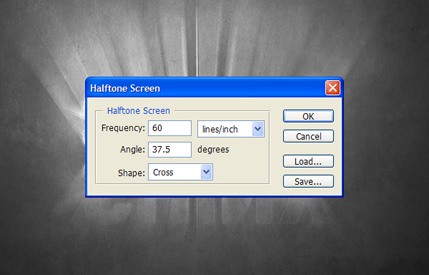
Go to Mode > Grayscale. Select Flatten in the pop-up window. Then go to Mode > Bitmap and follow the screen grabs to deal with the Bitmap and Halftone Screen pop-up windows.
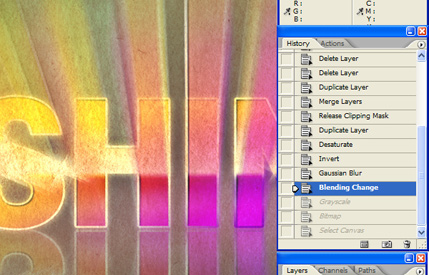
Once it has been applied, select the entire canvas and load it onto the clipboard (CTRL+C). Go to your History palette (Window > History) and click back to just before you changed to Grayscale Mode. Then paste the copied bitmap layer and move it to the top of the Layers palette.
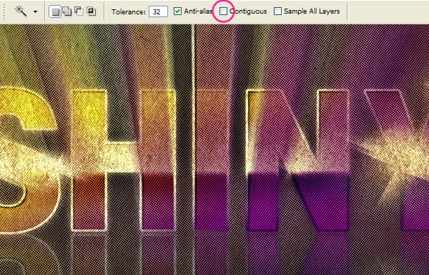
Select the Magic Wand Tool and un-check the Contiguous box on the Options bar. Use the wand to select any patch of white on the bitmap layer, then delete all the white.
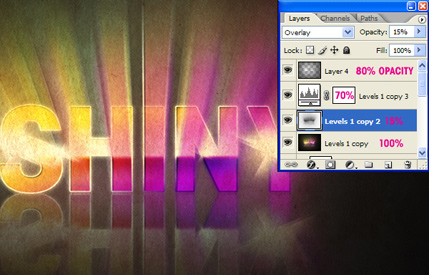
Change the bitmap layers blending mode to Soft Light and it's opacity to 80%. Then tweak the opacities of your other three final layers as shown in the screen grab. These should be your merged art layer, the copy which was desaturated, inverted & blurred and the Levels Adjustment layer. The copied art layer should also be set to Overlay.
That's mostly it... But if you want to get the proper 'old look' then get yourself some dirty/grunge brushes and paint in a final layer of scuffs and dirt (like these). Don't use white but a creamy off-white such as #ddc8b3 as your foreground colour and enlarge the brush a lot. This will add to the aged feel. It's worth creating a new layer to draw on and experiment with your brushes.
First let���s start with�Ķ

For this set I used Strathmore Newsprint for the paper. I like newsprint for some techniques because it���s very soft and thin and almost like cloth. It can be soaked with liquid and then dry without being totally destroyed. I���ve gone so far as to completely dunk a sheet of newsprint into water, and it still stayed in tact.

For the ink/paint I���m using an inexpensive black acrylic paint that can be found at any hobby store. We���re going to thin this paint down with water to the consistency of ink.

For good measure, I���m throwing in some bleach. Awesome effects can occur when you introduce bleach into the mix. It not only effects the paint but also effects the paper as well. This is a great example of trying something off the wall. The most important part of creating Photoshop brushes is to experiment wildly.

You���ll need a nice collection of brushes, but don���t buy expensive ones. Instead grab a tone of cheap ones in all shapes and sizes. Different sized brushes in varied shapes produce different effects, so it���s nice to have a variety on hand.
I���m going to start by adding bleach to one of my glasses and paint to the other.

We want to thin the paint down in order to splatter it. I used just a bit of water to get the paint to the consistency of ink.

You can see from the above photo that the paint is much thinner than what���s originally in the bottle. But don���t get it too thin or it will spread and soak into the paper too much and we���ll lose contrast in the final brush.
Next, I poured a little bit of bleach onto the newsprint.

Be careful here, we don���t want too much, just a nice puddle that we can add our paint to.

Okay, now for things start to get fun. I dipped the brush into the paint, and held it an inch or two above the bleach puddle and used my finger to ���flick��� the bristles. This creates a nice splatter effect.


Now repeat this several times in slightly different directions, and don���t be afraid to mess up. This is not an exact process, just keep working until you are happy with the result.

You can see from the above photo that the paint behaves different over the bleach puddle and on the bare paper.

One brush down�Ķ Now we���ll have to wait for the bleach to dry before laying on the scanner.

Word of caution�Ķ You���re going to get messy. That���s part of it�Ķ And you might smell like bleach for a day or two. All in the name of art, right?
Next I scanned the image. Below is the result of the scanned image with no alteration within Photoshop.

To create the brush I started with a blank canvas set to Grayscale 2500��2500 pixels. This is the max allowed brush size within Photoshop.
I then copied the scan over to the new document and resized and angled the splatter a bit to fit within the square document.

Now we want to take out all of the gray so that we���re left with only black and white. To do this go to (Image | Adjust | Levels). Below are the setting that I needed to remove all gray. This will vary depending on your scan.

Now we can create the brush by going to (Edit | Define Brush Preset�Ķ). Now the brush is saved to the brushes palette as the very last brush in your current library.
Here���s a shot of my final brush.

Download and instal this sample to see how this one turned out.
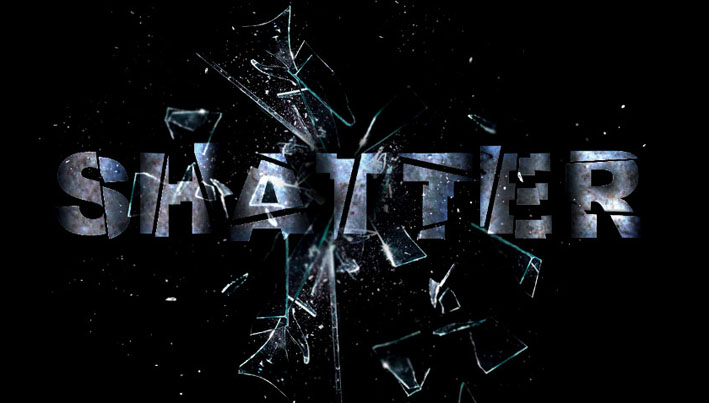
Here we'll be creating some shattered glass typography FX, you can type in any text you'd like for the tutorial.
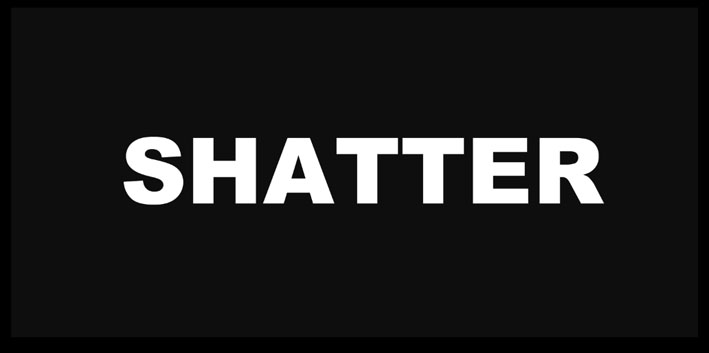
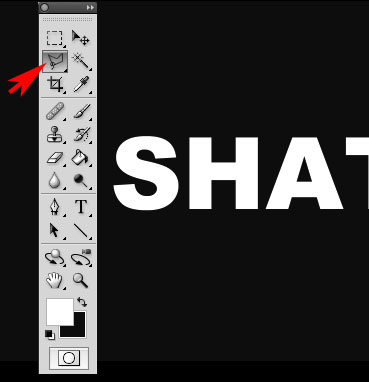
While you are downloading those resources... Open up Photoshop and create a new canvas with the sizes 1500 x 720px and fill it with Black. Once you have that set up, grab your text tool (T) and choose a nice bold font. In this case I used Arial Black, at a size of 200pt and White in color. Whatever font you use make sure it's not too big, leave some space around the text. Center the text on the canvas and then rasterized the layer - To center it, just use the Move Tool (V) to click and drag the text in the middle of the screen, to Rasterize make sure your text layer is selected and then go to Layer>Rasterize>Type. This will turn your text layer into a flat bitmap layer, ready for editing. You should have something looking like this.

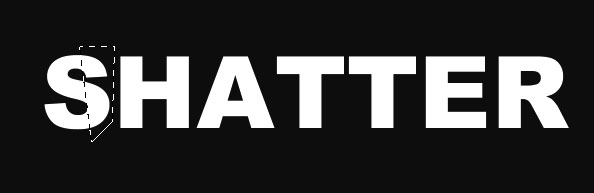
Now that you have your Type setup on the canvas and your layer Rasterized. It's time to get editing. Grab your Polygonal Lasso Tool, and start to cut up a small section of the first letter and create a straight-edge slice through. Once you've completed your shape, double click to connect the lines together.

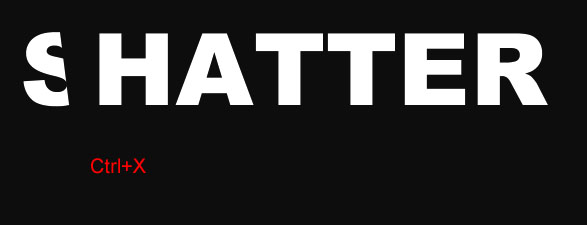
Ctrl+X and Ctrl+V to cut and paste the portion of the letter on a new layer. By using the Move Tool (V) you are able to move that portion of the letter around, and position it as you like.
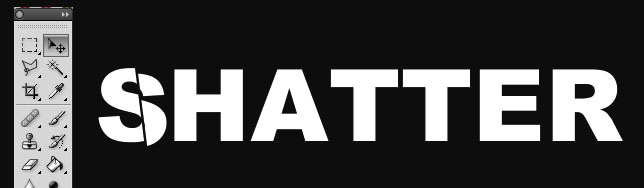
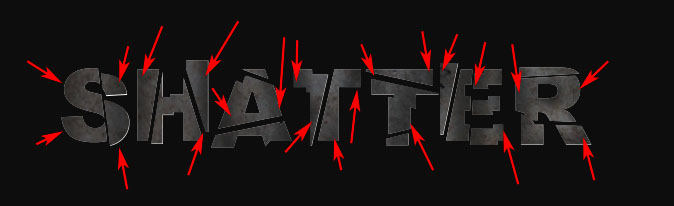
Using a similar techniques as earlier let's cut and shift and play around with the rest of the text. A brief run through the steps - Make sure your initial Text Layer is selected and grab your Polygonal Lasso tool, select the part of the letter you want to move and then Cut it, Edit>Cut (CTRL+X) and then Paste it Edit>Paste (CTRL+V) and then use the Move Tool (V) to shift the shape around, repeat this process over and over, you can slice and dice the letters up any way you wish. Take the time now to run through the letters, here's a sample of the progress of these letters below.


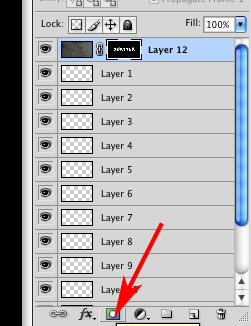
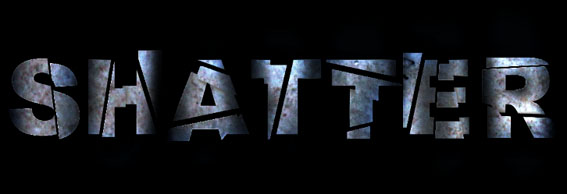
As you can see, each time you paste a piece of letter, it creates a new layer just above your initial layer. I ended up with 11 layers here. Their is nothing fancy about cutting up the word, just play around and use your imagination. Select the parts and cut and paste them and move them around to create a sliced feel of the word. This was my outcome after I sliced up the word 'Shatter'.
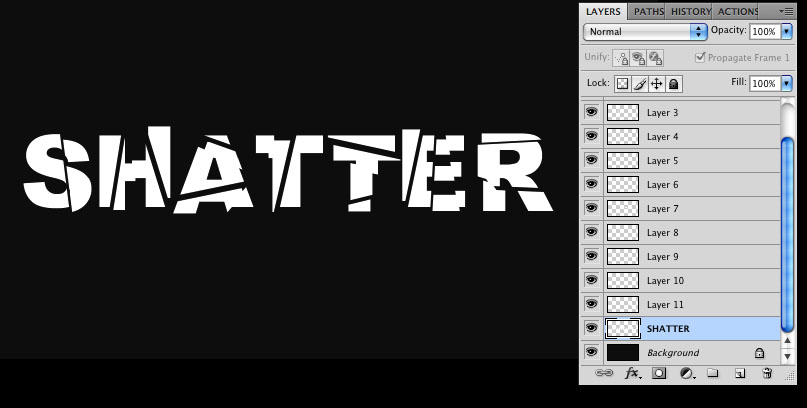
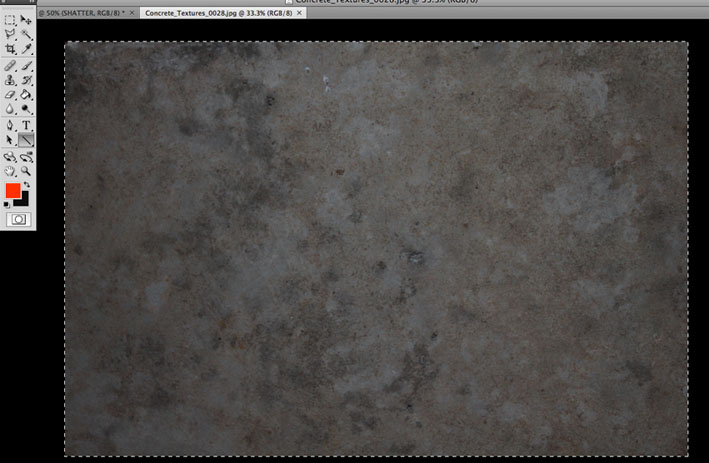
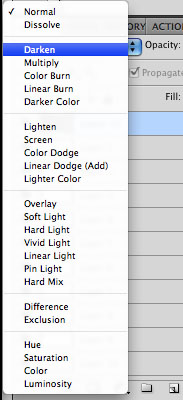
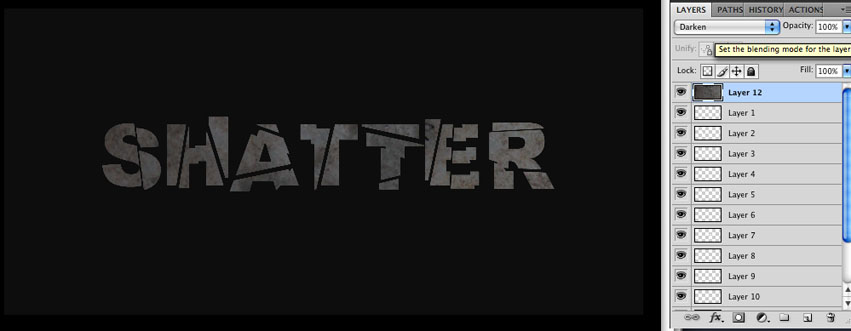
Now we are going to use stock images to just spice up the piece a bit. Firstly get yourself a nice concrete texture, use one out of the pack of 24 High-Res Concrete Textures you downloaded, Ctrl+A and Ctrl+C to select and copy the chosen texture image, the Ctl+V to paste it. Now place the concrete texture above all other layers and then set the Blending Mode to Darken.
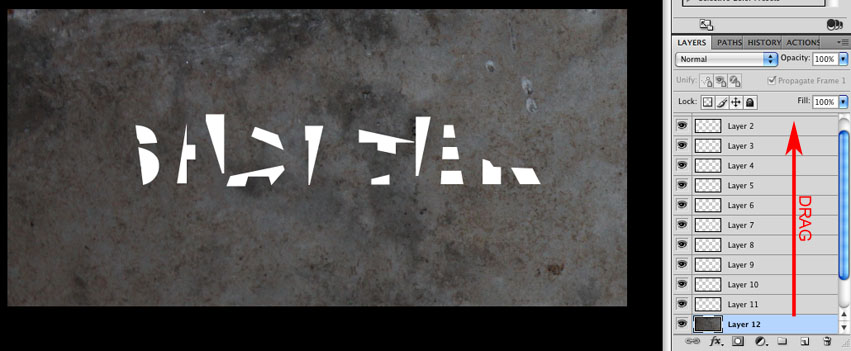
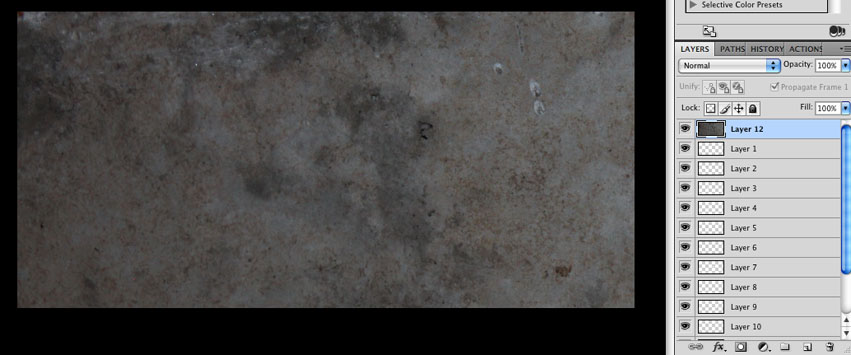
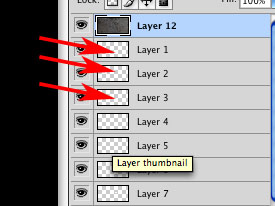
Now, here's the tricky part, make sure the top layer with your texture is selected, now starting with the NEXT layer down you have to hold down CTRL+SHIFT while you click each individual Layer's Tiny Window. This will highlight the Layer with the selection tool. Go down your list of layers and be sure to select all of the pieces of text. This is what your selected items should look like when you're done.
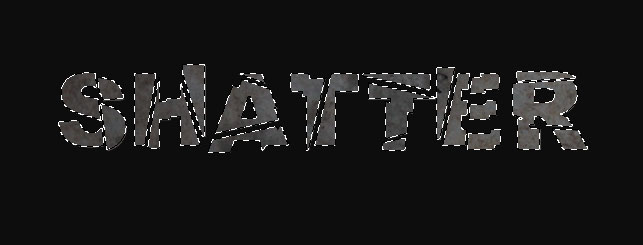
Now select the Add Layer Mask button on your layers palette, it's just next to the FX button at the bottom.
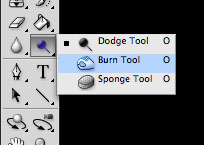
This doesn't look like much at the moment, but we will change that in a second. Go to your Textured layer and select your Burn Tool (O). Set the exposure somewhere between 70% to 90% and choose a medium sized soft brush. Make sure the texture layer window is selected. Burn the edges of the letters to create a contrasting effect.


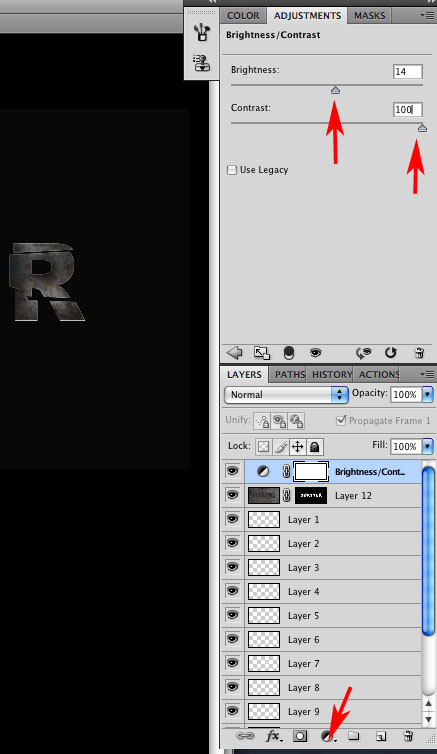
Now go to Layer>New Adjustment Layer>Brightness and Contrast - Set the Brightness to +14 and the Contrast to +100. This should add some depth to your Lettering, but not enough. We are going to add a layer style to the sliced pieces. Double click on one of the sliced pieces and choose a Drop Shadow and use the settings below. Then hit OK.
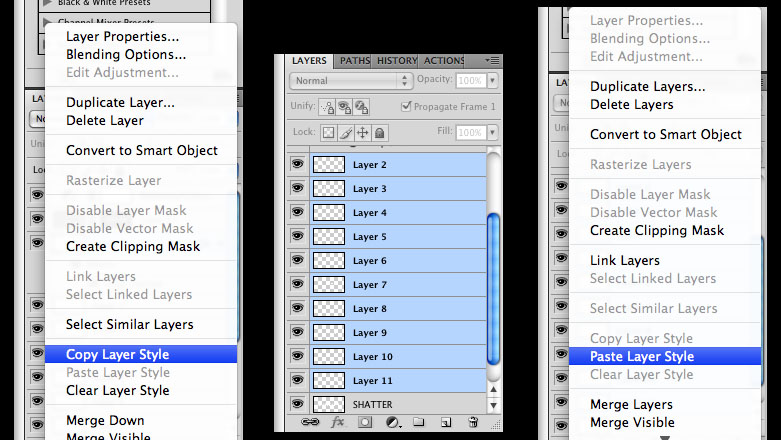
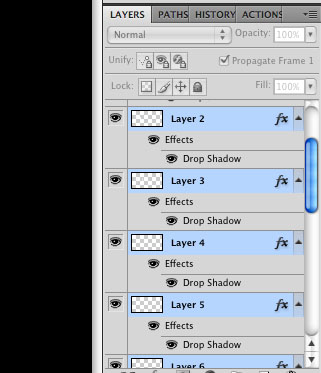
Now right click on your layer that you just added the Layer Style to and select Copy Layer Style. Then Select all the Sliced Layers, do NOT include the Textured Layer, or the original text layer. You can select them by holding down CTRL and clicking on each layers name. Once you have them all selected right click on anyone of them and select Paste Layer Style. This should add a large amount of depth and diversity to your letters.
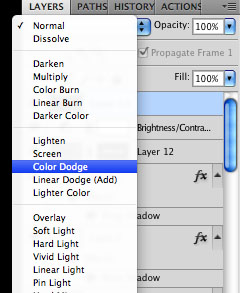
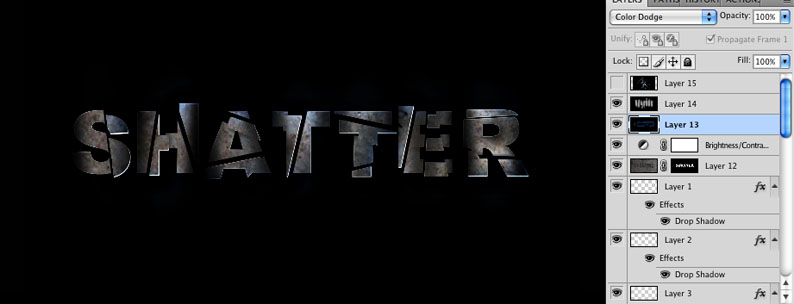
Now create a new layer (CTRL+SHIFT+N), drag this layer to the very top of your list of layers, and then fill it with Black. Now set the blending mode of the layer to Color Dodge and select your brush tool. Use a fairly large soft brush and pick any pale blue color and vaguely paint the edges of the Text. Next, create another New Layer and fill it with Black, I set the Blending Mode to Overlay and grab the Brush tool with the same soft brush and just White as your foreground color, and brush on the lettering to bring out some light and highlights in the text. The more times you pass the brush through the center of each letter, the brighter it will get.
Our final step for this tutorial is pretty basic, use the Smashed-Glass image you downloaded and import it into your composition. Set the Blending Mode of the layer to Linear Dodge, drag it to the very top layer and erase any of the parts that you don't want.
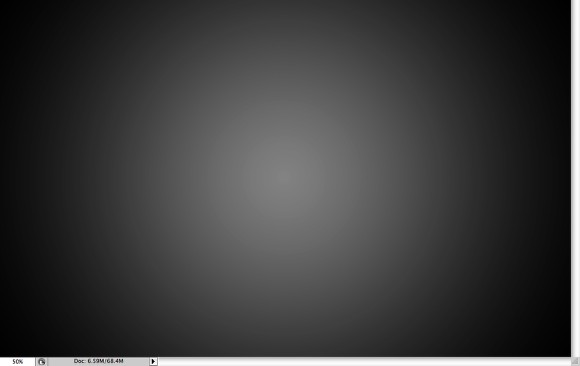
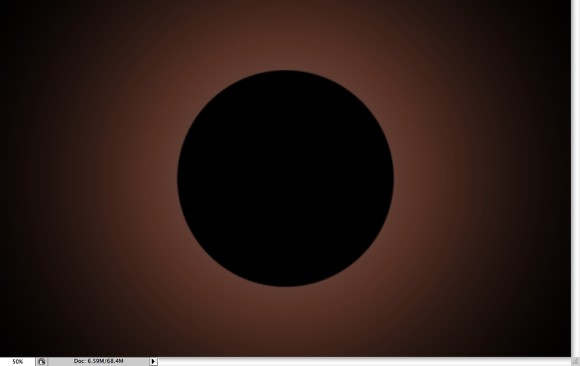
Open Photoshop and create a new document (1200 x 800 pixels). Add a new layer and with the Gradient Tool (G), fill the background with a Radial Gradient from black to a very light grey in the center.
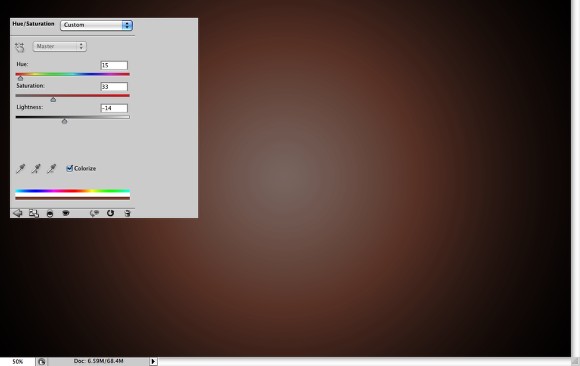
Go to Image>Adjustments>Hue and Saturation. Use 15 for the Hue, 35 for the Saturation and -15 for the Lightness.
With the Ellipse Tool (U), create an ellipse in the center of the image.
Here's a quick guide to the stroke and fill properties of the Ellipse Tool: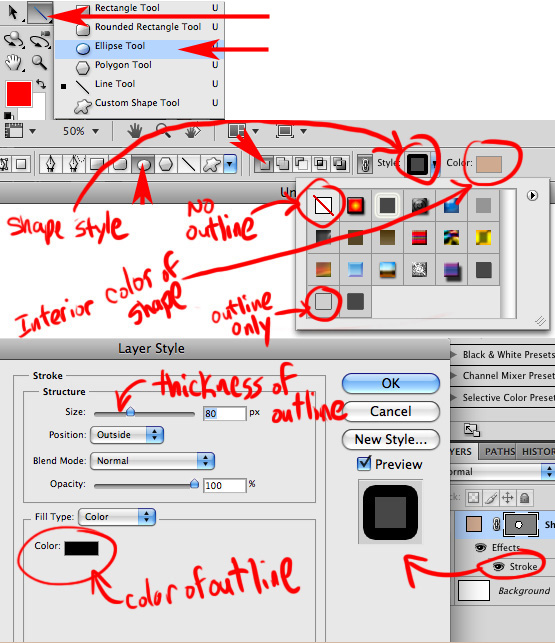
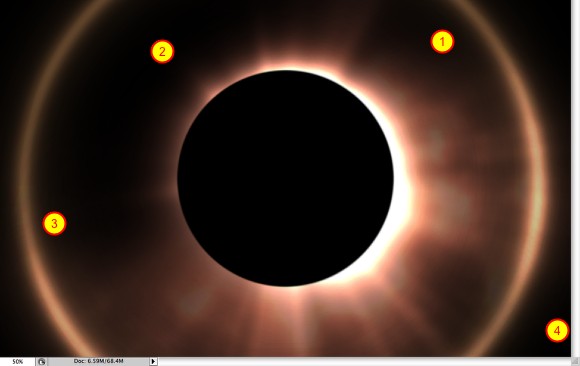
Again with the Ellipse Tool (U) create a bigger ellipse. Hold down SHIFT to make it a perfect circle. Then go to Edit > Fill... Choose black. Then go to Layer>Layer Style>Stroke. Use 60px for the Radius and white for the color.
This will create a white ring around the black circle. Create a new blank layer on top of his. Select these 2 layers and go to Layer>Merge Layers. The you'll have a rasterized black circle with a white border. Now select the Magic Wand tool and click and Delete the black center.
After that duplicate this layer TWICE, because we will need 2 copies of it.
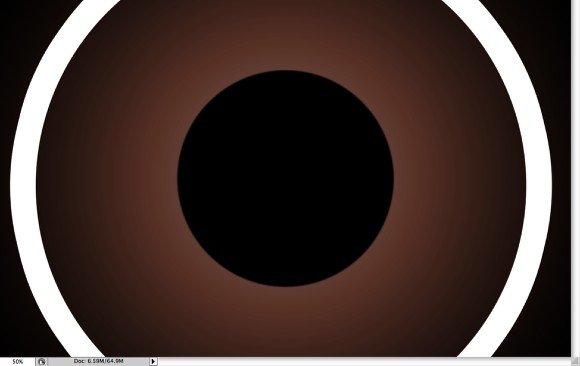
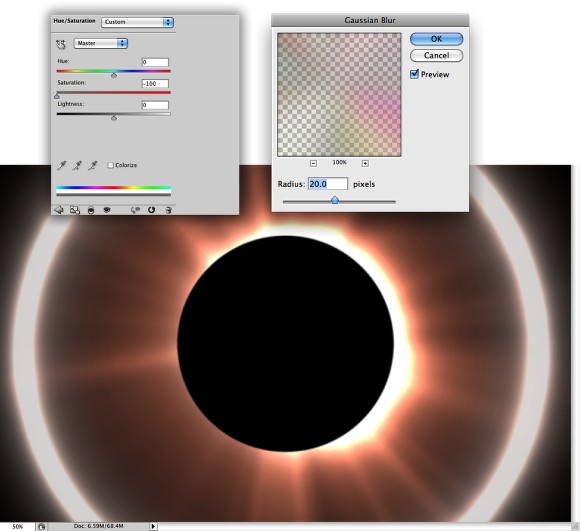
Select one of the "ring" layers and go to Filter>Blur>Gaussian Blur. Use 100 pixels for the Radius. Also change the Blend Mode to Screen.
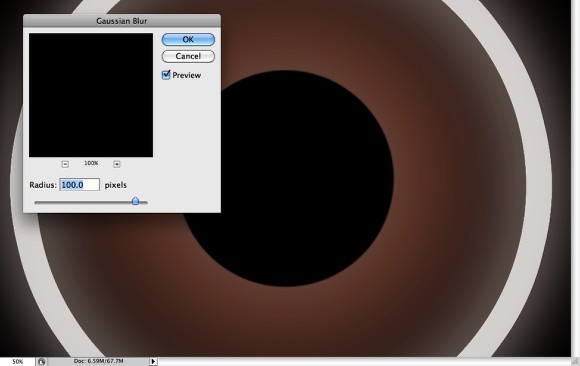
Add a new folder in the Layer Palette and move the other ring into this folder. Change the folder's Blend Mode to Color Dodge, then select the ring layer and go to Filter>Blur>Gaussian Blur. Use 35 for the Radius.
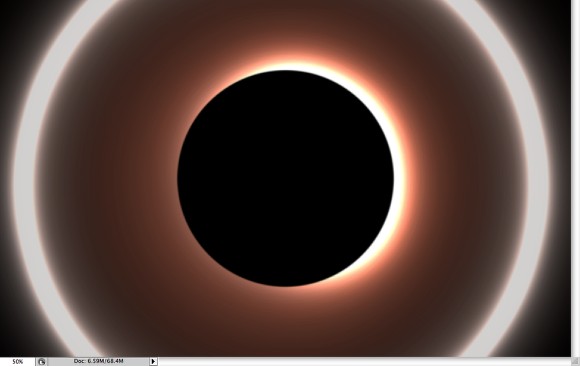
Add a new folder in the Layer Palette right on top of the gradient layer. Then change the Blend Mode of the folder to Color Dodge. After that add a new layer inside the folder and with the Brush Tool (B), use white for the color and a big soft brush to create the light behind the black circle.
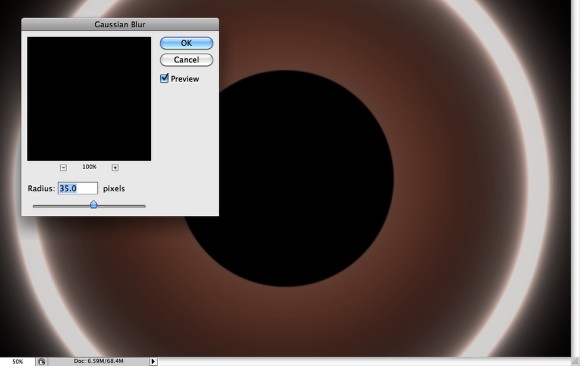
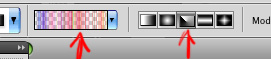
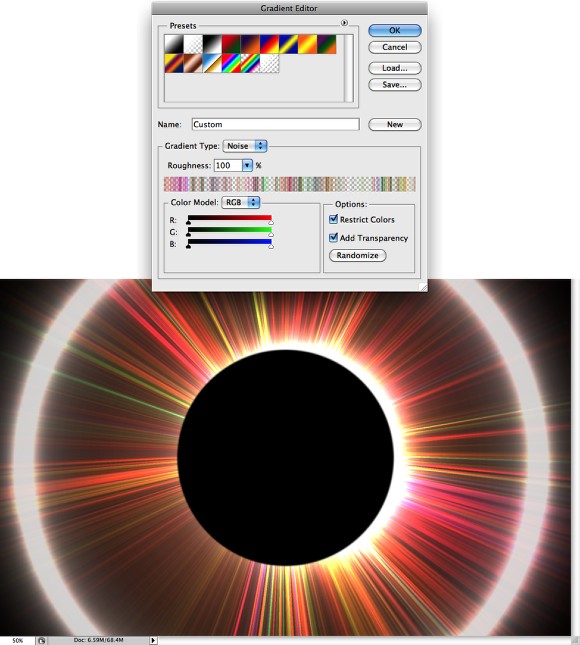
Add another layer still inside of the folder we have just created the light beneath the black planet. Select the Gradient Tool (G) and edit the gradient. Change the Type to Noise, the Roughness to 100% and select Restrict Colors and Add Transparency. Fill the new layer with the gradient like the image below.
Go to Image>Adjustments>Hue and Saturation. Reduce the Saturation to -100. After that go to Filter>Blur>Gaussian Blur. Use 20 pixels for Radius.
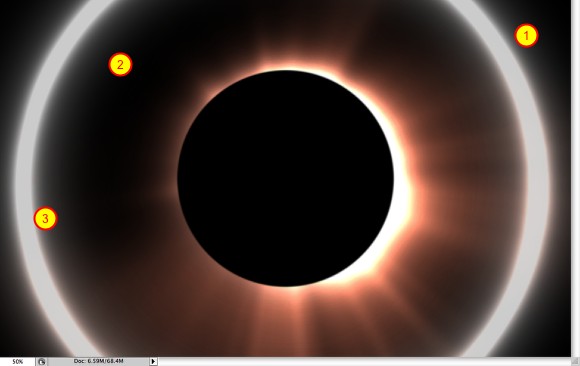
Select the Folder with the light layers and go to Layer>Layer Mask>Reveal All. Then select the Brush Tool (B) with a very soft brush and black for the color. Start painting over the Layer Mask to hide some parts of the layer (1-3)
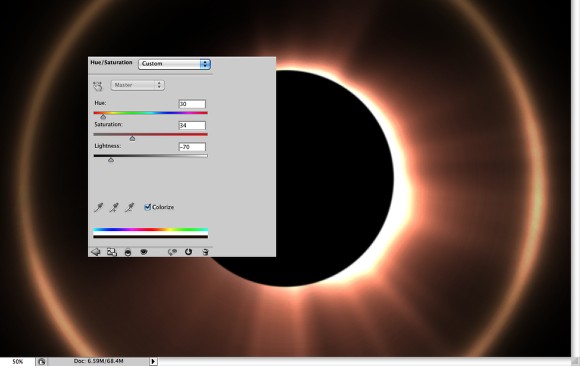
The ring of light is too white so lets add some color. Select the layer with the ring of light that you applied more blur (Step 5), then go to Image>Adjustments>Hue and Saturation. Use 30 for the Hue, 35 for the Saturation and -70 for the Lightness.
Add a new layer on top of the other layers and go to Filter>Render>Clouds. Change the Blend Mode to Color Dodge and the Opacity to 20%.
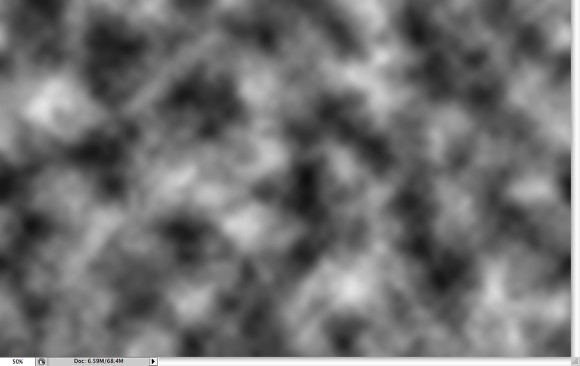
With the Eraser Tool (E) delete areas of the smoke as well (1-4). The idea is just to add some noise and waves to the lights.
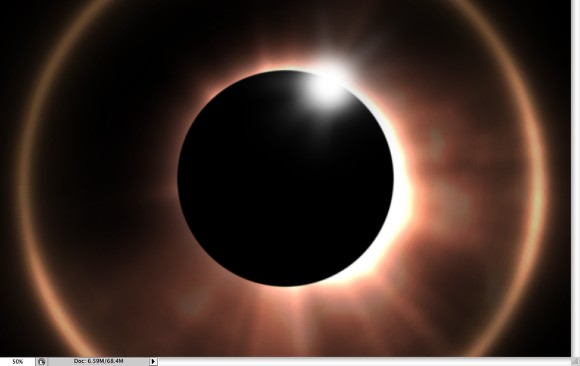
Now, add a layer on top of the black ellipse. Then with the Brush Tool (B) paint a light at the top right corner of the ellipse. You can, also, add another layer and repeat the Steps 8 and 9 to create some rays of light. But start the gradient from the center of the light effect and not the document's
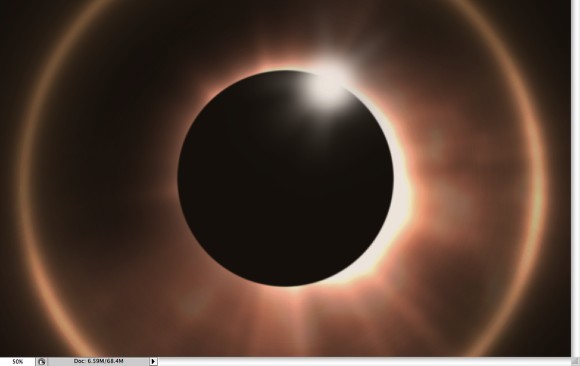
Add another layer on top of the others and fill it with a beige color (#B59071), then change the Opacity to 20%.
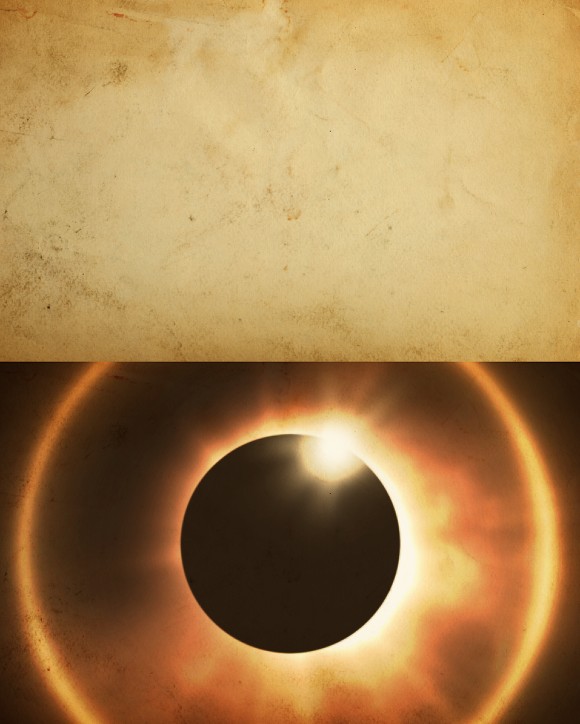
Import an old paper texture and put it on top of the other layers. You can download one here. Open the file in Photoshop and press Ctrl+A+C (to select it all and copy it), then paste it on the top layer of your eclipse file (Ctrl+V). After that change the Blend Mode to Overlay.
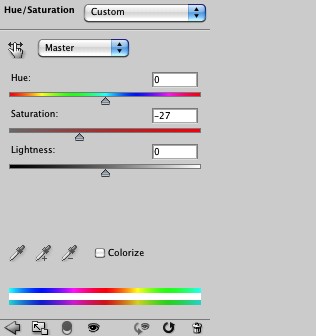
Go to Layer>New Adjustment Layer>Hue and Saturation. Use 0 for the Hue, -25 for the Saturation and 0 for the Lightness.
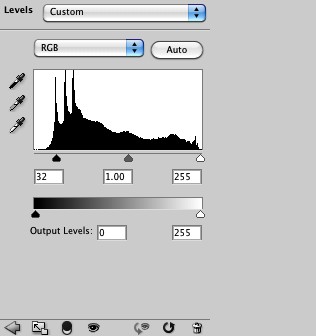
Now go to Layer>New Adjustment Layer>Levels. Increase the Black input to 30. That will make the image darker.
The whole process won't take more than 30 minutes and it's pretty straightforward. The idea of this tutorial was to show you how to create some light effects first using greyscale and then with the Hue and Saturation we add nice colors. Now it's up to you, it's really important that you try different settings and colors as well.
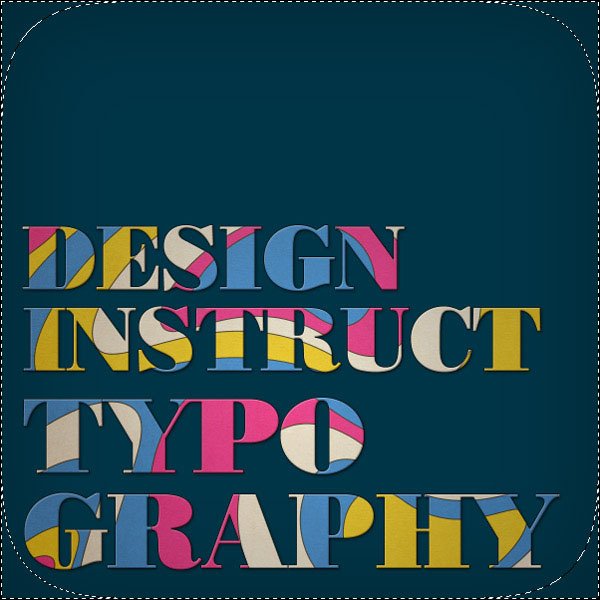
We are going to start by creating a new 1200px x 1200px document in Adobe Photoshop.
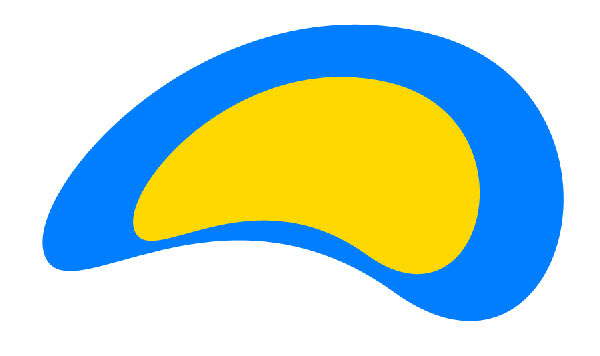
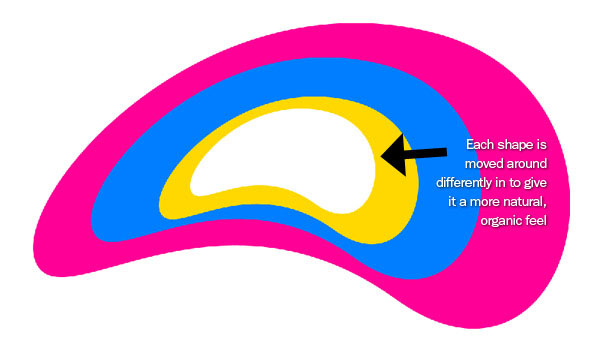
Using the Pen Tool (P), we are going to create an abstract organic shape, something like what I have below. Make sure that you make a Shape layer, and not Paths; you can change this setting via the Options bar.
Change the color (double-click the Color option box to open up color editor dialog box) to a blue color (#017eff). Keep in mind that, for now, we are going to use fully saturated colors, which are at the top right of the color spectrum.

We are going to duplicate the shape layer we just made with Ctrl + J.
Change the color to a bright yellow color (#ffd801). Again, pick a color that is at the top right of the color spectrum.
Use Ctrl + T (Free Transform) to transform the shape to make it smaller; hold down the Shift key to keep the shape in the same proportion as the original.
Repeat step 2 twice more. Change the first color to white (#ffffff) and a pink color for the second one (#fe0096) for the second one.
The shapes should be moved around inside one another a little bit to give it more of a natural, organic, floating feel; you can use the Move Tool (V) to move things around.
Before we go any further, we are going to add a stroke around each shape. Click on the Add a layer style icon at the bottom of the Layers Panel. Then click on Stroke and adjust your settings so you have black (#000000) as your stroke color and 2px as your stroke size. Repeat this for all of the shapes.

Move the layers we just created into a folder called Shape1. Right-click on the folder and click Duplicate Layer Set. Call the new folder Shape2.
Click on the Shape2 shape folder and then Ctrl + T for a Free Transform. Rotate Shape2 until you get something like what I have.
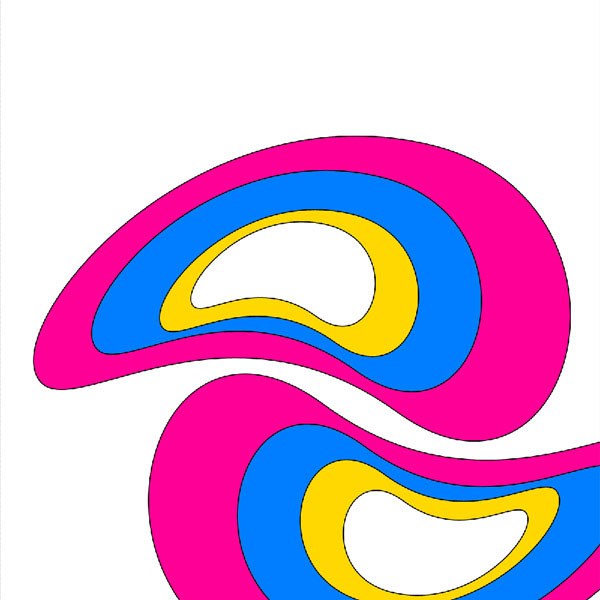
Continue duplicating and rotating the shapes until you cover up most of the area of the canvas while keeping the white space in between the shapes. You can also go into Edit > Transform > Flip Horizontally to get the shapes to fit better. The key is to get a flowing feel within the blue negative space as well as with the shapes themselves.
Alternate the same 4 colors in the different shapes so you have more of a random look.
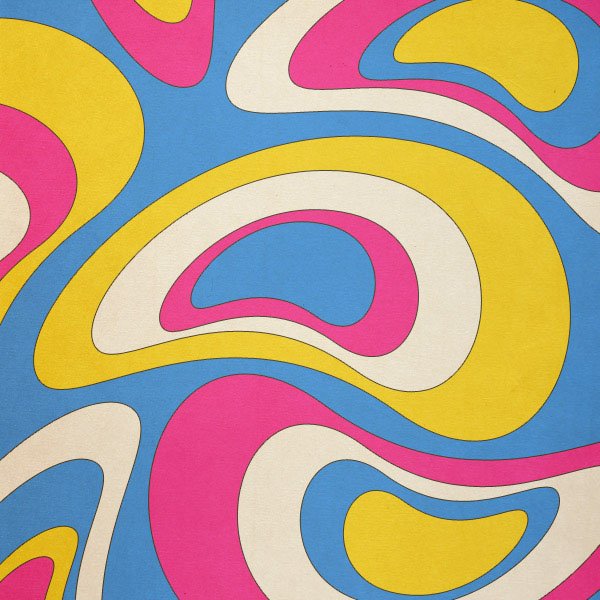
Change the background layer to the blue (#017eff) you picked earlier, sothat you have something like the image below.

We are going to give our background more of an old and retro look. To achieve this look, we are going to use this paper texture from Zen Textures.
Using Ctrl + T (Free Transform), shrink the texture so it fits around the image. Make sure the texture is the top layer and lower the opacity to 40%. Now would be a good idea to save your Photoshop document, by the way.
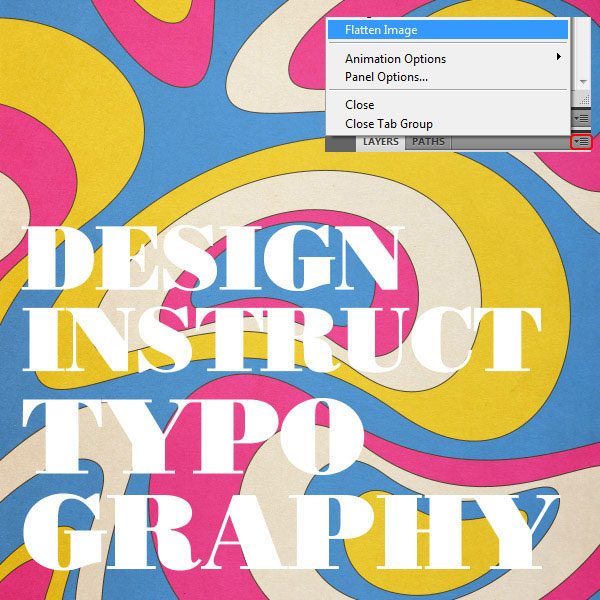
We are going to take all the layers and merge them into one layer. To do this, click on the downward-pointing arrow icon on the top right of the Layers Panel and click on Flatten Image in the menu that appears.
Our shapes should turn into the background image, which is locked. To unlock it, double click on the layer and then rename it to something like Wavy Backgound.
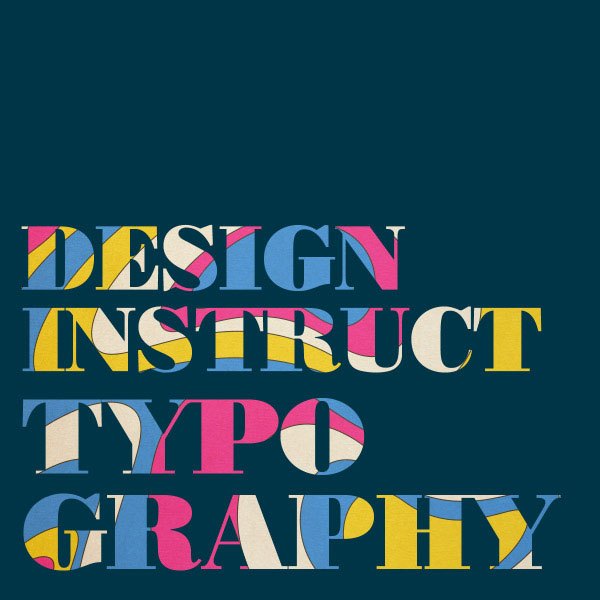
Now we are going to put in some white (#ffffff) text. The font I am using is Bodoni Poster, but you can use whatever font you would like (a bolder font will work the best).
Drag the text layer down the Layers Panel so that it is under the wavy background layer.
Click on the Wavy Background layer and go to Layer > Create Clipping Mask (Ctrl + G). This should mask out our background so that it shows up only where the text is. In your Layers Panel, the masked out image should have a downward arrow, and the text should be underlined.
The benefit of making letters this way is that you can change the text around any way you want and still have the masked image in the background.

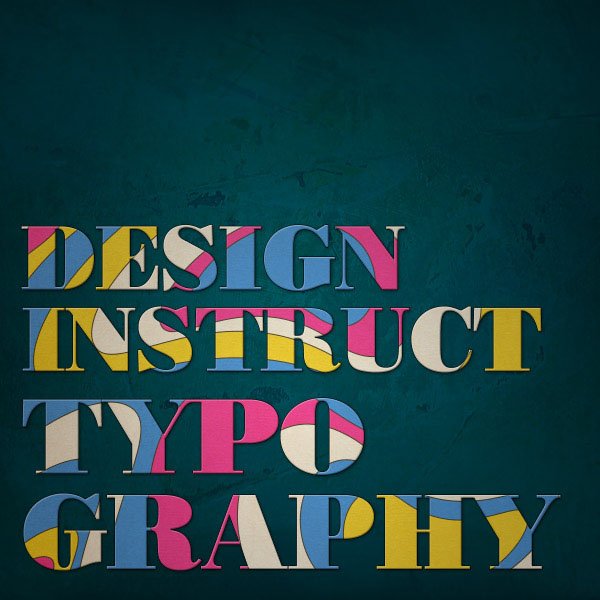
Create a new layer and move it all the way to the bottom. Call it Background and fill it with a blue color like #003547.
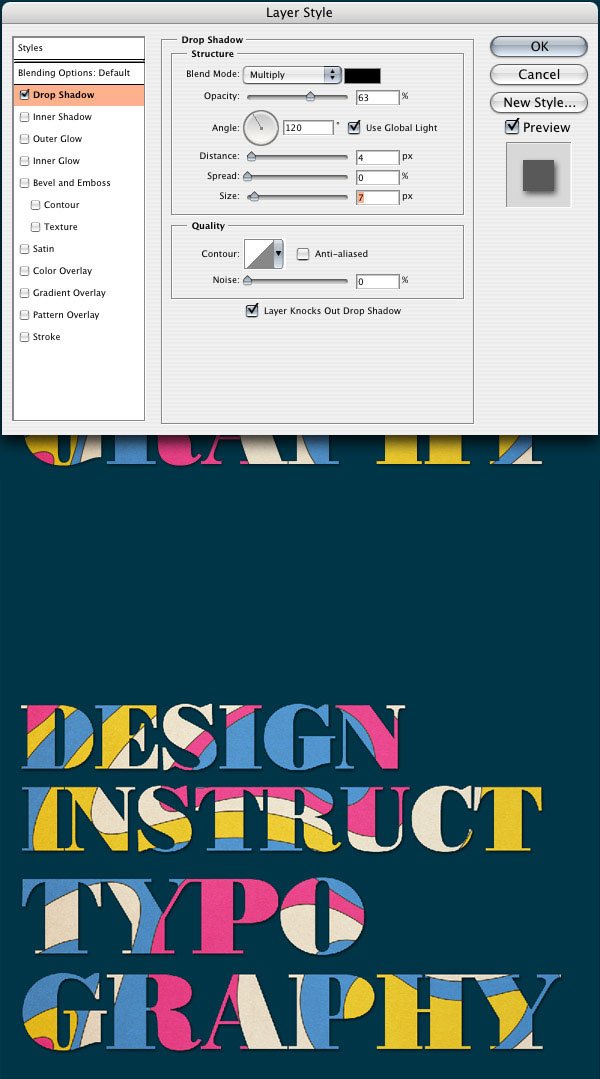
Let's add some effects to the text. Click on the text layer, then click on the Add a layer style icon on the bottom of the Layers Panel and choose on Drop Shadow. Change your settings to what I have below. This subtle background will give our text a little more depth so that it looks like it is sitting on the background.
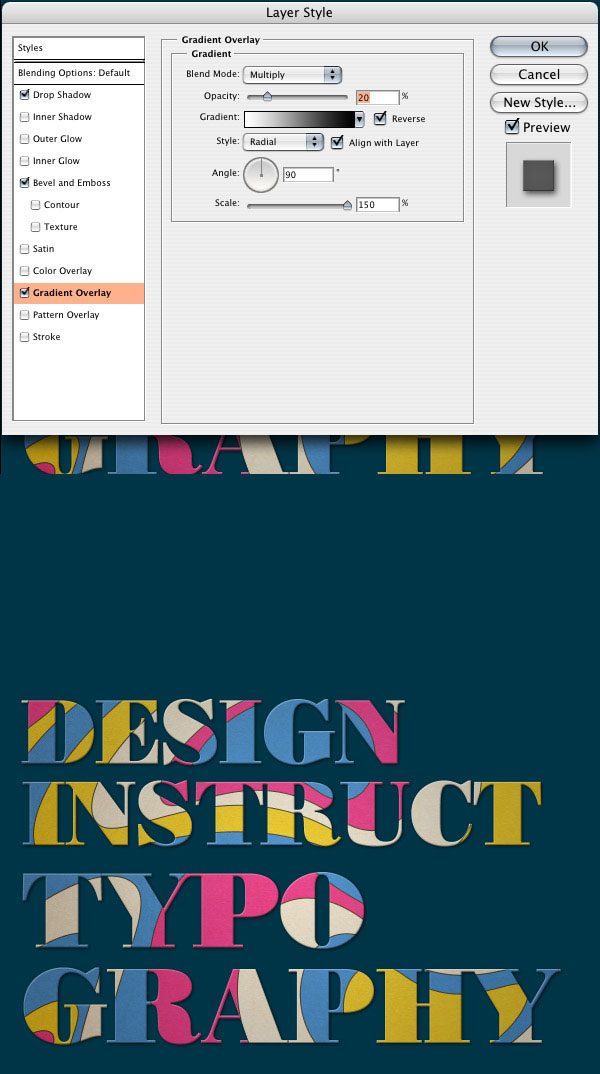
Now we are going to open up the Layer Styles dialog box again and apply a Bevel and Emboss layer style. This will give our text a little bit of an edge, giving it a subtle 3D look.

Open up the Layer Styles dialog box again and apply a Gradient Overlay layer style. We are using a white to black gradient. This will vary the lightness and darkness of the text and give it a little more realistic look to it.
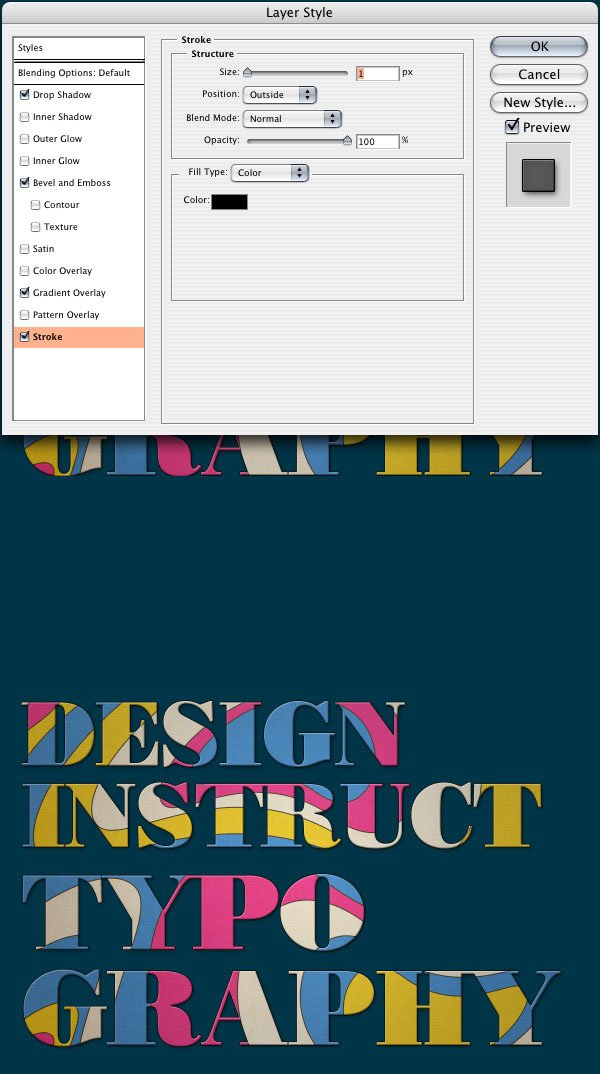
The last thing we are going to do to the text for now is go into the Layer Styles dialog box again and add a 1px black stroke to the text via a Stroke layer style. This will tie in our text with the shapes in the background, which also have strokes on them.
We are going to work on the background now. First, we are going to darken the edges of the canvas to create a shadow.
Create a new layer (Ctrl + Shift + N) and move it just above the background layer in the Layers Panel.
Get the Rectangular Marquee Tool (M) and change the Feather option (at the top of the screen in the Options Bar) to 100px.
Click and drag a box around the entire canvas and then get the inverse selection with Ctrl + Shift + I (which is the same as Select > Inverse).
Fill the area with black (#000000).
Drop the opacity down to 30%.
Your result should look similar to what I have below.
We are going to give the background a slight white opacity gradient in the middle of the canvas to give a sense that there is a light source coming directly above.
Choose the Background layer in the Layers Panel, click on the Add a layer style icon, and add a Gradient Overlay layer style. Change it so that it is white on the left side with 100% opacity and white on the right with 0% opacity.

Our background is going to have an old textured look. We are going to achieve this look by layering a few textures to get what we want.
First, we need to get the collage texture from Zen Textures.
Use Free Transform (Ctrl + T) to fit the texture into place (holding down the Shift key to keep the texture from getting skewed disproportionately).
Move the texture so that it's just above the Background layer and change the Blend Mode to Multiply.
Change the opacity of the layer to 50%.
The next texture we are going to use is the stained paper texture from Zen Textures. Bring the texture into our document and resize it.
Change the Blend Mode of the layer that the texture is in to Multiply.
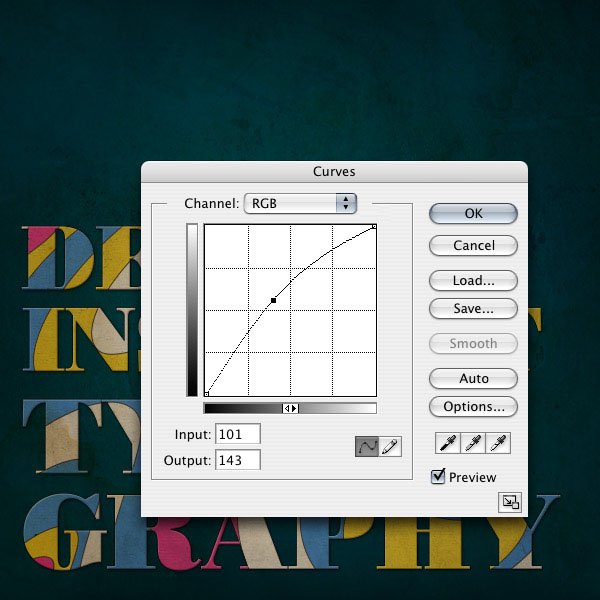
Now since this makes our art piece too dark, we are going to lighten it with the Curves tool. Use Ctrl + M to open up the Curves tool dialog box and create a curve like what I have below.
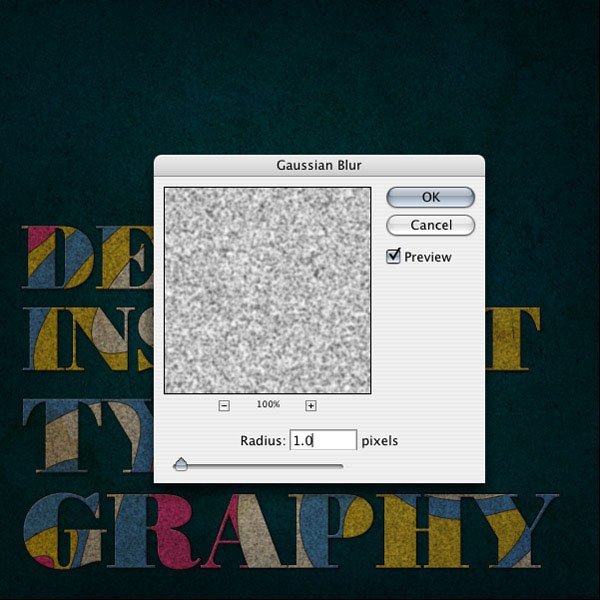
We are going to add some noise to the image to give it an overall older/aged look. Create a new layer and fill it with white (#ffffff).
Go to Filter > Noise > Add Noise and change the amount to 103%, Uniform Distribution, and make sure Monochromatic is checked.
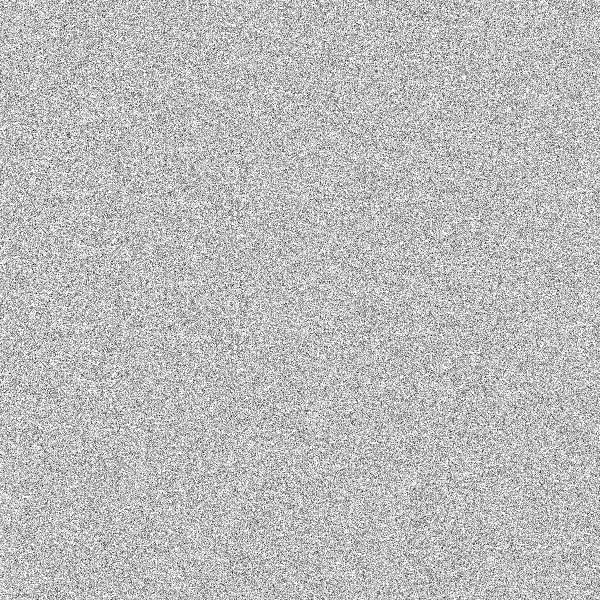
Change the Blend Mode of the noise layer to Multiply.
Go into Filter > Blur > Gaussian Blur and change the Radius to 1.0px.
Drop the opacity of this layer to 40%.
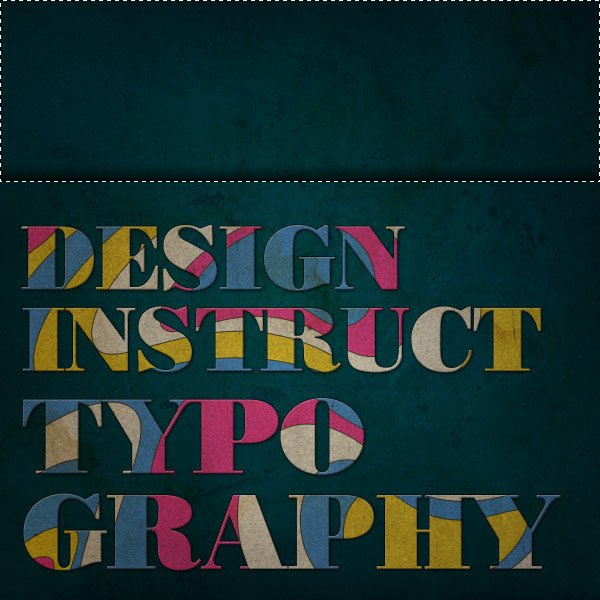
To finish it up, we are going to create a crease in the background that will frame the top of the text.
Using the Rectangular Marquee Tool (M) with the Feather option at 0px (which is the default, but we changed it earlier on to 100px), create a box marquee selection at the top of the canvas.
Click on the Gradient Tool (G) and make a small black gradient with the darkest part coming from the bottom of the box like I have below.
Press Ctrl + Shift + I to get the inverse selection.
Create a new layer (Ctrl + Shift + N) and add a white gradient with the Gradient Tool (G) so that the brightest part is at the top of the box. The darkest black and brightest white gradients should meet.

Drop the opacity of the black gradient layer to 50% and the white gradient to 20% so you get a more subtle crease.
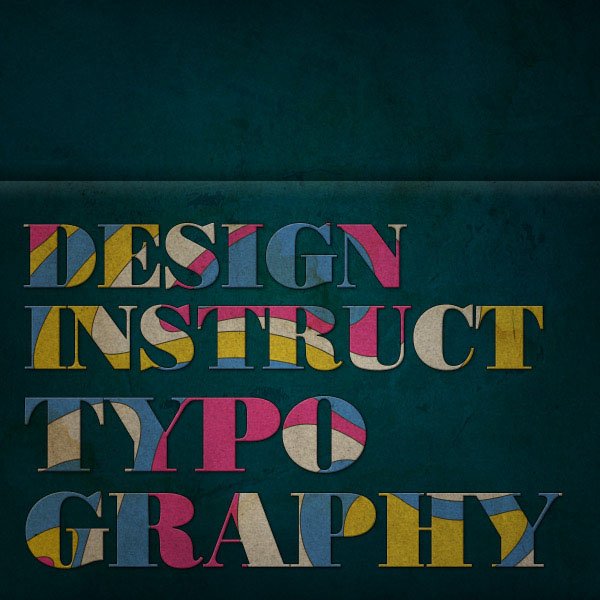
If you want to make the crease fade away on the right side of the canvas like I have below, click on the empty box on to the left of the two gradient layers in the Layers Panel (this should bring up a chain link icon). Ctrl + E will merge the two layers together.
Click on the Add layer mask icon and, using the Brush Tool (B) with a black, 0% hardness brush tip at 20% opacity, start slowly brushing away the crease on the right side until you get something you like.

There we have it folks, a technique for creating some funky retro text reminiscent of the 70's.
Save & Open up this wood texture from Zen Textures in Photoshop.
Go to Image>Image Size and change the width to 1200px and make sure the resolution is at 72 pixels/inch. This will give us the width that we want for our document.

Using the Type Tool (T), create some white text that will roughly fit the width of the document (leaving some space on the edges). I am using ITC Franklin Gothic Heavy for my font, but anything bold should work.
Using the Crop Tool (C) crop the top and bottom edges so they have a small margin around the text, about the same amount as the sides or a little more.

Click on the eye icon to the left of the text layer to make the text disappear.
Go to File>Save, and save it as a Photoshop file. We are going to be using this file later on in the tutorial.

Make sure you have the background layer selected. We are going to duplicate the layer with Ctrl+J.
Now go to Image>Adjustments>Threshold. Make your threshold level around 70.

Go into Select>Color Range, and make sure your fuzziness is at 200. Now with the eyedropper click on a black part of the document and hit OK. A marquee around all the black areas should come up.

We want to get the inverse of our selection, so to do that we are going to do Ctrl+Shift+I Now we can click on the text layer and click on Add Vector Mask.

Click on the eye icon next to the text layer to bring it back (if it isn't already), and click on the eye icon next to the black and white wood layer to make it go away.

If we zoom in we will notice that the masked out parts are too sharp to be believable, compared to the sharpness of the wood. To fix this we are going to go into Filter>Blur>Gaussian Blur. Change the blur to about 0.4px.

Now we want to make the edges look a little more believable. First we need to make the mask and the layer just one regular layer, so right-click on the layer and click on Rasterize Layer. Now Right-click on the mask and click on Apply Layer Mask.

Now go to Filter>Distort>Displace and change the horizontal and vertical scales both to 2, click OK. A file browser should come up. Open up the file we saved in the beginning of the tutorial.

If you zoom in you'll notice the edges follow the lines on the wood background. This is what the Displace Filter was for, to blend the edge of the text with the texture.

Drop the opacity of the text down to 80% to give the white part some subtle wood grain.

Now we are going to add some lighting effects to our graphic to make it look a little more interesting.
First off, lets create a new layer (Ctrl+Shift+N) and move it above the text layer. Click on the Elliptical Marquee Tool (M) and change the feather to 75px. Now click and drag a circle around the text.

We are going to get the inverse selection (Ctrl+Shift+I) of
the circle and fill it with black. Change the blend mode to Soft Light.

Create another new layer (Ctrl+Shift+N), above the text
layer and the shadow one we just created. Create a circle around the text like
we did in step 10 and fill it with an orange color (something like #FF9B0B).

Change the blend mode to Soft Light and the opacity to 50%.

Finally we are going to give our document an overall orange glow. Make sure your foreground is the orange that we used in the previous step and the background is black. Now go into "Create new or fill adjustment layer" (this middle icon at the bottom of the layers palette) and click on Gradient Map. The foreground and background colors should make a black to orange gradient for us. Make sure you click on reverse and click ok.

Drop the opacity down to 20% and change the blend mode to Overlay.

