SEND ALL FINAL IMAGES & VIDEOS TO: ron.doucet@gmail.com
With your Name and Project Number in the file name:
"your_name_ project#.JPG"
ie: joe_blow_project03.jpg
PROJECTS = Assignments ranging from various Research tasks, Photoshop tutorials, and Storyboard tests.
STORY STRUCTURE = Reading materials on theory for character development, screenwriting, and plot analysis for film.
IPUB Course Outline
The dates below are the Deadlines for each group of tasks.
You may click on the project name to jump directly to the instructions:
< Week 1 - Due: Apr.12 >
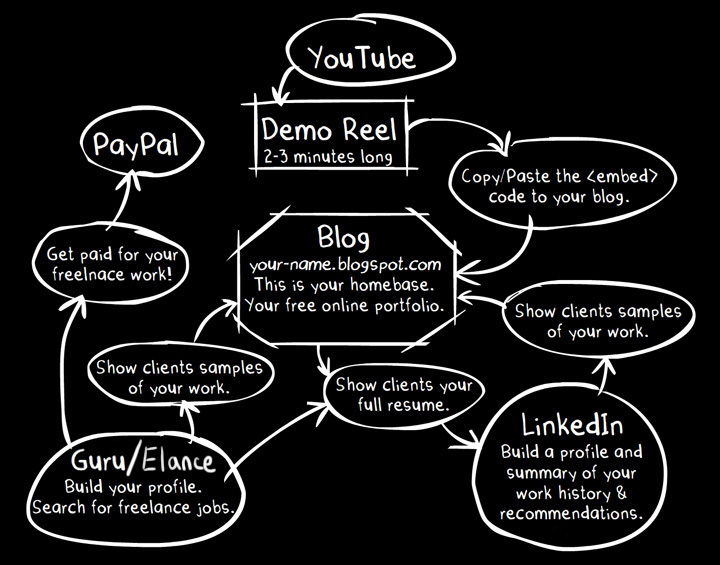
Project #1 - Internet Publishing: Online Portfolio
Project #2 - Research: Strong Compositional Style
Story Structure #1: Visual Storyforming
Story Structure #2: Determining The Mind of a Main Character
< Week 2 - Due: Apr.19 >
Project #3 - Research: Triangular Composition
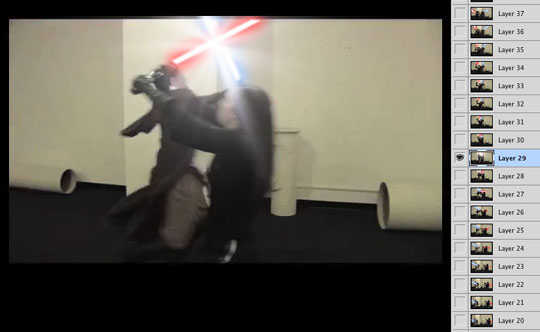
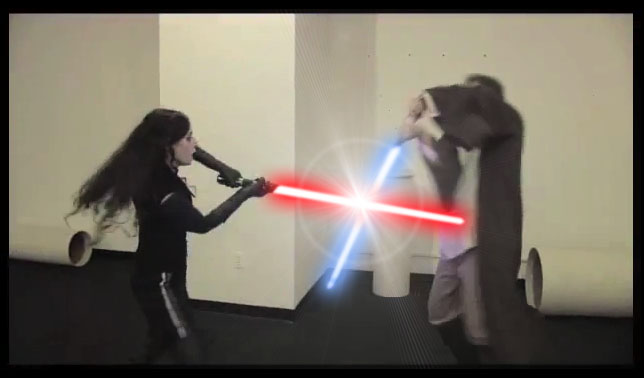
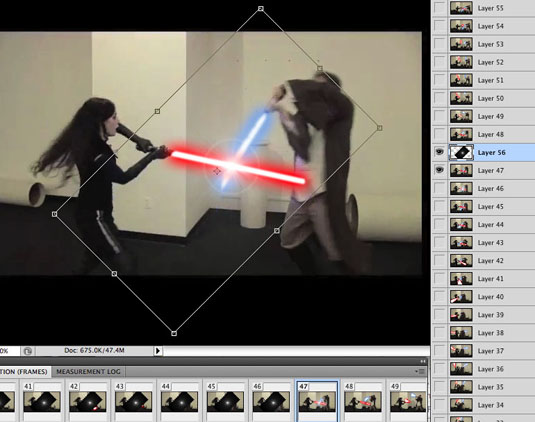
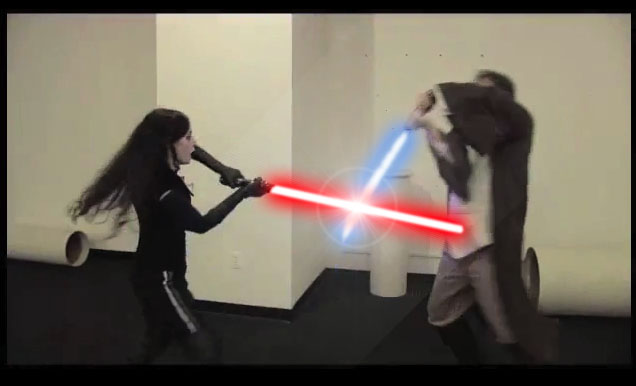
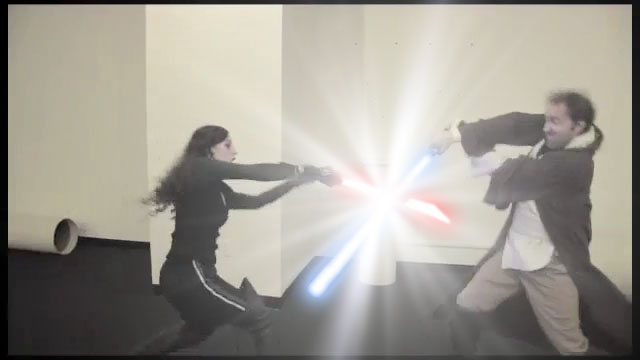
Project #4 - Storyboard Assignment: Leon
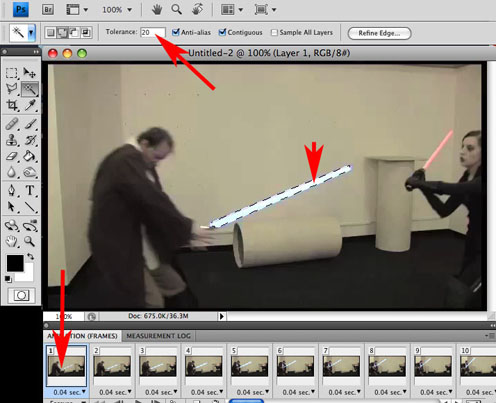
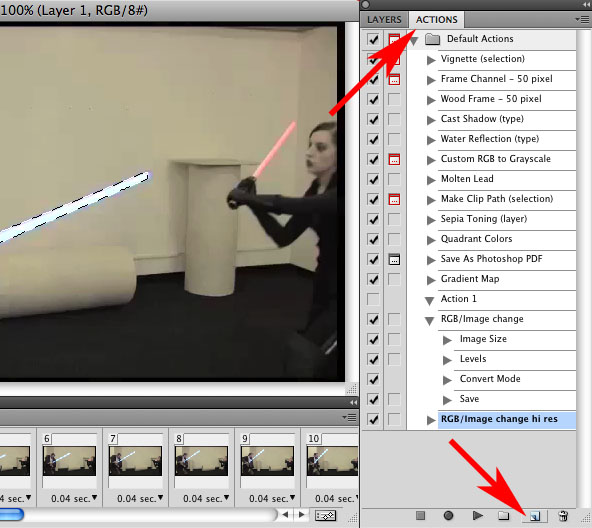
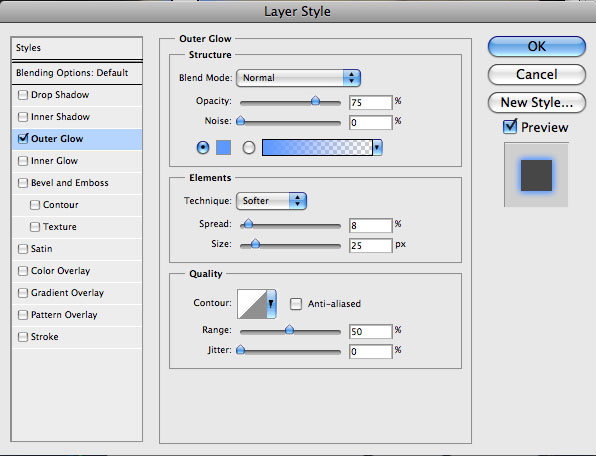
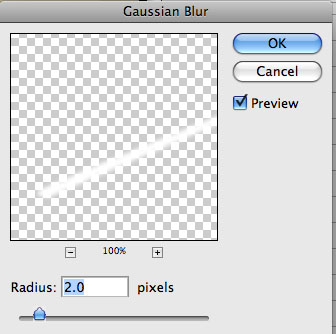
Project #5 - Photoshop: Animation/Rotoscoping & Actions Workflow
Story Structure #3: What Character Arc Really Means
Story Structure #4: How Your Main Character Solves Problems
< Week 3 - Due: Apr.26 >
Project #6 - Research: Shot Progression
Project #7 - Storyboard Assignment: Incredibles
Project #8 - Photoshop: Pixel Art
Story Structure #5: Character Motivation
Story Structure #6: Three Main Aspects of Storytelling
< Week 4 - Due: May.3 >
Project #9 - Research: Shot Progression
Project #10 - Storyboard Assignment: Carnivale
Project #11 - Photoshop: Product Ad Design
Story Structure #7: Your Main Character's Most Personal Issue
Story Structure #8: Impact Characters
Story Structure #9: When the Main Character is Not the Protagonist
< Week 5 - Due: May.10 >
Project #12 - Research: Movie Trailer
Project #13 - Storyboard Assignment: Cinderella Man
Project #14 - Photoshop: Text Effects on Wood Texture
Project #15 - Photoshop: Leather Texture
Story Structure #10: Consistent Plot Points
Story Structure #11: Personal Tragedy
Story Structure #12: Personal Triumph
< Week 6 - Due: May.17 >
Project #16 - Storyboard Assignment: Justice League
Project #17 - Photoshop: Comic Book Coloring
Story Structure #13: End of a Main Character's Arc
Story Structure #14: A Story is an Argument
< Week 7 - Due: May.24 >
Project #18 - Storyboard Test: Duncan's Revenge
Story Structure #15: Two Sides of the Same Coin
Story Structure #16: The Headline of a Story
< Week 8 - Due: May.31 >
Project #19 - Storyboard Test: Dysfunctional Dam
Story Structure #17: The Most Important Event in a Story
Story Structure #18: The Story Limit
< Week 9 - Due: Jun.14 >
Project #20 - Storyboard Test: The Diamond
Project #21 - Flash: Button-Activated Motion Graphics in Flash
Project #22 - Flash/Photoshop: Build a Self-Contained Flash Website
Story Structure #19: Story Transformation
Story Structure #20: Subtext
< Week 10 - Due: Jun.14 >
Materials for Next Week's Exam
Story Structure #21: How To End a Story
Story Structure #22: Creating Complete Stories
Story Structure #23: The Development of Character & Story
Conclusion
< Week 11 - Due: Jun.14 >
Final Exam: Composition, Storyboarding, Animation Production & Terminology


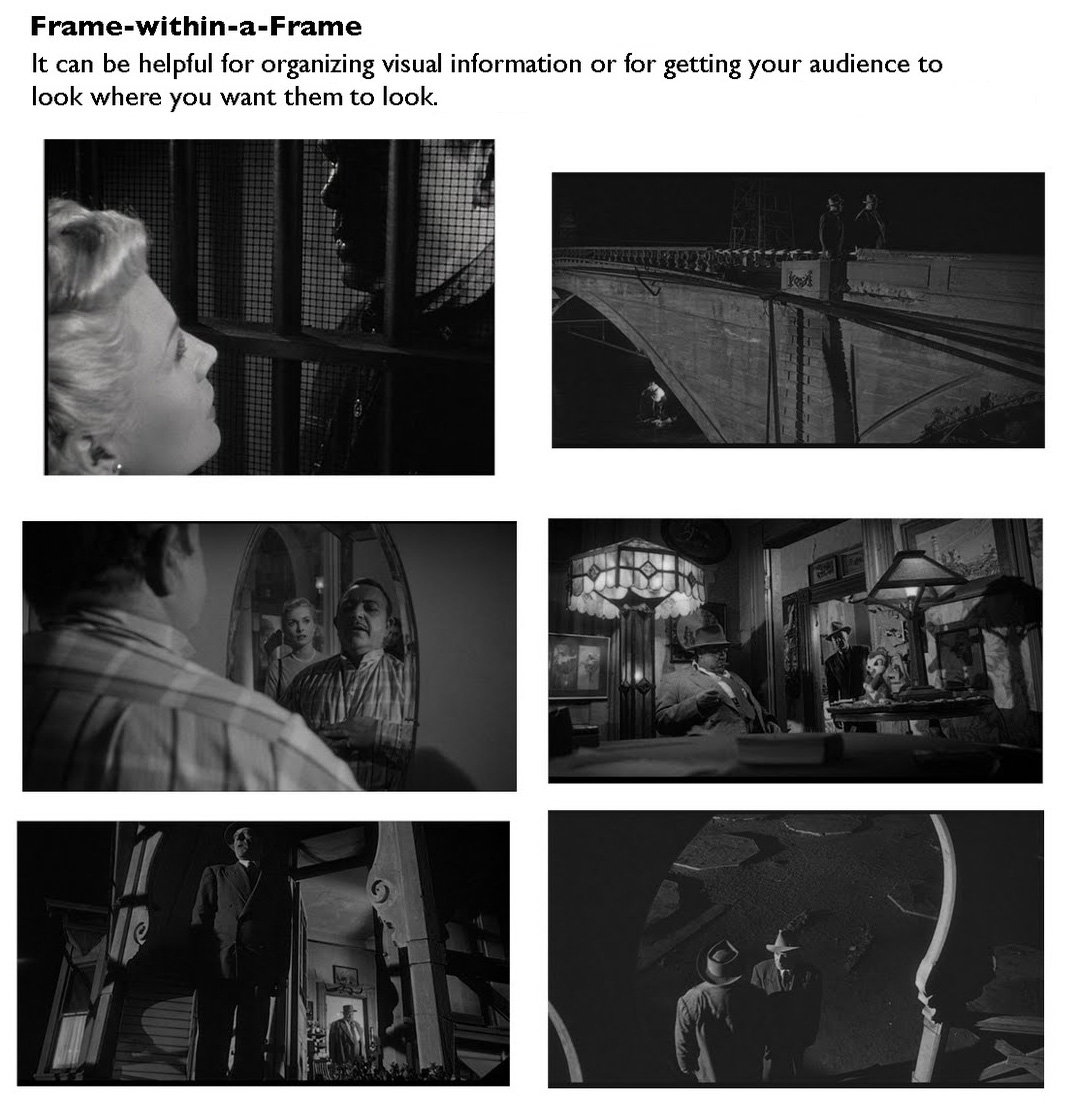
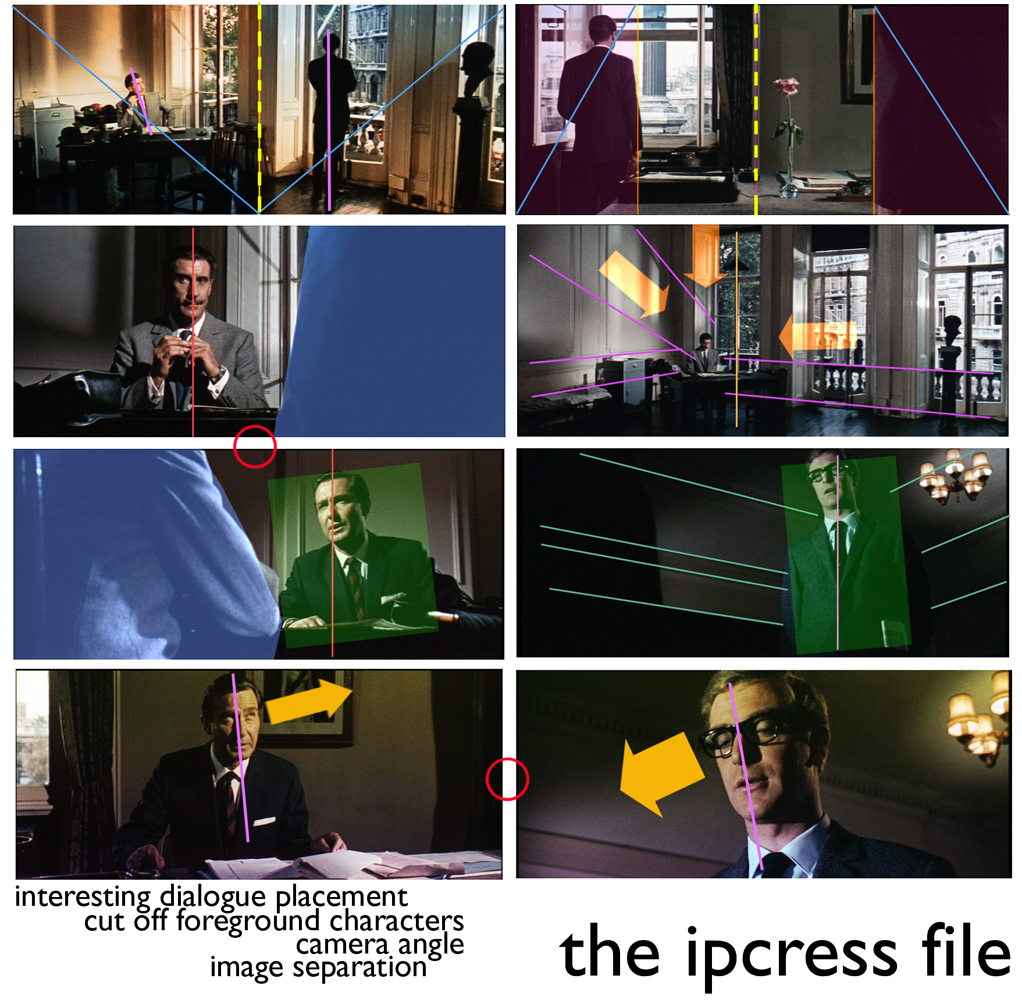
'Framing' can be used within the composition of a shot to help you highlight your main point of interest in the image and and/or to put it in context to give the image some depth.

The perspective that a shot is taken from is another element that can have a big impact upon an image.
Shooting from up high and looking down on a subject or shooting from below looking up on the same subject drastically affects not only the 'look' of the image, emphasizing different points of interest, angles, textures, shapes etc - but it also impacts the 'story' of an image.


There can be a fine line between filling your frame with your subject (and creating a nice sense of intimacy and connection) and also giving your subject space to breath.
Focus on the good stuff. Don't include too much. Extra elements can confuse things. Strengthen your subject by eliminating all unimportant components and background clutter. Either technique can be effective - so experiment with moving in close and personal and moving out to capture a subject in its context.
Sometimes it is what you leave out of an image that makes it special.

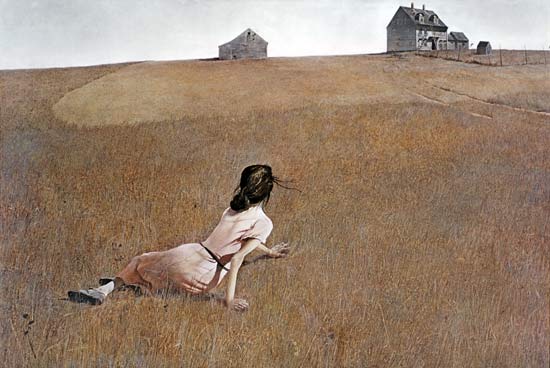
The positioning with elements in a frame can leave an image feeling balanced or unbalanced.
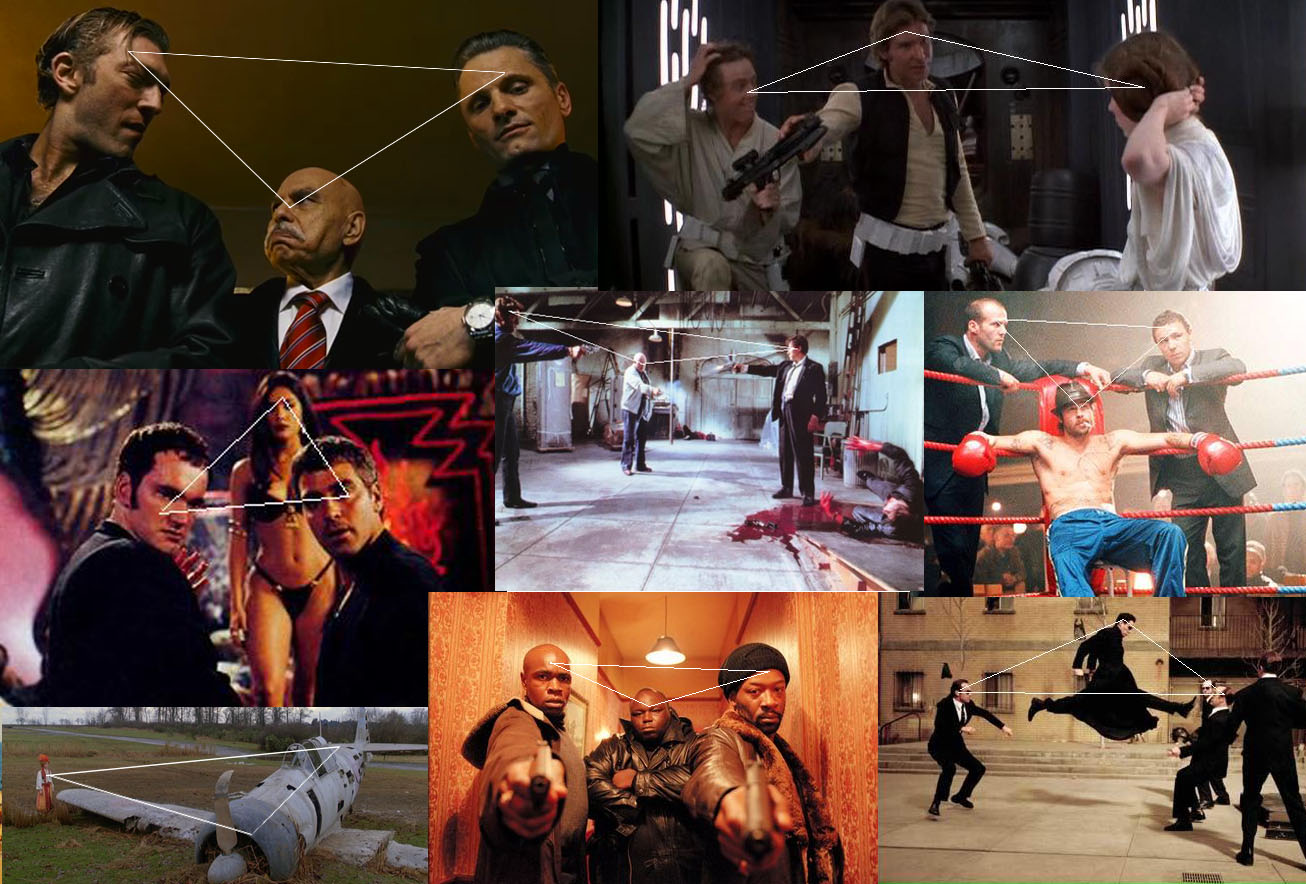
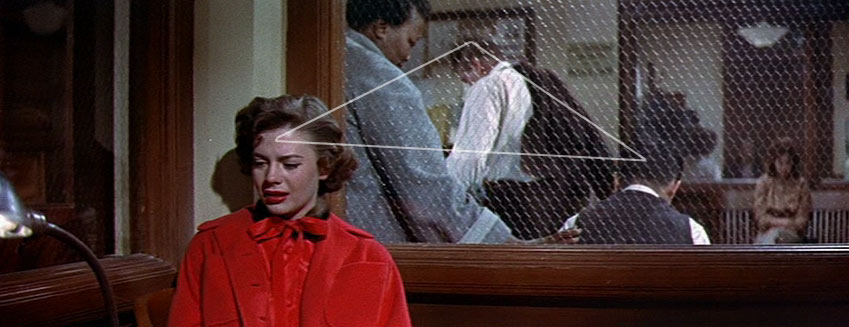
Find your balance. Off-center subjects can be balanced on the opposite side of the frame with leading lines, shadows, and objects in the foreground or background. Balance can also be achieved by creating simple geometric shapes. This makes images naturally easier to decipher and more pleasing to the eye. These photos below are a good example of subjects creating a triangular shape (more on this technique later), which brings strong balance and unity to the image.


It is applied in illustration also:

The colors in an image and how they are arranged can make or break a shot.
Bright colors can add vibrancy, energy and interest - however in the wrong position they can also distract viewers of an image away from focal points.
Colors also greatly impact 'mood'. Blues and Greens can have a calming soothing impact, Reds and Yellows can convey vibrancy and energy.

There are patterns all around us if we only learn to see them. Emphasizing and highlighting these patterns can lead to striking shots - as can highlighting ts elemenwhen patterns are broken.
Depending upon the scene - symmetry can be something to go for - or to avoid completely.
A symmetrical shot with strong composition and a good point of interest can lead to a striking image - but without the strong point of interest it can be a little predictable. Mostly, you should experiment with both in the one shoot to see which works best.

Images are two dimensional things yet with the clever use of 'texture' they can come alive and become more three dimensional.
Texture particularly comes into play when light hits objects at interesting angles.

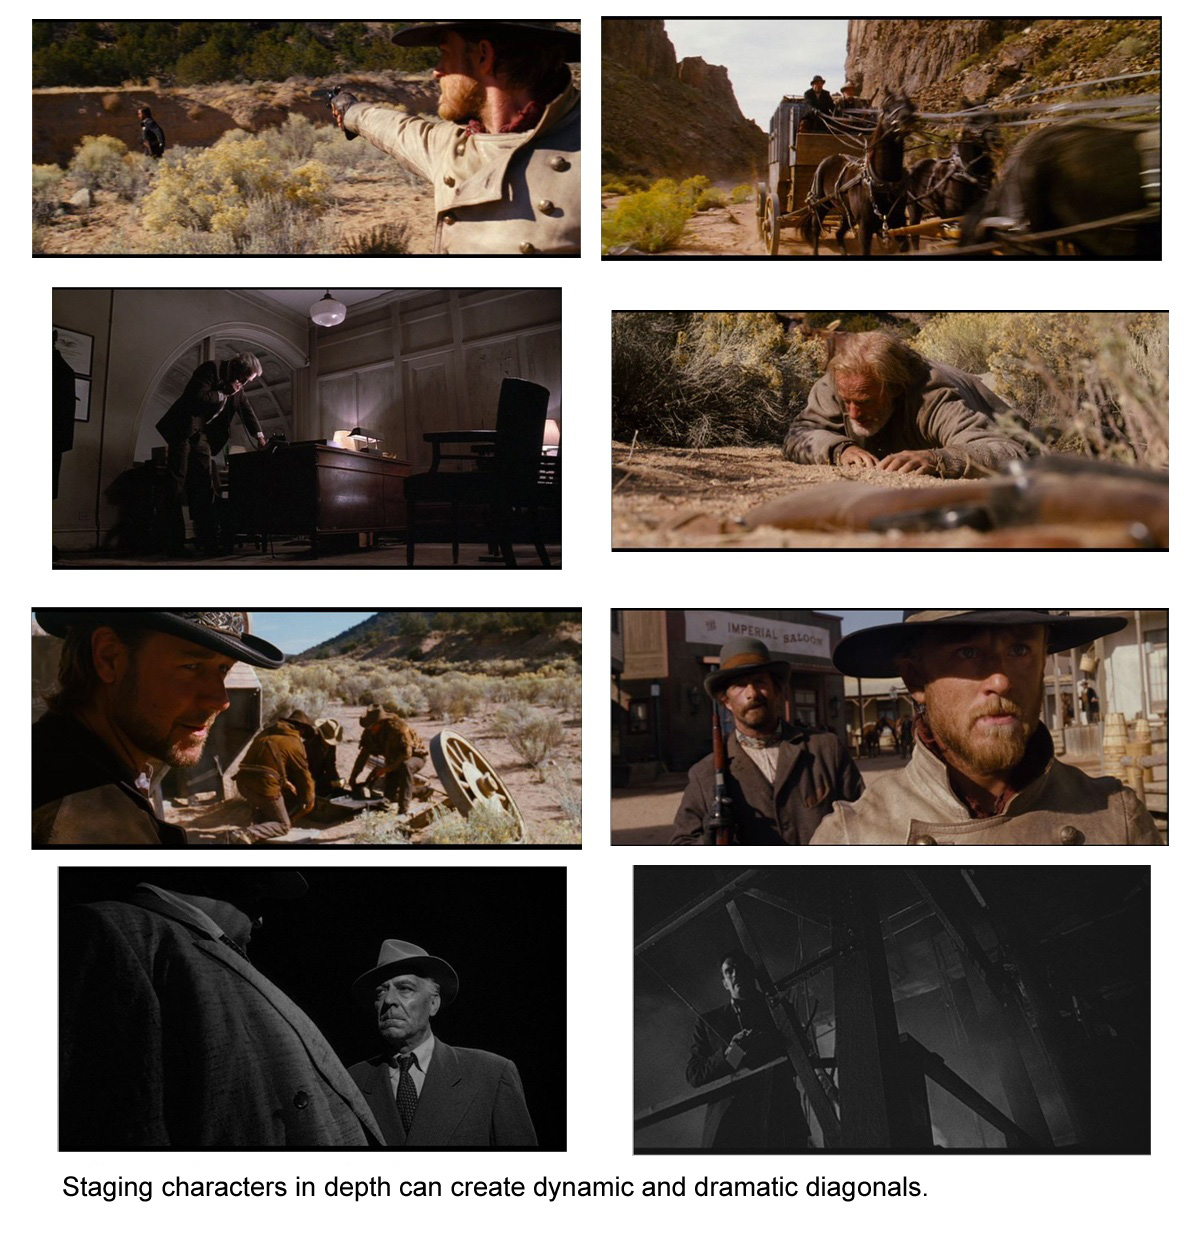
The depth of field that you select when taking an image will drastically impact the composition of an image.
It can isolate a subject from its background and foreground (when using a shallow depth of field) or it can put the same subject in context by revealing it's surroundings with a larger depth of field.
It is applied in filmmaking also:
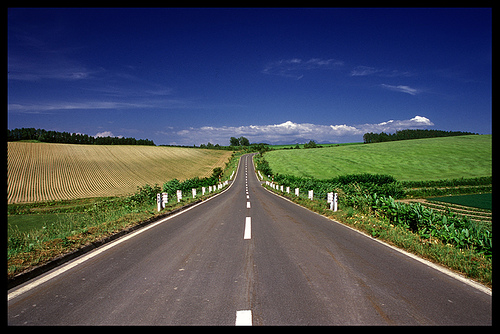
Lines can be powerful elements in an image.


They have the power to draw the eye to key focal points in a shot and to impact the 'feel' of an image greatly. Diagonal, Horizontal, Vertical, d anConverging lines all affect images differently and should be spotted while framing a shot and then utilized to strengthen it.
The key is to remember that in the same way a chef rarely uses all the ingredients at their disposal in any dish - that a photographer rarely uses all of the ingredients of composition in the making of an image.


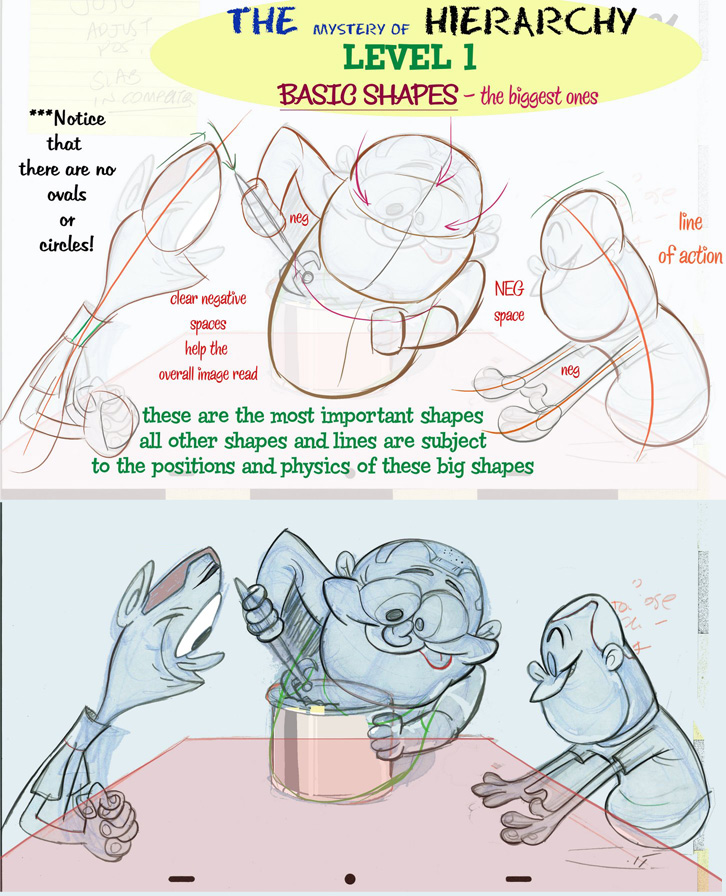
Instead
of starting a picture with small details, they instead have to plan a big
visual statement that reads clearly and simply.

The
overall image above is broken into 4 basic shapes. Then each major shape is
again broken into subdivisions.

Then
the next level.


Someone
with less control would get all absorbed in the details early on. Maybe he'd
start by drawing a bunch of individual leaves and hope they ad up to an overall
tree shape. Or he might do a wild pose of the character - with all the limbs
sticking out in every direction, and no overall silhouette.

Good
storyboard artists have to have this kind of self-control - to avoid getting lured into the details too early. Artists often struggle with composition, because they want to get right to the character first.

Here's
another example. The characters look great, but they fit perfectly into a much
simpler framework, which helps them read well.


Ranger
Smith, Cindy and Baba Looey act as one form, that in turn fits into the bush
shape behind them. They together are well separated from Yogi, who is the focus
of the picture. Boo Boo looks up at Yogi and is framed by the bushes behind
him. If all the characters were evenly spaced and the same size, the picture
would be confusing and wouldn't draw your attention to anything in particular.
The
characters and BG also frame the skywriting plane in the BG.


You
can see this definitive arrangement of shapes in all of Eisenberg's comics.
Great
illustrators like N.C. Wyeth use these exact same principles; only apply them
on more complex levels with more complex drawing:


You
can still see the big shapes dominating the compositions, and the details being
subservient to them through many levels.

Frank
Frazetta has beautiful intricate details in his work, but his images also are
stunning simple compositions. The whole image is a design. He became a master
at composition and hierarchy - so much so that his work is almost a caricature
of artistic control. Everything in his images fits so perfectly together that
it's almost unnatural - even though he is using guidance from a great
observation of nature.

The
differences between Frazetta and good animation cartoonists are in individual
skill and style, not so much in fundamentals. Frazetta can draw much better
than most cartoonists (or anybody else). He also can control more levels of complex
detail, and difficult elaborate structures - like anatomy.


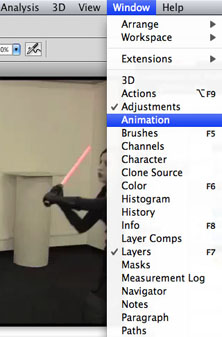
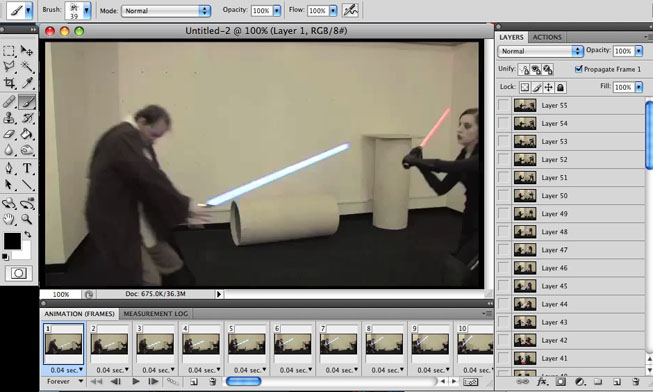
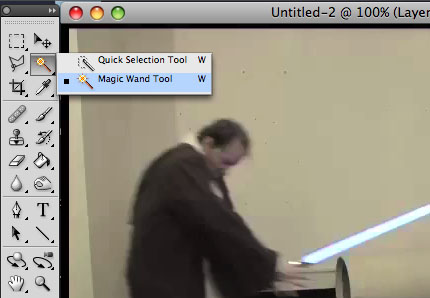
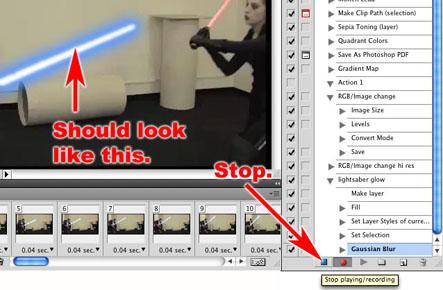
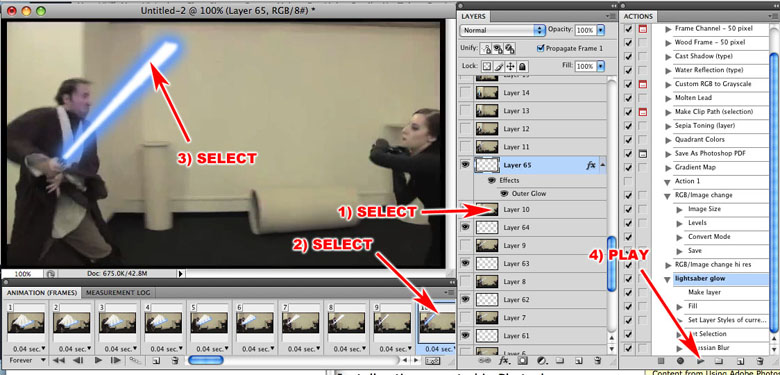
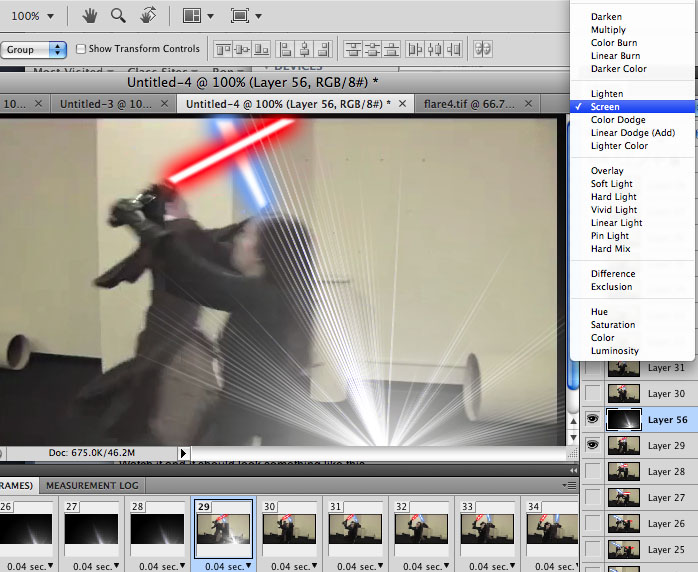
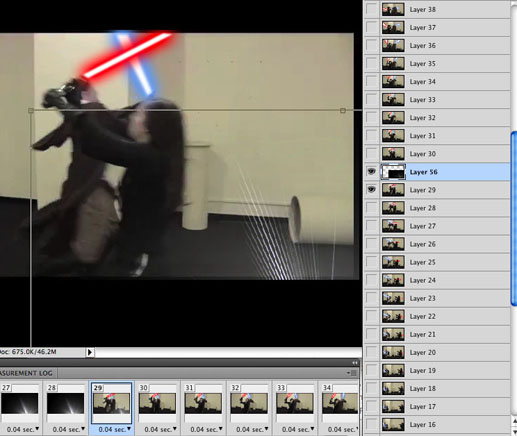
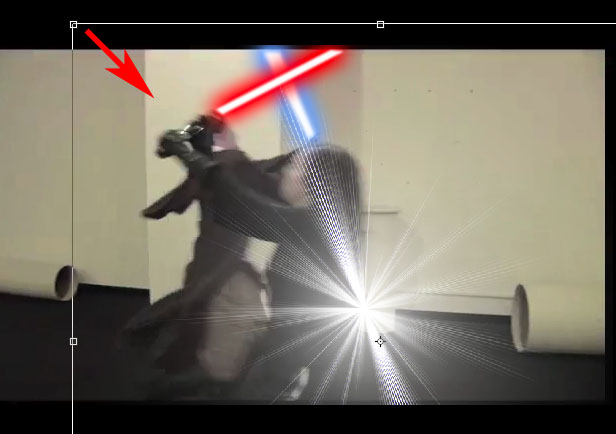
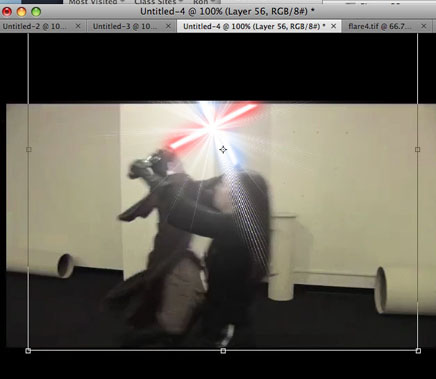
When using Photoshop, your main weapon is going to be the pencil tool (shortcut "B"), which is the alternate for the brush tool. The pencil lets you color individual pixels, without any anti-aliasing.
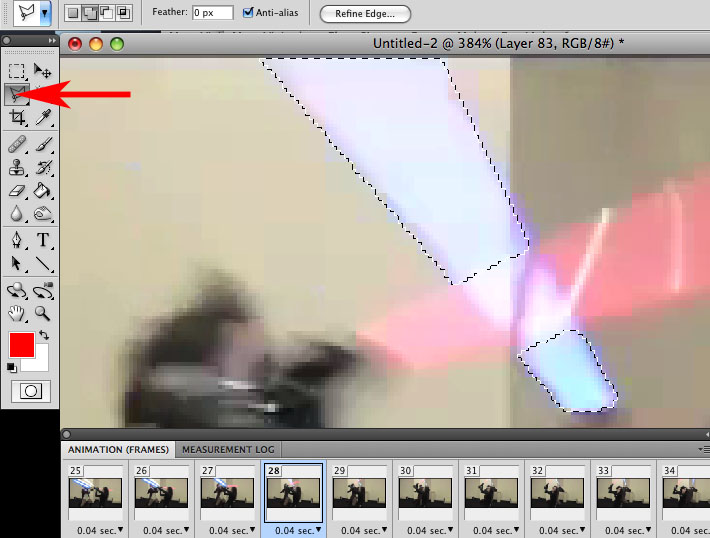
Two other tools that will come in handy are the marquee tool ![]() (shortcut "M") and the magic wand
(shortcut "M") and the magic wand  (shortcut "W") for selecting and dragging or copying and pasting. Remember that by holding "Shift" or "Alt" while you make your selection you can add or subtract from your current selection. This comes in handy when trying to grab areas that aren't perfectly square.
You'll also use the eyedropper ![]() (shortcut "I") to grab colors. Color conservation is important in pixel art for a number of reasons, so you will want to grab the same colors and reuse them.
(shortcut "I") to grab colors. Color conservation is important in pixel art for a number of reasons, so you will want to grab the same colors and reuse them.
Finally, make sure you learn the shortcuts. They can save you a lot of time and energy. A good one to know is "X", which switches your primary and secondary colors.
Pixels are essentially little blocks of color. The first thing you need to learn is how to use these blocks effectively to make any kind of line that you want. We'll discuss the two most basic types of lines; straight and curved.I know what you're thinking - this seems too easy to even bother with! But with these 8-bit graphics-style pixels, even straight lines can be problematic. What we want to avoid are "jaggies" - little breaks in the line that make the line look uneven. Jaggies pop up when one piece of the line is larger or smaller than the surrounding pieces.

For curvature, make sure that the decline or incline is consistent all the way through. In this next example, the clean-looking curve goes 6 > 3 > 2 > 1, whereas the curve with the jaggy goes 3 > 1 < 3.

Being comfortable making any line in pixels is crucial to doing pixel art. Later on, we'll learn how to use anti-aliasing to make our lines look more smooth.
For this assignment, we will be creating a Sprite.1. What will the sprite be used for? Is this for a website, or a game? Will I have to animate this later, or is this it? If the sprite will be animated later on, you may want to keep it smaller and less detailed. Conversely, you can pack as much detail into a static sprite that you will never have to deal with again. But think about where the sprite is going to go, and what will work best.
2. What constraints are being placed on me? Earlier, I had said that color conservation is important. One of the reasons is that, especially if you are working on a game, your palette of colors may be limited. Also consider the dimensions of your sprite and how it will fit with its surroundings.

For this tutorial, I wanted to make sure the sprite was rather large so that you could clearly see what was happening with each step. To that end, I decided to use the Lucha Lawyer, the ass-kickin'est wrestling attorney around, as my model! You can create any object, character or creature you wish.
A black outline will provide a good, basic structure to your sprite, so it's the perfect place to start. The reason we choose black is that it's nice and dark. Later on, I'll show you how you can change the color of the outline for more realism.There are two ways to approach the outline. You can draw the outline freehand and then clean it up, or you can start by placing the pixels as you want them from the start. You know, like "click, click, click".
I think which approach you should use depends on the size of the sprite and your skill at pixelling. If a sprite is very large, it's much easier to sketch the outline freehand to get the general shape and then clean it up later than to try and get it right the first time through.
In this tutorial, we're creating a fairly large sprite, so I'll demonstrate the first method. It's also easier to illustrate with text and pictures.
Load the default Square Brushes from the Library that comes with Photoshop, this will give you that hard-edge small square pixel line you want.
![]()
![]()
Even large sprites never usually exceed 200 by 200 pixels. The phrase "doing more with less" never rings more true than when pixelling. And you will soon find that one pixel can make all the difference.
Using your mouse or tablet, sketch out a crude outline for your sprite. You can use one of your own sketches as a rough guide, or use a graphic or image to trace over from the internet, make a new layer and start drawing over top of your rough drawing or image. Make sure it's not TOO crude, though - it should resemble more or less the final product that you want. Either way, keep it simple.
In this case, I'm basing my outline almost entirely on my sketch.
First, crank up the zoom to around 6x or 8x magnification so that we can see each pixel clearly. Then clean up that outline! In particular, you want to trim away stray pixels (the outline should only be one pixel thick all the way through), get rid of any jaggies, and add any small details that were passed over in Step 1.

Keep your outline simple. The details will emerge later on, but for now, concentrate on defining the "big pieces", like muscle segmentation, for instance. It may not look like much now, but be patient.
With the outline done, we have a coloring book of sorts that we can fill in. Paint buckets and other fill tools will make it even easier for us. Picking colors can be a little more difficult, however, and color theory is a topic that is beyond the scope of the tutorial. However, here are a few basic concepts that are good to know.
HSB stands for (H)ue, (S)aturation, and (B)rightness. It's one of a number of computer color models (i.e. numerical representations of color). Other examples are RGB and CMYK, which you have probably heard of. Most paint programs use HSB for color-picking, so let's break it down:
Hue - What you understand "color" to be. You know, like "red", "orange", "blue", etc.
Saturation - How intense the color is, or how intense the color is. 100% saturation gives you the brightest color, and as saturation decreases, the color becomes more gray.
Brightness (or "luminosity") - Lightness of a color. 0% brightness is black.
What colors you choose is ultimately up to you, but here are a few things to keep in mind:
1. Less saturated and less bright colors tend to look more "earthy" and less cartoony.
2. Think about the color wheel - the further away two colors are from one another, the more they will separate. On the other hand, colors like red and orange, which have close proximity on the color wheel, look good together.

3. The more colors you use, the more distracted your sprite will look. To make a sprite stand out, use only two or three main colors. (Think about what just red and brown did for Super Mario back in the day!)
The actual application of color is pretty easy. You want to first select the area you're going to fill with the magic wand (shortcut "W") and then fill by pressing "G" for the paint bucket and switch between your foreground color and background color with "X".

First, we have to pick a light source. If your sprite is part of a larger scene, there might be all kinds of local light sources (like lamps, fire, lamps on fire, etc.) shining on it. These can mix in very complex ways on the sprite. For most cases, however, picking a distant light source (like the sun) is a better idea. For games especially, you will want to create a sprite that is as generally lit as possible so that it can be used anywhere.
I usually choose a distant light source that is somewhere above the sprite and slightly in front of it, so that anything that is on top or in front is well-lit and the rest is shaded. This lighting looks the most natural for a sprite.

Once we have defined a light source, we start shading areas that are farthest from the light source with a darker color. Our "up and to the front" lighting model dictates that the undersides of the head, the arms, the legs, etc., should be shaded.
Remember that the play between light and shadow defines things that are not flat. Crumple up a piece of white paper into a ball and then unroll it and lay it on a table - how can you tell that it's not flat anymore? It's because you can see the little shadows around the crinkles. Use shading to bring out the folds in clothing, and to define musculature, hair, fur, cracks, etc.

A second shade, lighter than the first, should be used for soft shadows. These are areas that are indirectly lit. It can also be used to transition from the dark to the light, especially on curved surfaces.

Places that are being hit directly by the light source can have highlights applied onto them. Highlights should be used in moderation (much less than shadows), because they are distracting.
Always apply highlights after shadows, and you will save yourself some headache. Without the shadows already in place, you will be inclined to make the highlights too large.

Shading is where most beginners get tripped up. Here are some rules you should always follow when shading:
1. Don't use gradients. The ultimate newb shading mistake. Gradients look dreadful, and don't even begin to approximate the way light really plays off a surface.
2. Don't use "pillow-shading". Pillow shading is when one shades from the outline inward. It's called "pillow-shading" because it looks pillowy and undefined.
3. Don't use too many shades. It's easy to think that "more colors equals more realistic". In the real world, however, we tend to see things in big patches of light and dark - our brains filter out everything in between. Use at most two shades of dark (dark and really dark), and two shades of light (light and really light) on top of your foundation color.
4. Don't use colors that are too similar. There's no reason to use two colors that are very similar to one another. Unless you want really blurry-looking sprites!
Color conservation is something that pixel artists have to worry about a lot. One way to get more shades without using more colors is to use a technique called "dithering". Similar to "cross-hatching" or "stippling" in the traditional art world, you take two colors and interlace them to get, for all intents and purposes, an average of the two colors.Here's a simple example of using two colors to create four different shades using dithering:


Compare the top picture, which was made using the Photoshop gradient tool, and the bottom, which was created with just three colors using dithering. Notice the different patterns that were used to create the intermediary colors. Try experimenting with different patterns to create new textures.
Dithering can give your sprite that nice retro feel, since a lot of old video games relied heavily on dithering to get the most out of their limited palettes (look to the Sega Genesis for lots of examples of dithering). It's not something that I use very often, but for learning's sake, here it is applied (possibly over-applied) to our sprite.

You can use dithering as much or as little as you want. Honestly, it's a technique that I've only seen a few people use really well.
Self-traced lines, also known as Selective Outlining (or "selout") is the process of shading the outline. Rather than using black all the way around, we apply a color that is closer to the color of the sprite itself. Also, we vary the brightness of this outline along the edge of the sprite, letting the light source dictate which colors we apply.Up until this point, we've kept the outline black. And there's nothing wrong with that, really, since it looks pretty good and it keeps the sprite well-separated from its surroundings. But by using black, we are sacrificing more realism than we might like to, since it gives the sprite a "cartoony" look. Selout is a great way to get around that:

You'll notice I also used selout to soften the folds of his muscles. Finally, the sprite begins to look like a coherent whole rather than a whole bunch of separate pieces.
Compare this to the original:
Generally, you want to add your intermediary colors at the kinks, since that's where the line breaks and looks uneven. If it still looks too uneven, add another, lighter layer of pixels. Have your intermediary layers flow in the direction of the curve.
I don't think I can explain it any better than that without complicating things. Just look at the pictures, and I think you will understand what I mean:


Now let's anti-alias our sprite. Keep in mind that if you want your sprite to look good on any color background, do not anti-alias on it's outer edge. Otherwise, you will see an unfortunate-looking "halo" of your in-between colors around your sprite and it will look nasty as hell.

The effect, as you can see, is subtle, but it makes a big difference.
You may ask why we don't just apply a filter from our paint program to the sprite if we want to make it look smoother? The answer is that no filter is going to make your sprite as clean-looking as if you did it by hand. You have total control, not only over the number of colors you use, but where they get used. And you know better than any filter what areas need to be smoothened out, and what areas are going to lose their pixelly quality if you anti-alias them.
This last part is what separates an ethusiastic amateur from a hardened professional.Step back and take a good long look at your sprite. Chances are, it's still a little rough. Take the time to refine it and make sure that everything is perfect. Give or take how tired you are, this can actually be the most fun part. Add little details to make your sprite more interesting. Your skill and experience with pixelling will show through here.

You may have been wondering why the Lucha Lawyer's eyes have been missing this whole time, or why the supoena he was holding was blank. Well, it's because those were small details that I wanted to save until the end. Also take notice of the trim I added to his armbands, the fly I added to his pants, and... well, what would a man be without his nipples? I also darkened the lower half of his torso so that his left hand would stand out more against his body.
You're finally done! The Lucha Lawyer weighs in at an impressively light 45 colors (or perhaps ultra-heavyweight, depending on your palette restrictions) and has dimensions of approximately 150 by 115 pixels. Now you can have that beer!
Here's an animated .gif that shows the evolution of our sprite:

1. Keep learning the fundamentals of art and practice with traditional mediums. All the skills and knowledge involved in drawing and painting will apply to pixelling as well.
2. Start with small sprites. The hard part is learning how to cram a lot of detail into a few pixels, not making huge sprites (that just takes time).
3. Study the work of the artists whom you admire and don't be afraid of being unoriginal. Biting off other people's work is the best way to learn. It takes time to find your own style.
4. If you don't have a tablet, get one. Repetitive stress injuries from clicking the mouse are no fun and will not impress the ladies (or dudes).
5. Share your artwork with others and get feedback. And who knows, you might just meet some new, geeky friends!


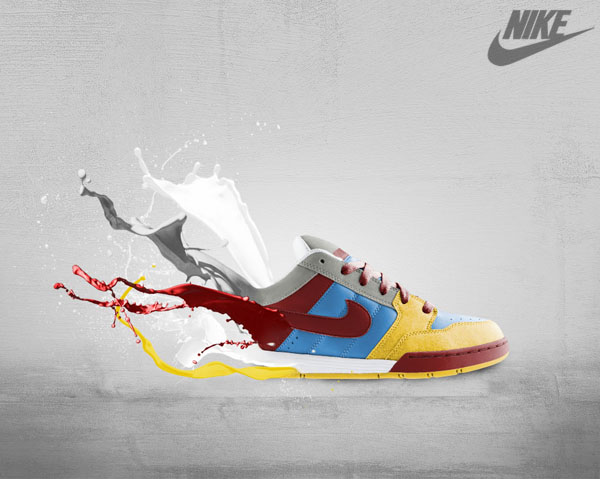
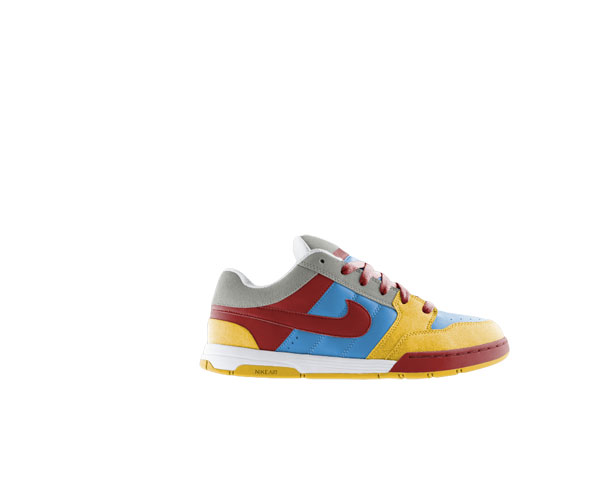
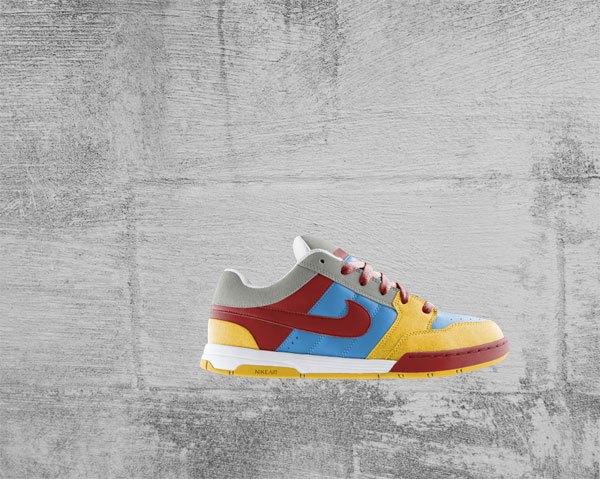
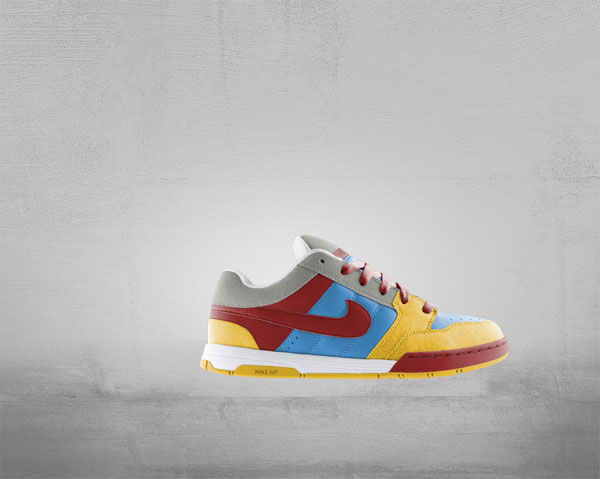
Here is the ad poster design we will create. For this tutorial, I've chosen a classic Nike shoe. You can use any kind of product image and create the same effects. If you want to work with this particular shoe open it from the zip file you just downloaded. If you want to pick your own product make sure you extract it so that it is isolated on its own layer without a background.
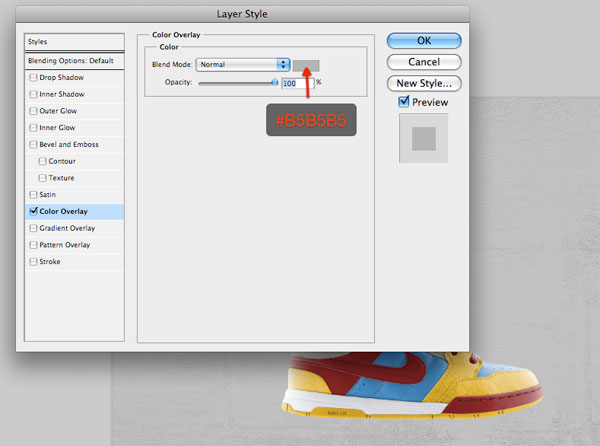
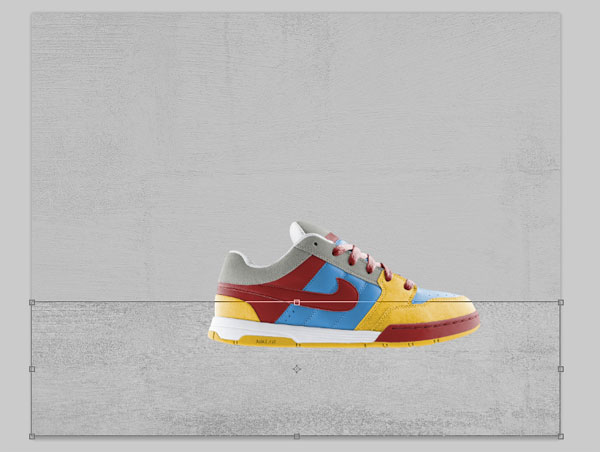
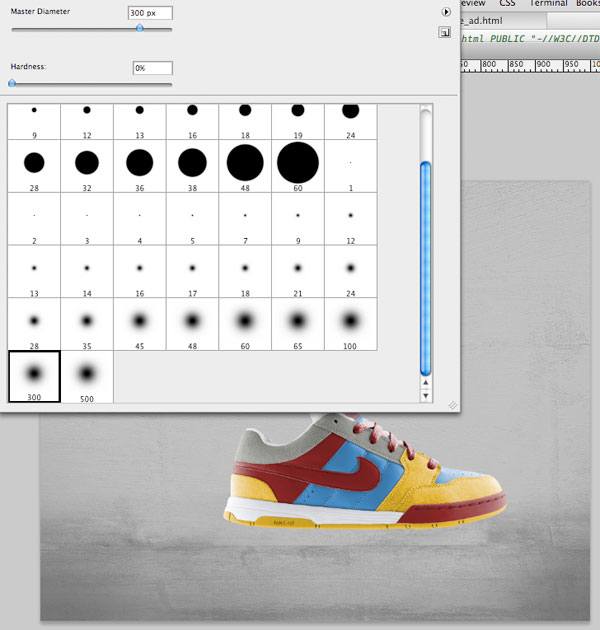
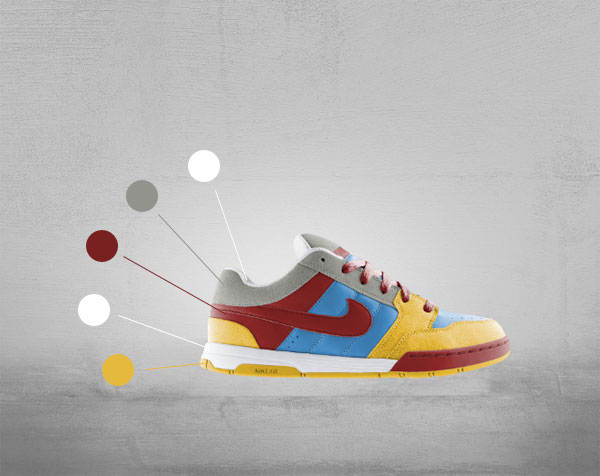
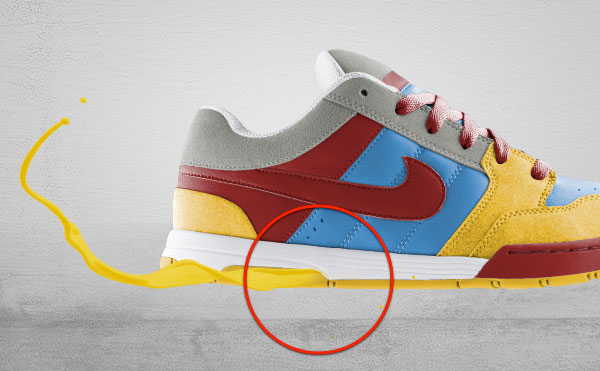
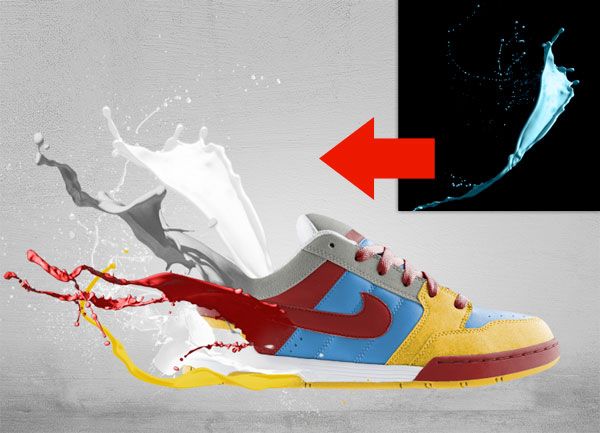
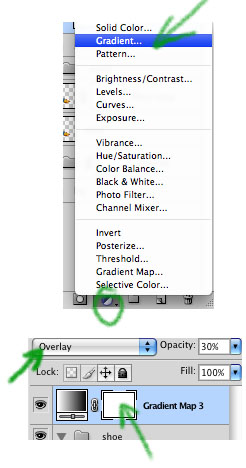
Once you've decided on the poster design's subject (i.e. what article of clothing, electronics or product you'll be featuring), Use the Pen Tool (P) in Paths mode to select around the edges of the shoe. Press Ctrl(or Cmd on a Mac) + Enter (on the layer) to make a selection (or, on your photo, right-click inside the path and then choose 'Make Selection' in the menu that appears), invert the selection (Select > Inverse) and hit Delete to remove its background. This process should isolate our subject for our product ad and prepare us for the next part. Create a new document (Ctrl/Cmd + N) in Photoshop. Mine is 1000��800px with a white background. Once your new PSD is created, paste in the shoe. The focus of our work is the product (the shoe); this is why we will create a soft, unobtrusive background with the goal of making the piece focus into the subject. Extract & Open the texture files from the zip file you downloaded, I picked the second one here, select it, and copy/paste it into your document with ypur product (Ctrl+A Ctrl+C go to your work file Ctrl+V). Press Ctrl+T to activate the Free Transform command and reduce grunge texture's image size to fit our canvas. Place the texture's layer between the shoe layer and the default white Photoshop Background layer. Desaturate the texture by selecting its layer in the Layers Panel and pressing Shift + Ctrl/Cmd + U (or choosing Image > Adjustments > Desaturate). After desaturating the texture, switch its layer's Blend Mode to Overlay. The background will now become completely white because it's overlaid into the white Background layer, but don't worry: we will fix this using blending options. Right-click on the Background layer in the Layers Panel and select Blending Options. The Layer Styles dialog window will pop up. Here, add a grey (#b5b5b5) Color Overlay. After you have added the Color Overlay layer style, reduce texture layer's Opacity to around 30%. Tip: When you resize a texture, lots of small details will be lost. To enhance details on your texture, you can use the Sharpen filter (Filter > Sharpen > Sharpen) if you want. Now that we have a nice grungy background, let's create the floor for our subject. Duplicate the texture layer by right-clicking on its layer in the Layers Panel and choosingDuplicate Layer in the menu that appears. Since the Blend Mode of the original texture layer is set to Overlay, we need to set the Blend Mode of the duplicated layer back to Normal. Afterwards, Press Ctrl/Cmd + T to activate Free Transform and then drag down the top-center transform control to reduce the texture's height as if we are squashing it down - in this way, we are creating the idea of perspective. Next, grab the Burn Tool (O) from the Tools Panel to darken parts of the floor; in particular, we want to darken the bottom corners. The floor is still too prominent - we want it to be more blended with the textured background. In this way, we give depth to the image and the floor looks less distracting. Use the Eraser Tool (E) to remove the top horizon (the top edge of the floor). Choose a large, soft brush with Hardness at 0% for your Eraser Tool. Tip: If you prefer, use a layer mask and a black brush on the floor layer to achieve the same result. To complete the floor, create a new layer on top of it, select a black, large, soft brush and paint over the corners to darken them. Afterwards, reduce the Opacity of this layer to 10%. The aim of this step is to drive the viewer's attention to the center of our canvas where we've placed the product. The background is almost complete. The last touch is a light effect behind the shoe. It's my habit to enhance subjects with light effects - it's a way to embellish the product and draw even more attention to it. Don't forget that the aim of an ad poster is to sell, so we have to do our best to increase the customer's desire to buy it. Even just a few details can make the difference between them looking longer or looking away quickly. For the light effect, start by creating a new layer that is immediately above the background layers. Then use a big, white soft brush and click once on the canvas with the Brush Tool (B) to create the light effect. We will now integrate paint effects into our composition. We will place them on the back portion of the shoe, making it look like as if paint is melting the shoe (hence, "toxic paint"). In order to achieve this result, we need to determine what colors to use by sampling parts of the shoe with the Eye Dropper Tool (I) and we also have to play with their colors to match shoe colors. For this effect, you will need to extract the Paint Tossing Pack from the zip file downloaded earlier. Let's start from the bottom of the shoe (the yellow area). The best option would be to find a paint effect with a simple horizontal-oriented shape. This one (which is part of the Paint Tossing Pack) is perfect for our needs: Open this texture in Photoshop and double-click on the default white Background layer to unlock it. Grab the Magic Wand Tool (W), select the white area by clicking on a white area in the canvas (which should automatically select all white areas), and hit Delete to remove the background. Drag the prepared shape into the main canvas. Activate the Free Transform command (Ctrl/Cmd + T) to rotate and resize the paint shape. Position it on the yellow sole of the shoe. Now we have to make the paint shape yellow; we will use two adjustment layers for this. With the paint shape layer as the active layer in the Layers Panel, choose Layer > New Adjustment Layer > Gradient Map. In order to affect only the paint (and not all the layers that are below the Gradient Map adjustment layer), create a clipping mask (Layer > Create Clipping Mask) on the adjustment layer. Set a color gradient going from a dark yellow (#e9c603) to a lighter one (#f3df71). The paint's color is still too light, so use a Curves adjustment layer (Layer > New Adjustment Layer > Curves) to darken it a little bit so that it matches the yellow color of the sole of the shoe. Finally, create a layer mask on the paint shape, grab a soft, black brush and then use the Brush Tool (B) to erase a small area on the right side of the paint shape so that it looks as if it belongs to the shoe. Other "toxic paint" effects are created using the same method, but applying different adjustment layers. For the white paint shape, I've applied a Black & White adjustment layer to desaturate the shape and a Gradient Map adjustment layer going from a light grey (#d7d7d7) to white (#ffffff) to color it. For the red paint, I've chosen a red paint shape from the Paint Tossing pack that's rotated horizontally with Free Transform. To darken its color, I've applied a Curves adjustment layer. For the grey paint, I've increased its brightness to 70 using a Brightness/Contrast adjustment layer (Layer > New Adjustment Layer > Brightness/Contrast). Secondly, I've added a Gradient Map adjustment layer going from a dark grey (#525252) to a lighter grey (#e6e6e6). Finally, for the last paint effect, I've applied the same adjustment layer used for the Bottom White Paint. Select the shoe layer and create a layer mask on it by clicking on the Add layer mask button at the bottom of the Layers Panel. Once the mask is created, you can use a black, soft brush for the Brush Tool (B) to erase parts of the shoe without losing any pixels (which is great if you want to modify your work, go back to its original state, or if you make a mistake - just delete the layer mask). This will create the illusion of the paints being continuously connected to the shoe. Create a new layer below the shoe layer; we will add a soft shadow effect for the shoe on this layer. The best way is to grab a soft, black brush and paint at the bottom of the shoe. Once you have painted the areas where the shadows are, decrease the layer's Opacity to reduce the shadow's prominence. Create more shadows, but don't just use a single layer to create shadows. I suggest creating different spots on different layers. In this way, you have more control, you can create depth, and you can tweak individual shadow layers to produce interesting outcomes. For example, you can reduce the Opacity of each layer at different values so that the shadow looks more realistic. The ad poster is almost complete. Colors interact in a way that I like. It's simple but vivid at the same time. It's also directed and focused, as a product ad design needs to be. Observing the current composition, I think there's nothing left to change. What we can do better, though, is increasing the poster's color contrasts. To do this, create a new Gradient Map adjustment layer on top of all the other layers. Set the gradient to go from black to white and then switch the adjustment layer's Blend Mode to Overlay. Finally, reduce the layer Opacity until you're satisfied with color contrasts in your composition, an Opacity value of 30%, seems to work well here. To style it up a bit, just add the Nike logo (or ANY logo you wish), in this case I downloaded the logo on a white background, placed it in the document, set the layer to Multiply, and we're done. Save & Open up this wood texture from Zen Textures in Photoshop. Go to Image>Image Size and change the width to 1200px and make sure the resolution is at 72 pixels/inch. This will give us the width that we want for our document. Using the Type Tool (T), create some white text that will roughly fit the width of the document (leaving some space on the edges). I am using ITC Franklin Gothic Heavy for my font, but anything bold should work. Using the Crop Tool (C) crop the top and bottom edges so they have a small margin around the text, about the same amount as the sides or a little more. Click on the eye icon to the left of the text layer to make the text disappear. Go to File>Save, and save it as a Photoshop file. We are going to be using this file later on in the tutorial. Make sure you have the background layer selected. We are going to duplicate the layer with Ctrl+J. Now go to Image>Adjustments>Threshold. Make your threshold level around 70. Go into Select>Color Range, and make sure your fuzziness is at 200. Now with the eyedropper click on a black part of the document and hit OK. A marquee around all the black areas should come up. We want to get the inverse of our selection, so to do that we are going to do Ctrl+Shift+I Now we can click on the text layer and click on Add Vector Mask. Click on the eye icon next to the text layer to bring it back (if it isn't already), and click on the eye icon next to the black and white wood layer to make it go away. If we zoom in we will notice that the masked out parts are too sharp to be believable, compared to the sharpness of the wood. To fix this we are going to go into Filter>Blur>Gaussian Blur. Change the blur to about 0.4px. Now we want to make the edges look a little more believable. First we need to make the mask and the layer just one regular layer, so right-click on the layer and click on Rasterize Layer. Now Right-click on the mask and click on Apply Layer Mask. Now go to Filter>Distort>Displace and change the horizontal and vertical scales both to 2, click OK. A file browser should come up. Open up the file we saved in the beginning of the tutorial. If you zoom in you'll notice the edges follow the lines on the wood background. Drop the opacity of the text down to 80% to give the white part a subtle groove that the wood has. Now we are going to add some lighting effects to our document to make it look a little more interesting. First off, lets create a new layer (Ctrl+Shift+N) and move it above the text layer. Click on the Elliptical Marquee Tool (M) and change the feather to 75px. Now click and drag a circle around the text. We are going to get the inverse selection (Ctrl+Shift+I) of Create another new layer (Ctrl+Shift+N), above the text Change the blend mode to Soft Light and the opacity to 50%. Finally we are going to give our document an overall orange glow. Make sure your foreground is the orange that we used in the previous step and the background is black. Now go into "Create new or fill adjustment layer" (this middle icon at the bottom of the layers palette) and click on Gradient Map. The foreground and background colors should make a black to orange gradient for us. Make sure you click on reverse and click ok. Drop the opacity down to 20% and change the blend mode to Overlay. In today's quick tip tutorial we will demonstrate how to create a leather texture from scratch using a few filters in the right combination.
Create a new file with a white background. Set the foreground and background color to black and white by pressing D. Click Filter > Texture > Stained Glass. Create new layer and fill it with white. Change its opacity to 50%. Repeat previous filter by pressing Cmd + F. If you want tweak the setting use Cmd + Alt + F. Press Cmd + E to merge both layers. Click Filter > Noise > Add Noise. Press Cmd + A then Cmd + C to copy all to clipboard. Open Channels panel and create new channel. Then Paste (Cmd + V). Click RGB channel to return to Background layer. Click Edit > Fill, choose Use: Color and pick your color. You can use any color you want, just make sure it's dark enough for the next filter. Click Filter > Render > Light Effects. In Texture Channel choose Alpha 1. The default light is too dark. You need to add more light sources by dragging the lamp icon to the preview box. Set its type to Omni. Click OK and the result should look something like below. Change the background and foreground color to white and black by pressing D then X. Activate the Gradient Tool, choose radial with white to transparent. Create a new layer and draw a gradient. Change opacity to 4%. This will add subtle lighting to the leather. The Lighting Effects filter will add a small border to the image (just a few pixels). To remove it, click Image > Canvas Size and reduce the size of the image. You can change the color by adding an adjustment layer Hue/Saturation. Check colorize and move sliders until you satisfied with the result. That's it. I hope you like the final result and have learned some new techniques from this short quick tip tutorial.
Too many points of interest in one section of your
Here's an example of a "busy" picture. The skateboarder is hard to look This shot is very simple. You can see the skateboarder and the Point Of View Leadroom Noseroom
If your subject is in motion, give them plenty of space within the frame to move into. Leading Lines Diagonals Tangents The fence post directly behind the skateboarder is distracting in this Balance Natural Frames Contrast Depth Of Field You might notice that you've As with the article last week regarding why Everything Is Not a Hero's Journey, there also exists a certain group of people that seem to think many popular Protagonists are really just carbon-copies of one another. To them, every central character in a story is simply another evolution of Gilgamesh. Now, to a certain extent, they are right. Luke is more than just a Protagonist. Both Neo (Keanu Reeves) in The Matrix and Luke Skywalker (Mark Hamil) in Star Wars fulfill the role of the classic Protagonist; that is, they are the ones who are pursuing the successful resolution of the story's primary goal. In this purely objective context they do resemble each other. But where their similarity breaks down is in the deeper investigation of what is really going on inside of them personally. Many central characters find themselves faced against apparently insurmountable odds. Many grow to a point where they fundamentally have to change the way they see the world (though this is not always the case). And many find emotional relief from their personal issues at the end of a story ��� many reach a catharsis where they overcome that which held them back. When using the above as touch points for examining a story, sure, it looks like every Protagonist is the same. Both Neo (Keanu Reeves) in The Matrix and Luke Skywalker in Star Wars easily fit into these generalized observations regarding story. But that's just it ��� they lack specificity. Not only are these concepts of story useless to a writer in figuring out exactly what to do with their story, they also prove to be ultimately detrimental because of their blatant inaccuracies. Constructing a story ��� a meaningful story ��� is a hard and demanding process. There can be no room for best guesses or gross generalities. Both The Matrix and Star Wars, while similar at face value, really are quite different. One concerned itself with faith, the other with trust. Every Main Character comes to a story ripe with personal baggage. Whether it be some deep psychological issue from when they were a child, or something that just happened to them yesterday, this personal issue ��� or problem ��� is what motivates them to participate in the larger entity that is a story. Mr. Andersen has a hard time believing. In The Matrix, Thomas Andersen (Neo) suffers from a preponderance of disbelief, both in himself and in the world around him. When asked by Morpehus to climb out on the ledge in order to escape Agent Smith, Thomas doesn't get very far before turning around. "I can't do this, " he claims as he cowers back inside. It is this idea that he is so unpersuadable, both inside and outside of the Matrix, that sits at the heart of Neo's personal struggle. In Star Wars, Luke Skywalker consistently gets into trouble because of his relentless need to test himself. When R2 goes missing, he leaps at the chance to prove his mettle and promptly gets his ass handed to him by the local natives. This flaw haunts him at every turn. In earlier drafts, there was even a sci-fi take on the classic 50's drag race, complete with the requisite scene of Luke pushing his dragster beyond the limits of safety in order to test his abilities against his fellow desert delinquents. This drive to test himself at every turn was Luke's major personal problem. Luke, on the other hand, never had a problem with believing. Clearly these two characters are coming from two different places. Luke never had a problem believing in the Force; he was on-board with the whole thing from the moment he lost his aunt and uncle. Likewise, Neo didn't create problems because he felt this need to test himself all the time; if left to his own devices he probably would have still been there camped out in front of his computer screen. They both were motivated by two distinct and separate problems. Why does this matter? Different problems require different solutions. You wouldn't use masking-tape to hold together soap bubbles anymore than you would use a hammer to make a sandwich. Each problem defines its own appropriate solution and nothing less will than that one particular solution will resolve it. Disbelief requires faith as a solution. Test requires trust. Thomas Andersen eventually grows to a point where he can begin believing that he is, indeed, Neo. Faith resolves his issues. Luke eventually grows to a point where he is willing to let go. Trusting in the Force resolves his issues. Both characters managed to resolve their individual problems by using the correct solution for the issues that plagued them. Now, at first glance, faith may seem an awful lot like trust. Couldn't you argue that Neo was really trusting Morpheus when he decides not to run from Agent Smith? And couldn't you say that Luke started believing in the Force when he turned off his targeting computer? Not really. Neo would not be the superhero he was at the end of the first film if he simply trusted in Morpheus. There was no way he was going to be able to stop those bullets until he truly believed that he could. Similarly, we already established that Luke believed in the Force ��� he even had an argument with Han about it back when he was first training on the Milennium Falcon. Luke needed to simply trust in this otherworldly "force" for the torpedoes to hit their mark. Why then is it so important to delineate the exact nature of the problem in a story? Reliance on this is why Star Wars needed Luke. The Main Character's problem represents the finest level of granularity from which one can appreciate the true meaning of a story. That's why an exploration of it can so often seem like splitting hairs. It is important though to make this distinction, because there is so much more that is built on top of the problem, so much more that relies on the accurate understanding of it, that to get it wrong would only cause greater problems in the story at large. The Main Character's problem is intimately tied to the problems suffered by all the characters in a story. It's why this particular Main Character is even in the story in the first place; and it is the answer to the question Why now? so often referred to in story meetings. If for some reason these two problems are at odds (the external and internal), the Main Character may seem out of place, or worse, inconsequential to the resolution of the story. In addition, there will be a discrepancy between the kinds of goals in stories with dissimilar problems. Problems of belief will naturally lead to goals focused on accomplishing some insurmountable task. Problems of trust organically lend themselves to goals more focused on simply doing something. Like the distinction between faith and trust, the distinction between acquiring something and doing something is a very important one. This is why Luke would not have fit into the story that was The Matrix, and why Neo would have had a hard time finding a home amongst the inhabitants of Star Wars. Each particular story goal required a different central character, a different vessel for the meaning of the story. Taking control of the Matrix was the Goal of the story. The goal of The Matrix was to gain control over the software program, to bend it to the will of the humans. Simply fighting Agent Smith and his well-dressed friends was not enough (as evidenced by Morpheus' years of trying). Neo was the lynch-pin for the successful achievement of that goal because the one thing that would allow them to gain that control ��� unwavering belief ��� was an important factor of Neo's character development. Luke, as described above, had no problem with believing. Trying to replace Neo with Luke would have broken the logic of the story structure and diminished any appreciable meaning. In Star Wars there was no attempt to gain control over the Empire or the tyrannical systems they employed. Instead, there was only the will to find a competent way to fight them. That was the goal of the story. And like Neo, Luke was the key to the successful achievement of that story goal because learning to trust was a crucial part of his individual character development. The only way for the Rebels to successfully fight against the Empire was to trust in something other than themselves. Neo trusted Morpheus from the very first IM he received. To swap him for Luke would have destroyed that story's meaning and shortened the film to about thirteen minutes. These two characters are simply not interchangeable. Not every story is the same. There are tens of thousands of different meaningful story structures, each with its own unique perspective on why things are the way they are. And because each unique story structure requires a specific kind of central character, it follows that there are just as many variations of Main Character. The Matrix was trying to prove how having more faith can lead to greater happiness, while Star Wars was trying to prove that trusting in something other than yourself is the way to go. While looking at them through the lens of the Hero's Journey they might seem the same, the truth is that they carry two very distinct and separate messages. This is yet another reason why the Hero's Journey is a failed device for appreciating the meaning of a story. By definition, everything in a meaningful story is connected. Character flows through plot which flows through theme and finally closes the circle through genre. The machine that is a well-told story is a delicate balance of passionate storytelling and solid logical story-structure. To be inaccurate on even the smallest of matters is to invite failure in the construction of the story at large and a breakdown in the communication of the message the Author hopes to send. Let's revisit one of Christopher Nolan's lesser-known (though not lesser films) The Prestige. Telling the story of two magicians fighting for fame and fortune in the Victorian Era, this 2006 thriller delivers concrete emotional wallop amongst the dark suspense and surprise that is common with Nolan's work. Much of his success can be attributed to the sound story structure he diligently applies to every film. Story structure that, like Inception, gives greater meaning to the events that unfold. One of the precepts for a meaningful story centers around the idea that when looking at the two principal characters one will transformationally change, while the other will remain steadfast. While this may seem to run counter to the widely accepted notion that a character must change in order to arc, it actually speaks of a more accurate understanding of What Character Arc Really Means. Two approaches are presented towards solving the story's major problem, one appropriate, the other not so much. Which one is which is entirely up to the Author and the message they wish to communicate with their audience. When both characters change there is nothing said, no greater purpose to the events on-screen, and therefore, no reason to remember the film some twenty-five minutes later when one pulls out of parking. To a writer, change should be evaluated by comparing the character's final resolve at the end of the story with who the character was at the beginning. If their character ��� if the way they look at and see the world ��� has somehow become drastically different from where they started, then yes they have had a transformation of character. If on the other hand, they simply grew into a viewpoint they only somewhat believed in at the beginning, then they have actually held steadfast to their worldview. They haven't changed, they have simply grown. One can grow without changing who they are and how they see the world. At first glance it may seem that both principal characters change in The Prestige. Robert Angier (Huge Jackman) changes from a magician unwilling to get his hands dirty (as evidenced by his reticence to kill even the smallest of birds) to a man willing to kill himself over and over again for the roar of the crowd. On the other side of the street, Alfred Borden (Christian Bale) transforms from a man willing to do whatever it takes to keep his magic a secret (as evidenced by the prompt removal of two perfectly good digits) to a man willing to admit the truth of his situation regardless of who he may hurt. So how can both be considered Change characters if in doing so, the story would be considered broken? Ignoring this paradox for a moment, the similarities between the two ��� the "You and I" connection, become as equally important in the investigation of this story's structure. Both magicians are driven by that desire for "the Prestige." If the film had been written by an lesser artist, there might have even been an on-the-nose conversation where Angier calls Borden out: ANGIER You know ...you and I ...we're not that all that different. BORDEN And how's that? ANGIER We both would do anything for the sound of their applause. Ugh. As it stands, we do get something close to that in the final reveal scene, but admittedly with more artistry and professsionalism than the ham-handed example above. Regardless, both characters are driven by that desire for recognition, but only one of them truly lets it go at the end. To determine who, it becomes necessary to separate out the individual storylines. It is Angier's desire for adulation that truly defines him. The Main Character's Throughline, while woven into the thematics and plot events of the larger main story, maintains its own concerns and thematic issues. In fact, these dramatic concepts are so unique to this character that he or she would take them with them no matter what story they went into. If Luke had never run into R2 and instead was involved in a story about drag-racing across the dunes of Tatooine (Taladega Wars), he would still have found time to whine about how he was stuck on a planet where his spaceship fantasies could never become a reality. Likewise, if William Munny had never heard of Big Whisky, and instead was involved in the great Oklahoma Land Rush with Tom and Nicole (Far and Unforgiven), he would still have had those issues with maintaining his wife's attitude that he "ain't a bad man any more." If someone were to try and claim one of his stakes, why...well let's just say that Little Bill probably got off easy. Thus, in order to truly understand what is most personal to the Main Character of a story, it becomes necessary to filter out all those elements that really are a part of the larger main story. This is even more important in a film like The Prestige where the Main Character is also the Protagonist not always the case. Far too many times what people think of as a personal moment from the Main Character point-of-view actually turns out to be a choice or action taken from their point-of-view as the primary driver of the main story. If one were to overlook all of Angier's actions as Protagonist (and his goal of trying to understand how Borden does the Transported Man trick), his most personal issues deal with his desire to be the very best, his obsession with the adulation of the audience, and of making them forget their ordinary lives ��� if even for a second or two. These are the kinds of issues he would take with him into any story as they are the problems central to his very nature. They coalesce nicely with the rest of the story, but they can be seen as separate and individual and most importantly, personal to him. Scenes where we the audience see the Main Character alone are often chock-full of these sort of personal thematic issues. In The Prestige we get such a moment during Angier's first performance of his own Transported Man trick. Having successfully swapped places with his alcoholic look-alike, Robert takes his triumphant bow from below the stage ��� out of sight of the adoring audience but thankfully within earshot. His desire for that love, regardless of how he has to get it, speaks volumes about his character. Another often-used device in communicating this personal throughline is to have another character in the story point out plainly and clearly what the Main Character's real problem is. This is not the same as the Impact Character, who by their very existence in the story forces the Main Character to deal with their personal issues, but rather a character who simply comes out and says, "Hey, you know what your problem is?" David Bowie's Tesla fills this role when he warns Angier of proceeding: TESLA I can make your machine, Mr. Angier. But I can also give you some advice... (pointed) Go home. Forget this thing. I can recognize an obsession. As Mr. Alley could tell you, I myself am given to one now and then. It will not do you any good. ANGIER Have your obsessions done you no good? TESLA At first. But I've followed them too long ��� I am their slave. Their whipping boy. And one day they may choose to destroy me. Angier looks into Tesla's eyes. ANGIER If you understand an obsession then you know you won't change my mind. And thus we have a perfect example of a Main Character moment. With these issues at the core of what Angier is personally struggling with it becomes obvious that he grew INTO his resolve, not out of it. His desire began as a small kernel of motivation, but eventually grew into something that consumed him, resulting in his eventual destruction. This was, of course, the meaning behind the whole piece. Angier, therefore, was a Steadfast Main Character. Not ready to get his hands dirty...yet. Resolve, which is what we are concerned with when determining whether a character ultimately changes or stays true to their nature, sits apart from the actual character's growth. Their growth is how they get there, how they end up at that moment of crisis, faced with that choice that will set in stone their resolve. Main Characters can waffle back and forth through the story (and probably should for the sake of interest), but it is that final culminating moment that ultimately defines them. Have they grown to a point where they are ready to let it all go and see the world anew? Or have they determined for themselves that yes, the way they have been going about this is truly the way to go. Angier's need to "get his hands dirty" was something he had to grow into, but was always something he had the potential for. Only then could the audience begin to love him the way he wanted them to. He had moments of doubt, moments when he considered changing, but in the end, in the end he stuck with that desire for fame. Borden, on the other hand, completely transforms his worldview. The key scene for this happens when his wife asks the twin brother (the one more interested in Johanssen) whether or not he really loves her. Since the moment he met her, Borden has been driven to keep up the perception that both he and his brother were one and the same. How else could he successfully pull off the trick of the century without this elaborate deception? The only problem is that this success came with a price ��� the emotional torture of his innocent wife. Eventually, and in no small part to his interactions with Angier, Borden comes to a place where he just can't keep it up any longer and reveals to her the truth: INT. LIVING ROOM, BORDEN"S HOUSE ��� CONTINUOUS Sarah turns to face Borden. Desperate. SARAH I can't live like this! BORDEN (angry) What do you want from me! Sarah pauses. Catches her breath. SARAH (quiet) I want you to be honest with me. No tricks, no lies, no secrets. Borden calms. Looks into her eyes. Nods. SARAH (CONT'D) Do you love me? Borden looks into her eyes. Sincere. BORDEN Not today. Sarah takes this in. Borden watches, helpless. SARAH (whispers) Thank you. Borden watches her turn away from him. Borden changes to someone no longer driven by illusion. Reality has taken over as his new approach to solving problems and one can imagine that, moving forward, Borden and his brother might choose a different line of work. Unfortunately, in undergoing this transformation of character, Borden breaks Sarah's heart, revealing to her that all along the trick was more important than their relationship. Motivated by this new revelation, his wife feels as if she has no other alternative than to take her own life. In sharp contrast, there is no way Angier would give up that stage for anything or anybody. Separating out the throughlines, determining the difference between a character's resolve and their personal growth, clarifying which principal character transforms and which maintains their point-of-view ��� all of these are tools a writer can use to insure that their story stays consistent and meaningful throughout. When writing a story as complex and non-linear as The Prestige, understanding precisely what is going with the characters that populate it can go a long way towards making sure the audience does not leave befuddled or overcome with unanswered questions. Those who prefer to leave such concepts left to chance, or to the whims of their individual muse, aren't really looking close enough because really...they don't want to know. They want to be fooled. Every problem has its own genesis, a moment at which the balance is tipped and the previous sense of oneness is lost. With separation comes the awareness of an inequity, and a desire to return back to a state of parity. Every problem has a solution, and a story explores that process of trying to attain resolution. In a story, this Opening Event ��� or beginning of a story ��� is commonly referred to as the Inciting Incident. The Inciting Incident (or "exciting incident" as someone once referred to it) is the event or decision that begins a story's problem. Everything up and until that moment is Backstory; everything after is "the story." Before this moment there is an equilibrium, a relative peace that the characters in a story have grown accustomed to. This incisive moment, or plot point occurs and upsets the balance of things. Suddenly there is a problem to be solved. Stories are about solving problems. Sometimes they are solved, as is the case with Star Wars, Casablanca or Inception. Other times, as with stories like Hamlet, Amadeus or Se7en, they aren't. Regardless of outcome, this Inciting Incident gets the ball rolling by introducing an inequity into the lives of the characters that inhabit the story. The Protagonist seeks the solution, the Antagonist seeks to prevent it. Every story works this way. The two central objective characters, Protagonist and Antagonist, battle it out until approximately one-quarter of a way into a story, some other event or decision occurs that spins the story into a brand new direction. This second plot point is referred to as the First Act Turn as it turns the story from the First Act into the Second. This is a further development of the problem, not the beginning of a problem. Other plot points ��� the Mid-Point and Second Act Turn ��� continue to escalate the issues surrounding the efforts to resolve the problem until finally, the Concluding Event, or Final Plot Point, ends the story. As mentioned above, this does not necessarily mean the problem has been solved. It simply means that the efforts that were undertaken by the Protagonist have come to their natural end as every resource has been exhausted. These plot points naturally split a story into four parts. For fans of Aristotle, the first part is the Beginning, the second two are the Middle and the third is the Ending. There is a meaningful reason why there are four parts. In short, for every problem there are four basic contexts from which you can explore the way to solve a problem. Once you have explored all four contexts, the story is over. Any continuation would simply be a rehash of something that has already been investigated. The most important thing to take away from all of this is that the First Act Turn is NOT the Inciting Incident. This is a common mistake by many first time writers, and is generally caused by a lack of understanding exactly why these plot points exist in the first place. One plot point starts the problems, the other furthers the complications of said problem. The following is a list of great stories with their corresponding Inciting Incidents and First Act Turning Points. The numbers provided are either based on page numbers, Kindle percentages or minutes depending on what source material was easily accessible. For those who don't know, the general idea is that one page of a screenplay generally lines up with one minute of screen time. A 120 page screenplay often lasts two hours on screen. or 120 minutes. Thus, the Inciting Incident would occur on or near page 0, while the First Act Turn would happen somewhere near page 30 (out of 120). If we're talking percentages, that would be about one-quarter of the way into a story. The Inciting Incident of Star Wars is Darth Vader's attack on Princess Leia's ship (1/120). While there was a civil war going on prior to this event, it isn't until the Empire shows its true colors by illegally boarding a ship purported to be on a "diplomatic mission" that the real problems of the story begin. The Empire has grown ruthless in its efforts to contain any rebellion, this inciting event is only the beginning of many more to come. The First Act Turn begins with the Empire's sinister agents attack on peaceful Jawas and ends with their barbeque of Uncle Owen and Aunt Beru (30-31/120). Suddenly, what began as a simple conflict over jurisdiction has now turned into an all-out rampage that affects even the most remote and more importantly, innocent, members of the galaxy. The problem has grown in its potential for even greater conflict. The Inciting Incident of The Matrix is Morpheus' decision that Mr. Andersen is the One they have been looking for (2/130). This one decision drives the entire rest of the story, for if he hadn't picked Tom the rest of the world would have stayed comfortably numb in their battery pods. Without the Inciting Incident, there would be no story. The First Act Turn begins with Neo's decision to come in off the ledge (21/130). It isn't until this true sign of character that Morpheus is forced into taking even greater strides to break poor Mr. Andersen out of the Matrix. These deliberations by Neo ��� continuing with his "giving the finger" scene, choosing whether or not to stay in the car, and culminating with his decision to take the red pill ��� all create resistance to Morpheus' initial selection. It isn't until Neo finally decides that he is the One (121/130) that the problems in the story come to a successful resolution. The Inciting Incident of Unforgiven is Little Bill's leniency towards Quick Mike (5/120). Little Bill is known for dealing with criminals in his own special way, why the sudden change of heart? His refusal to respond in kind creates a rift within the story at large, and forces the whores to seek out their own justice. The first Act Turning Point only makes matters worse with the arrival of English Bob and his refusal to surrender his sidearms to "proper authority"(33/120). The Inciting Incident of The Sixth Sense is Vincent's attack on Malcom (8/109). Without this gunshot, there would be no story and no compulsion for Malcom to meet with Cole. The First Act Turning Point comes with Cole's revelation that he might suffer from the same violent tendencies that Vincent did. His steps back and his conclusion that Malcom can't help him only furthers the problems caused by the perception that Cole is merely a "disturbed" child (22/109). The Inciting Incident of Casablanca is Ugarte's decision to give Rick the letters of transit (15/127). While the murder of the two couriers seems to get things rolling, problems don't really start until Ugarte decides to give them to Rick. After all, people get murdered in Casablanca all the time. But give them to someone whose allegiances are in question? Now we've got a problem. These papers and the efforts to retrieve become the major source of conflict for everyone involved in the story. This is why Rick's deliberations over what to do with them, including his refusal to help out Ugarte ("I stick my neck out for nobody"), propel the First Act into the Second (30-45/127). With Rick in charge of who gets them and when, Laszlo's mission becomes that much more difficult. The Inciting Incident of The Lives of Others is Minister's Hempf's decision to have Georg Dreyman "watched." (10/135). Without this bigwig's desire for Dreyman's girlfriend, Wiesler would have continued his life as he always had, and quite possibly would never have crossed paths with this writer and his friends. Like Casablanca, the First Act Turn comes more as a wave than an actual singular event. This time it is Dreyman's best friend, the director Albert Jerska, and his constant ruminations over the purpose of his life that progressively complicate a simple spy operation into something far more reaching and grander in scope. Jerska's dark contemplations of suicide inspire Dreyman to write and give reason for Wiesler to better understand the kind of struggles and torment these artists go through as a result of the state's actions. And finally, the Inciting Incident of The Incredibles occurs with the overwhelming flood of lawsuits stemming from Mr. Incredible's loss in court against Oliver Sansweet, the man he rescued from suicide (14/127). This rush to sue forces the Supers into hiding, promising "to never again resume hero work." These previously costumed guys (and girls) now can't be who they want to be, and thus yet another story inequity has been created. If it had just been Sansweet, then perhaps things would have simmered down. The flood of lawsuits tipped the scales. Problems escalate when Bob and Frozone almost get caught during the fire in the apartment building sequence (32/127). Before, Bob had found a way to deal with the initial problem by moonlighting with his best friend. This event, and their near apprehension by local authorities, forces Frozone to decide that this night was the last one. What was once a manageable problem has now become an even bigger one, and eventually provides the motivation for Bob to accept the mysterious invitation from Mirage. Plot points drive a story towards the resolution of its problem. Even Bill understood the connection between the first two plot points. But what about other forms of narrative fiction? Surely this is just a "formula" for Hollywood-wannabes to follow... Story is story regardless of the delivery device. The Inciting Incident of Shakespeare's Hamlet is the death of Hamlet's father. As with The Matrix, where the actual inciting event happens "off-screen", the story immediately opens up with the characters plagued by the problem's effects: Quick tranlsation: Hamlet has been thrown into great despair because of his mother's impulsive move to quickly marry his father's brother, Claudius (10%). The fact that she couldn't even wait a month drives Hamlet mad, thus creating a problem in Elsinore that calls for some sort of resolution. This problem grows in importance when the Ghost of Hamlet's father informs his son of what really happened: No longer an inequity that must be suffered, the death of Hamlet's father now becomes something that must be avenged (20%). The dramatic energy produced by the news of his father's passing has waned to the point where something new must come along and drive the story further towards its inevitable conclusion. This revelation of a "murder most foul" is that event, and can be considered the First Act Turning Point of the play. Determining the events or decisions that escalate a story's problem should be Job One for the working dramatist. It is one thing to create an opening scene that wrecks havoc on the characters in the film and forces them to deal with this new problem, quite another to ensure that the inequity persists until the closing curtain. Eventually, as with Hamlet, the potential for dramatic conflict will decline throughout the course of an Act. It is the same drop in potential that one feels as the pain from a pinch or slap in the face subsides over time. In order for the problem of a story to continue to drive the characters towards an eventual solution, a new potential must be introduced. These new dramatic forces, escalating the problem beyond that initial blast, drive the story forward in such a way that the characters themselves could never return to who they were or what they did during that first initial response. There can be no turning back. Act turns exist to re-energize the potential of a story's problem, not to satisfy page-counting readers or paradigm-happy script gurus. Connecting the two first plot points to this problem, and making sure that they aren't simply the same event, will give an audience something to engage in and something to become invested in. The fact of the matter is that no audience member can resist the draw of the problem solving process as it unfolds on the big screen; it's human nature to see what greater meaning can be gained from how the resolution plays out.
Project #11
Photoshop: Product Ad Design
Resources
Step 1: Preparing the Product
Step 2: Create a New Photoshop Document and Place the Subject
Step 3: Add the Background Texture
Step 4: Enhance the Background Texture
Step 5: Create the Floor

Step 6: Create a Light Effect Behind the Shoe
Step 7: Create a "Toxic Paint" Effect

Prepare the Yellow Paint Shape


Bottom White Paint

Red Paint

Grey Paint

Top White Paint
Step 8: Refine and Enhance the Shoe with a Layer Mask

Step 9: Add Shadows on the Shoe

Step 10: Perform Final Refinements
That's it!
Story Structure #7
Your Main Character's Most Personal Issue
To get a different perspective on what is really going on in your story you need to view your story (the script, the storyboard) and impartial and unbiased, this can be difficult to do, the more involved you are in the development of the story, both how it is written and how it is visually displayed, the more difficult this can be. You should not change how these main concepts of storytelling work, just the way you approach them. In doing so, you'll find different questions to ask yourself about your story itself.
The Main Character's Throughline is the one spot where you can get a broad overview of what is really bothering the main character. While the further down the chart you delve the more precise you can be about your writing, you also risk confusion as the differences between things gets smaller and smaller. Better to stay at the top until you really feel confident with the kind of issue your Main Character is dealing with.
Think of your Main Character's most personal issue - that issue that they would take with them into any story, regardless of what happens around them. Got it? OK, now ask yourself these questions:
* If her situation improved, would she be happier?
* If her mindset improved, would she be happier?
* If the way she engaged in activities improved, would she be happier?
* If the way she thought about things improved, would she be happier?
All of these may pertain to your Main Character, but only one of them will feel really right.
Perhaps she's an underpaid factory worker who thinks only the rich can get richer. If she was paid a decent rage would she be better off? Not really, because it wasn't her situation that was holding her back, it was her defeatist attitude that class dictates providence.
Or maybe she's a struggling pianist stricken with such an awful fingering technique that she spends most of her days trying to bury her love for classical music. Wouldn't she be happier if she just realized things are what they are and instead embraced her passion for Bach? No, she'd continue to be miserable with every missed key. On the other hand, with a little extra time spent practicing her scales, she might find herself loving the classics even more.
Asking yourself these questions will help you nail down the source of your Main Character's issue. With that information in hand, you can then spend time writing scenes that develop on that issue and either have your Main Character work through resolving it or leaving it to fester. Either way, you'll have the confidence knowing where your Main Character is coming from to write effectively and consistently.
Story Structure #8
The Impact Character
The Second Most Important Character in a Film
Everyone agrees that the Main Character is the most important character in a film. Why? Because through this person, an audience experiences first-hand the emotions and consequences of the narrative surrounding them. But there is another, less understood character that is primarily responsible for influencing growth in the Main Character. This character is known as the Impact Character.
When the Impact Character is steadfast, then he will make his arguments to the Main Character in reference to his own drive. He will treat his own drive as if the same things should be driving all others as well.
This often pops up in conventional arguments where the Impact Character says to the Main Character, "you know, we are just like, you and I," (if the IC is steadfast) or "we are nothing alike," (if the IC changes)."
Is that true? Is it really that black and white? "We're alike" if the Main Character changes and "We're nothing alike" if the Impact Character changes. Is it really that easy?
Overall, we should understand that this is a generality and therefore shouldn't be taken as a strict rule of dramatic narrative, but it started me thinking. How did this generality hold up under further scrutiny? And more importantly, could it help me with my own work?
I took six Impact Characters, three who Change and three who Remain Steadfast, and applied the above concept.
Change Impact Characters.
Score one for Marshall Samuel Gerard. Chasing Richard Kimble (Harrison Ford) in and around Chicago I could hear Tommy Lee Jones uttering "We are nothing alike Richard." Gerard is not the type to suggest that he and a fugitive wanted for murdering his wife are anything alike. It would be quite strange to hear him say so.
Robert the Bruce (Angus MacFayden)...hmmm. "We are nothing alike, William Wallace (Mel Gibson)." Perhaps deep down inside his shameful self might feel that, but I don't recall him ever saying it aloud. Instead the voice of disparity comes from Robert's father, the Leper. Robert wishes to join Wallace but his father reminds him that Robert is a noblemen, not some commoner like Wallace. "Uncompromising men are easy to admire ...But it is exactly the ability to compromise that makes a man noble." As his father puts it, Robert and Wallace are nothing alike.
In October Sky - Coal-mining father John Hickam (Chris Cooper) certainly doesn't feel like he and his son Homer (Jake Gyllenhaal) have anything in common. John considers himself more of a practical man while Homer has head (and his rockets) in the clouds. Again I believe he even has a conversation with his wife about how he and his son are nothing alike.
Steadfast Impact Characters.
And now we move on to Lester Burnham (Kevin Spacey) and his own "personal hero," Ricky Fitts (Wes Bentley). When Ricky's boss threatens to fire him for not working, Ricky tells him, "Fine, don't pay me. I quit. Now leave me alone." Words Lester wishes he could say to his own boss. Ricky doesn't come out and say "You and I are alike," but he might as well have.
What about the obviously named Cole Sear (Haley Joel Osment) and his relationship with the troubled child psychologist Malcom Crowe (Bruce Willis)? In the classic hospital scene, Cole asks "Tell me why you're sad." At first Malcom refuses, but soon realizes that Cole is just as sad as he is; perhaps opening up could help the young boy out. Again, the words aren't said but the intention is there.
And what about Andy Dufresne (Tim Robbins in Shawshank Redemption)? Before he tells Red (Morgan Freeman) about Zihuatanejo he talks about the whirlwind tornado that fate dealt him. "I just didn't expect the storm would last as long as it has." We cut to Red, his head hung low. And although we can't read the expression on his face, we know for certain that Red feels the same. Personally I like it much better when you can do the "You and I are alike" line without actually having to say it - part of the reason why I chose these examples.
So does the rule work?
It seems like it does. I mean, you can't imagine Ricky telling Lester "We're nothing alike" or John Hickam telling his dreamer son "You and I have so much in common. Let's sit down and talk about our dreams." Still, it's probably not a good idea to rely on it all the time, but I do think there's a real world reason for why the rule works so well.
The character who has the most to lose (or gain depending on how you look at the Change) is more often than not the one who will resist any notion of similarity between the other.
When someone tells you, "You know, you're acting just like so-and-so" and you react with disgust or disbelief, chances are that so-and-so is your own personal Impact Character. We hate seeing a part of us that we don't quite understand or even want to accept.
This resistance is a resistance to Change and depending on which side of the argument you stand, you're either going to be a proponent for it or you're going to speak out against it. That's one of the main reasons why the Impact Character exists: to provide that other side of the argument. So it's comforting to know that with a few simple words ("We're both alike" or "We're nothing alike") you can easily tell which side of the argument this second most important character stands on.
Story Structure #9
When the Main Character is Not the Protagonist
One of the most important things you can do to better understand story is to separate the Main Character's storyline from the overall storyline. It's a difficult concept to grasp at first, but once fully understood, helps to create endless possibilities of great storytelling.
So why make a distinction between the two?
When you blend the two together you can cause all kinds of blind spots during the writing process. It's the reason why so many people confuse the Main Character with the Protagonist and assume that both are the same. It's the reason why so many story theorists ascribe to the Hero's Journey mythology made famous by Joseph Campbell. And it's also the reason why some unsuccessful stories can have too many Main Characters. Writers that suffer from the latter haven't taken the time to identify the one personal viewpoint on the story's central problem; they're essentially grasping at story-straws for something that they know they need, but can't quite exactly figure out what.
Separating Hero, Protagonist, and Main Character...
A Main Character is the player through whom the audience experiences the story first hand.
A Protagonist is the prime mover of the plot.
A Hero is a combination of both Main Character and Protagonist.
In other words, a hero is a blended character who does two jobs: move the plot forward and serve as a surrogate for the audience. When we consider all the characters other than a Protagonist who might serve as the audience's position in a story, suddenly the concept of a hero becomes severely limited. It is not wrong, just limited.
So the Main Character is the central character in the Main Character Throughline while the Protagonist is the central character in the Overall Story Throughline. They can, and often are, the same character but they don't necessarily have to be. In fact, there are many stories that don't follow this pattern. To Kill A Mockingbird is the example used in the theory book. Attitcus (Gregory Peck) is the Protagonist in the larger overall storyline surrounding the trial of Tom Robinson. Scout (Mary Badham) is the Main Character in the very personal storyline examining her prejudices towards "Boo" Radley. Both examine prejudice; the former from a more cold, logical perspective, the latter from a more heartfelt, emotional perspective.
More recently I learned that the William H. Macy Las Vegas casino film The Cooler also doesn't follow this usual pattern.
The Cooler - BernieIn that film, Bernie Lootz (William H. Macy) fulfills the role of the Main Character. As the Shangri-La's resident "cooler," Bernie is a man who can manipulate others through his mood; his very presence can turn a hot craps table into, well, crap. This psychological effect is something that Bernie would take with him into any other story and thus becomes his greatest personal problem. It just so happens that this problem works great in a story about Las Vegas casinos.
The overall story in that film examines the conflict between Old Vegas and New Vegas. The young upstart Larry Sokolov (Ron Livingston) wants to transform the rundown Shangri-La into a major competitor for the newer casinos on the strip like the Bellagio or the Wynn. Standing in his way is Shelly Kaplow (Alec Baldwin), the current manager of the Shangri-La. Shelly represents the old way of doing things and resents any attempts to "Disney-fy" his casino.
The Cooler - The Cast
So where does Bernie fit into this story and why is he not the Protagonist?
Tips for Identifying the Main Character
There are two techniques I've learned that can be very effective for pulling the Main Character's storyline out of the Overall Storyline. Either one may help you in writing your own story:
* 1. Take the Main Character out of the current story and put him or her in a completely different one. What personal problems would carry over into this new story?
* 2. When writing the Overall Storyline forget your character's names and only refer to them in terms of their roles. In doing this, you'll naturally assume an impersonal objective view of your characters, making it easier to identify how they fit into the Overall Storyline.
Instead of writing Bernie into a story about casinos, what about making him the central character in a story about hiking Mount Everest or pretending to be a secret agent? What would be some of the issues he would take with him into that new story? If he was hiking as part of a larger expedition his mood might make it difficult for others to make it the top of the mountain; some might even quit. In a secret agent story, his mood might be so powerful that his very presence would make some villains reconsider their efforts towards global domination.
The second technique becomes helpful when analyzing films like The Cooler. At first glance it may seem that Bernie is the Protagonist. After all, he is the one we care the most about and his goal of leaving Las Vegas does way heavily throughout the story. But when we look at Bernie in terms of his role as the "cooler," we can see that he has little more than an ancillary effect on the main plot of what to do with the Shangri-La. He is not a prime mover of that plot - the casino manager (Shelly) and the young upstart (Larry) are.
The Cooler - Protagonist and Antagonist Face Off
The question then becomes which one is the Protagonist and which one is the Antagonist���something that would probably be better answered in a separate article. For now, it is enough to say that Shelly is the Protagonist while Larry is the Antagonist. Bernie exists in the story and interacts with both, but he is not a prime mover of the plot. While Shelly and Larry do the bulk-work of the plot in the story, it is Bernie who is our "in" into the story itself; he's the one we identify most personally with.
- Week 5 -
Project #12
Research: Movie Trailer
Find a movie trailer that was edited in such a way that it peaked your interest and gives you a taste of what the story is about but skillfully does not show any spoilers.
Hint: movie-list.com
Project #13
Storyboard Assignment: Cinderella Man
View this clip.
Storyboard the sequence, play and pause on each shot, indicate any camera moves, changes in poses and expressions, recreate the framing and subject placement for every scene. Keep it rough and simple, imagine you are reverse engineering the sequence as you break down these shots to storyboard them. Think about the pacing and editing, why the cuts are framed the way they are, and the main focal point in each shot.


Project #14
Photoshop: Text Effects on Wood Texture
Here's a very fast and simple text art effect.
Step 1

Step 2

Step 3

Step 4

Step 5

Step 6


Step 7

Step 8


Step 9

Step 10

Step 11
the circle and fill it with black. Change the blend mode to Soft Light.
Step 12
layer and the shadow one we just created. Create a circle around the text like
we did in step 10 and fill it with an orange color (something like #FF9B0B).

Step 13


Final

Project #15
Photoshop: Leather Texture

Step 1


Step 2


Step 3

Step 4

Step 5

Step 6

Step 7

Step 8

Step 9


Step 10


Step 11

Step 12 (Optional)

Final Image
Story Structure #10
Consistent Plot Points
In a story, the major plot points are either driven by decisions or actions. While a story may naturally ebb and flow between both, when all is said and done, one of these will be seen as the primary driving plot force in a story. This is because meaningful stories are really just an argument and effective arguments have a pattern they must adhere to.
An author picks either an action or a decision to set the wheels of inequity into motion. In doing so, the argument of the story is begun. Choosing whether an action leads to a decision or a decision leads to an action is essentially telling an audience "This sort of thing leads to that." This pattern is now set up as the pattern of logic that will be examined in the Objective Story. An author then concludes her argument with the meaningful bookend, "No. Actually, this sort of thing leads to that."
Meaningful stories are really just an argument.
This is a simplified look at the mechanics in a story, but is essential towards understanding why the story driver must stay consistent.
If the major plots are different or are changed halfway through a film, the integrity of a story falls apart. The author ends up making an argument that sounds something like this: "This sort of thing leads to that. Well...no. Actually, that sort of thing leads to this."
The author who does this has, in essence, begun a completely new argument. The context has been spun around on an unsuspecting audience.
We, as an audience, were originally examining the logical effects of decisions leading to actions, or actions leading to decisions. This was the pattern that was being appraised. If we were looking at why certain decisions lead to problematic actions, we'd like to know what kinds of decisions would lead us away from those problems (or towards more if the overall story ended in failure). Likewise with actions leading to problematic decisions.
The fantastic thing about knowing the plot driver of your story is that you never again have to suffer from that awful question, "What happens next?" An action-driven story requires an action to spin the story in a different direction. A decision will do nothing to further the story. The same with decision-driven stories. In order for a decision-driven story to progress the story requires a decision to be made. Trying to force an act-turn with an action simply won't work.
Star Wars was driven by actions (Death Star created, Death Star destroyed), while The Godfather was driven by decisions (Don Corleone decides not to support the drug running, Michael decides to become the new Godfather). Toy Story was driven by actions (Buzz arrives in Andy's room, Buzz and Woody "land" in Andy's car), while Searching for Bobby Fisher was driven by decisions (Josh decides to hold on to the chess piece instead of the baseball, Josh decides to offer a draw to Jonathan).
Countless other great films stay consistent in the type of plot point that drives their story forward. At the very least, the two most important plot points - the Inciting Incident and the Concluding Event - need to be either both based on actions, or based on decisions.
Story Structure #11
Personal Tragedy
Feeling good about losing out is one thing, feeling miserable about winning is something else. Like the personal triumph, the personal tragedy straddles the emotional bridge between an all out rejoicing and an overwhelming depression.
But whereas the former emphasizes the good, this kind of ending focuses on the bad. It's the bitter half of a bittersweet ending, an ending that far too many of us have experienced in our own lives.
Success often comes with a price.
That's the overriding message of this kind of ending. These stories focus on the internal turmoil a Main Character suffers through in their endeavors to achieve success in the story as a whole. Often the Main Characters in these stories have pushed themselves to such an extreme that they have forgotten or buried their own personal issues. Victory, it would seem, is no salvation for one's personal demons.
The following clips are examples of stories where the good guys win, yet the Main Character goes home sad:
Besides being great films, what each of these clips have in common is an overwhelmingly gloomy soundtrack. In fact, they're so similar that they almost become interchangeable. Dark and ominous minor chords support what should otherwise be a joyous occasion. The Joker's vile scheme to plunge Gotham into chaos has been thwarted. Shouldn't Batman and Commissioner Gordon be jumping up and down with joy like mad? After all, in addition to stopping the Joker, they did manage to thwart Two-Face's attempt at dastardly revenge. Where's the all-out celebration? As it turns out, this downer is all Bruce's fault.
Throughout the The Dark Knight, Bruce Wayne (Christian Bale) has struggled with the impact he has had on the public and whether or not his presence is a good thing or a bad thing for the people of Gotham. He wants to be the hero, but realizes in the end that the only way he can save them all is by becoming the bad guy. He assumes responsibility for Harvey's murders and tells Gordon to let loose the dogs. In doing so, he secures Gotham's future, but at the price of his own. The good guys win, yet the Main Character goes home sad (or better yet, unfulfilled).
The Batman has seen himself live long enough to become the villain.
Personal Tragedy in Story Structure.
Bruce Wayne/Batman begins the film tormented with the kind of influence he has had on Gotham. Is he a force for Good or is he instead a catalyst for Evil? He spends the entire film mulling over his role as the Batman, desperately trying to find someway out or someone to replace him. In the end, he takes Two-Face's place as the villain - someone the people of Gotham can hunt and chase down. As the closing narration tell us, he becomes the Dark Knight.
In that film, Bruce Wayne has failed to resolve his angst. No smile there. He's still stricken by the fact that he has this negative influence on the city of Gotham. That's the very definition of a personal tragedy - a Main Character still stuck with the issues that they began the story with.
In The Wrestler...
When I saw the film the first time, I was trying to determine exactly what the writer or filmmaker was trying to communicate, it's never an easy process. I assumed this was more of triumph film than a tragedy, he had gone through personal growth his character didn't change from start to end, he went through lots of personal thinking and emotional ups an downs, in the end he realizes and accepts who he is and goes down the path he is most happy with, even though it may not be the right one.
But the film certainly has a bittersweet quality that most triumphant films lack. And when you take a step back and look at the film as a whole, it does appear that what they were trying to depict was a character who was willing to sacrifice it all for the roar of the crowd. It sounds more sophisticated and is probably closer to the kind of meaningful ending that Darren Aronofsky was going for.
Once I saw the film the second time, I saw it for what it truly was, a personal tragedy film. After his speech, and just before he makes the decision to kill himself for the crowd, Randy looks to the wings where his worst fears have been realized. The woman he loves has abandoned him, repeating the rejection by his daughter. He reverts back to his standard, lonely life and steels himself for what he will do for those who care more for The Wrestler, than Randy himself.
Story Structure #12
Personal Triumph
Sure, there are times when I succeed in my goals and feel really great about it. Likewise, there are moments when I fail in my efforts and feel really miserable about it (unfortunately more the latter, than the former). But rarely does life ever work out this nicely. More frequently, I find that I achieve my goals at the expense of my own personal life or I find that failing miserably turned out to be the best thing for me. Either way, it seems these outcomes happen more often than all-out triumphs or tragedies.
The only drawback with identifying these kinds of stories is that there isn't a great one-word term to explain them like there is with triumphs or tragedies. In a general sense they can be called "bittersweet," but even this isn't as accurate as it should be. Which is more prevalent, the bitter or the sweet? And to what part of the story does it apply? Bittersweet accurately describes the general feeling these kinds of stories have, but it's not too helpful in the actual creation of a story.
Because the Main Character is such an integral part of a story's meaning it can sometimes be helpful to use their emotional state as a kind of benchmark by which to evaluate the ending of a story. With this in mind, the "Bittersweet" ending can be divided into two categories: the Personal Triumph story and the Personal Tragedy story. The second (my ultimate favorite) will be looked at in greater depth in the following article, but for now, I'd like to focus on the sweeter part of bittersweet.
Developing The Personal Triumph.
These are the stories where the good guys lose, yet the Main Character goes home happy. As always, I've tried to put together a collection of clips illustrating this concept:
The first clip comes from the popular film, The Devil Wears Prada. In this story, Andy Sachs (Anne Hathaway) is the "good guy" trying to succeed in her attempts to be the assistant to Miranda Priestley (Meryl Streep). As the clip above shows though, things don't quite work out the way Andy thought they would.
Having grown to a point where she can confidently make the decision her heart wants her to, Andy turns away and chooses a life of tweed over one of Prada. However, even though she blew it, she still ends up gaining Miranda's approval. The good guy (or in this case gal) loses, yet goes home happy���a perfect example of a Personal Triumph story.
A perfect example of a Personal Triumph story is when the good guy loses, yet goes home happy. In Donnie Darko, the same kind of ending exists.
Just moments before he is crushed by the jet engine, Donnie starts laughing hysterically. Why? Because he is no longer worried about dying alone. Although we don't see the actual act, it's safe to assume that his relationship with Gretchen has grown to a point where he doesn't feel like he's alone in the world anymore (i.e, they slept together). Donnie has love. The Main Character, who started out in a catatonic state, ends up going home happy.
But where does this leave the rest of the world?
Unfortunately, Donnie's acceptance of his own death reverts the Primary Universe back to its miserable state. The alienation and the fixed conservative attitudes, which are the real source of the problems in the story.
Gretchen asks Donnie, "Wouldn't it be great if we could go back in time and erase all that pain and suffering?" But even a time-travelling superhero like Donnie can't outrun the past. Whatever happened, will always be.
Donnie could have let this world end by refusing to go back in time. In doing so, he would have brought an end to all of the painful and incompatible attitudes and the good guys would have won. But he didn't. He found a connection that he never thought he would and felt that that was enough of a life.
The Main Character goes home happy, yet the world as a whole, the "good guys" that we are rooting for, end up losing.
In the film Rain Man - In case it's been awhile since you've seen the film, Charlie Babbitt (Tom Cruise) abducts his brother Raymond (Dustin Hoffman) in hopes that he can ransom him for an inheritance. Along the way Charlie grows to love his brother and ultimately, decides to give up the inheritance. His brother means more to him now than any amount of money ever could. The "good guy" loses, yet goes home happy.
Much simpler to explain than Donnie Darko, but no less meaningful.
It's all about: Feeling Good About Losing Out.
In short, that's what these stories mean and why they feel the way they do. The audiences feels good about losing. In giving audiences something closer resembling real life, these films become cherished experiences that outlast the usual mindless drivel found in most theaters.
- Week 6 -
Project #16
Storyboard Assignment: Justice League
View this clip.
Storyboard the sequence, play and pause on each shot, indicate any camera moves, changes in poses and expressions, recreate the framing and subject placement for every scene. Keep it rough and simple, imagine you are reverse engineering the sequence as you break down these shots to storyboard them. Think about the pacing and editing, why the cuts are framed the way they are, and the main focal point in each shot.
Project #17 - Comic Book Coloring
Observe the sample comic book covers shown below. Pick any ONE of them and download it from the link further below (I apologize for the excessive amount of zombies).

Download the one of your choice, right click and save the target link:
Artwork #1
Artwork #2
Artwork #3
Artwork #4
Artwork #5
Artwork #6
Artwork #7
Artwork #8
Artwork #9
Artwork #10
Artwork #11
Artwork #12
Artwork #13
Artwork #14
Artwork #15
Artwork #16
Artwork #17
Using multiple layers, textured brushes, masks, lighting effects with shadows and highlights, and paint your chosen illustration to achieve a polished and professional look. The more detail, accuracy, and color depth the better.
Send the final JPG image file to the instructor.
Downloads:
Basic Paint Tutorial for a refresher of the fundamental techniques.
Step-By-Step Color Tutorial to get a detailed guide on flatting, coloring and layer masking.
Tutorial on Clip-Masking for adding and trimming your textures or custom brush stamps to the artwork.
All the following links below are both a collection of tips and tricks from various artists, with painting & illustrative guides from novice to advanced techniques.
Alternative methods behind painting with Adjustment Layers
A Guide to Creating & Applying Textures
It's a great way to keep certain things in mind when creating and manipulating artwork or photos.
Here's one final detailled look at the full potential of creating your own custom brushes:
Guide to Photoshop Brushes.
With some practice, this can open up many doors for some very cool and creative possibilities.
You may
DOWNLOAD and install these custom texture brushes for Photoshop, it' a random assortment that you could find uselful.
Need a reminder on how to install Photoshop Brushes? Scroll to the very bottom of this page for the info.
For the ulitmate guide on comic book coloring with tonal values, shading and lighting, view this video clip: Color Tutorial - but beware, the file is 245 MB! It will take a while for the video to download, maybe wait until you are at a computer with a faster internet connection, it is 1 hour and 25 min. long, despite the monotone voiceover, it's well worth the wait!
*** Read through the following site. It is a combination of tutorials from Sci-fi Art Magazines for concept design in Photoshop and online articles of guides for applying traditional art values to painting in Photoshop - along with theories on color palettes, lighting and composition:
"Designing & Painting in Photoshop"
This isn't relevant to this specific assignment, but it might interest you:
Tutorial on creating an illustration in Photoshop from thumbnails to final color composite.
Having trouble choosing nice color combinations?
Go here:
Color Scheme Designer
Kuler Color Themes
Aviary Color Editor
For inspirational Comicbook coloring look here and here and here.
A list of the best download sites for Photoshop Brushes:
PS Brushes - Your Number one source for Photoshop Brushes
Deviant Art - A large assortment of Photoshop Brushes
QBrushes - Free Quality Photoshop Brushes
NaldzGraphics - Photoshop Resources & Tutorials
GetBrushes - 150+ High Quality Free Photoshop Brushes
Miss M - Photoshop Brushes & Graphic Resources
In Obscuro - Free Adobe Photoshop Brushes
BittBox - Photoshop Brushes
Design Reviver - 350+ Brushes, Textures, and Fonts
Brusheezy - Free Photoshop Brushes
My Photoshop Brushes - Free Photoshop Brushes
Samples of finished comic book covers:
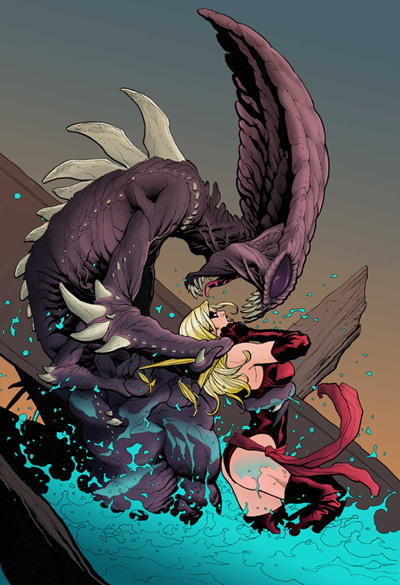
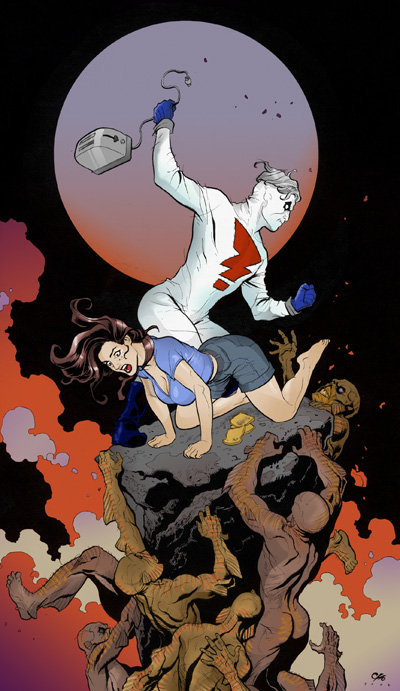
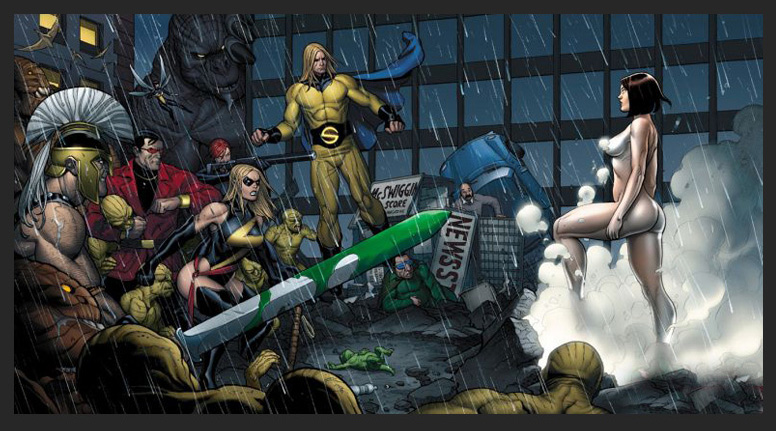

Other Samples:
Story Structure #13
End of a Main Character's Arc
Main Characters, just like the people in real life they are supposed to portray, find peace in their own way.
But what if those resolutions were achieved by means that most would consider sad or even reprehensible? What happens when an Author's judgment on a Main Character's growth clashes with societal standards?
Something truly awesome.
In Dennis Lehane's novel Mystic River you have no less than three Main Characters who, by one form or another, manage to resolve their own personal issues. While it is a story of triumph for one of them, the other two find themselves at the end of a personal triumph. Regardless of whether or not the problems in their overall stories were successfully resolved, the fact remains that all three were able to find their own version of peace.
The peaceful resolution to a Main Character's personal issues does not have to be a black and white issue. Proving that the end result of a Main Character's arc was a good thing does not have to be something that we as an audience actually feel good about. The author is in charge here, not the audience.
Whether you're talking about Sean, Dave or Jimmy, all three main characters manage to resolve their own personal problems. While Sean's is the closest to a happy ending, Dave and Jimmy's stories have that bittersweet feeling that is unfortunately more true-to-life. The end result is something closer to truth.
What gives this story its feeling of delicious intricacy, of being that much more like real life, is the degree to which these peaceful resolutions are found. Our moral appreciation of the ends towards achieving those means, if in discord with the Author's original intent, gives a piece of fiction that feeling of meaningful complexity. Neither technique, whether subtle or complex, is better than the other. Some Authors prefer to give their audiences something more.
Story Structure #14
A Story is an Argument
There is a significant difference between stories and tales. A tale is merely a statement; a linear progression from one event to the next culminating in one singular outcome. It can be thrown out immediately and disregarded as a one-time occurrence primarily because it has relatively little to stand on. A story, however, offers much more to an audience member.
The Development of Stories.
In sharp contrast to a tale, a story is an argument; a course of logical and emotional reasoning aimed at proving that a particular approach is either a good one, or a bad one. Because it is an argument it can be applied to all kinds of similar and not-so-similar situations. Whereas a tale can quickly be disregarded and ultimately forgotten because of the proliferance of exceptions, a well argued-story must be accepted by an audience member as one possible truth. The story always trumps the Tale.
An argument's ultimate goal after all is tell some truth, of relaying some meaning to an audience.
This is where the power of stories lies.
As way of example, I put together a string of movie clips proving this notion that truly wonderful films are a result of the filmmaker trying to argue a particular meaning.
- Week 7 -
Homework Assignment:
Download and watch the film "Memento" and be prepared to discuss the movie next week, you can see it here (warning: it's a big download)
Memento (717MB).
Project #18
Storyboard Test: Duncan's Revenge
Using the script provided in class and character designs for reference, storyboard the short story in full. Keep in mind of how to display the shots and how the types of shots you use will help to tell the story.
Watch Sherm Cohen's Awesome Storyboard Tutorials:
Download these boards.
Story Structure #15
Two Sides of the Same Coin
"You and I, we're just the same." "We have so much in common." "I looked in his eyes and I saw myself."
Ever heard these lines before?
Chances are, if you've been in a movie theater within the last hundred years, you've heard these words spoken. And spoken. And spoken yet again. In fact, you may have heard them so often that you've grown numb to them. The question then becomes why does this happen?
Did every filmmaker/screenwriter involved with these films read the same book? Did they all go to the same film school? More importantly, how can anyone in good conscience resort to using such clich��d dialogue? Where is the originality?
The answer lies in the fact that these words explain a very unique relationship.
The Reason for the Repetition
Clich��s exist because they're based, in part, on fact. In every complete story, the Main Character shares a common emotional bond with another principal character (often referred to as the Impact Character). The technical reason for why this connection exists can be found in my original article, There's a Reason We Are Both Alike, but the quick answer is that the Impact Character wouldn't have any impact if they didn't share some commonality.
This commonality revolves around the concept that the Impact Character explores the same issues as the Main Character, only from the opposite viewpoint. One will be dealing with issues externally, the other internally. In other words, if what the Main Character is dealing with is some internal issue like an empty heart, the Impact Character will be dealing with some kind of predicament. Think Scrooge and Marley from A Christmas Carol. Scrooge is heartless and Marley is forced to wear those chains. One is an internal problem, the other external.
The reverse is also true. If the Main Character is dealing with external issues, the Impact Character will be dealing internal versions of those issues.
The Impact Character exists because he or she is a catalyst for the Main Character's growth. Take away that connection between the two, and their power and role as that important character disappears as well.
Writers want their Main Characters to grow. Whether they know it intellectually or they do it naturally because of their talent, writers will write this Impact Character into their story in order to allow this growth to happen. In doing so, they'll find that the only way to get the Main Character to come face to face with their personal issues is to mold the Impact Character into a "shadowy reflection" of the Main Character.
As you can see there are both bad and good examples of this. Even the most talented and the most critically acclaimed find they are not immune to the power of these few lines of dialogue. Why avoid it if it works?
The Future of You and I
The problem comes when eventually everyone will be incorporating the "You and I" dialogue into their stories. As mentioned in the beginning, writers risk losing influence if audiences grow numb to it.
I tell my students, or anyone I'm helping out with on their stories, to go ahead and use the clich�� in the first draft. Have the Impact Character say to the Main Character, "You and I, we're both the same" and see where that line of thinking takes you. It will help you craft that important connection between the two characters and might even suggest some new scenes that will eventually improve your story.
Then, when you go back in to rewrite, take those lines of dialogue out. Completely. Find some other clever or subtle way to get across the same point. Maybe even find a way to get that idea of them being two sides of the same coin in a visual way (although, hopefully not as obvious as the K-Pax example in the clip). In this way, you ensure that the meaning of the story is received by the audience without the distraction of the unnecessary and the overused.
Story Structure #16
The Headline and Heartline of a Story
A great story consists of two fundamental arguments: the headline and the heartline. One argument plays towards the logical side of our existence; the other plays more towards the emotional. Both are essential. Why? Because you want to create stories that are both logically satisfying and emotionally fulfilling. Leave one side out and the audience feels cheated.
The two major arguments in a story can be referred to as the Objective Story and the Subjective Story. The Objective Story, often referred to as plot, engages the audience from the point of view of logic. Here the artist behind a story attempts to prove their argument by presenting characters as chess pieces, logistically weaving their way in and out of plot points in their attempts to achieve or prevent a common overall goal. From this point of view the characters seem cold to an audience member. While we may care about them, it is more their influence on the overall plot that we are concerned with.
On the other hand, the Subjective Story attempts to engage the audience from the point of view of feelings or emotions. Here the artist argues their case by creating empathy between the audience and two major characters. From this point of view we are more interested in how these two characters work together towards creating some level of fulfillment (or unfulfilment as the story requires). This is the heartline of a story and without it a story becomes cold, dispassionate and forgetful.
Stories Without Heart
Two films from a couple years ago unfortunately suffer from this dispassionate lack of heart. The Kingdom, directed by Peter Berg and written by Matthew Michael Carnahan, does a terrific job of presenting the problems and chaos surrounding the investigation of a terrorist attack in present day Saudi Arabia. And while the kidnapping of Jason Bateman's character Adam Leavitt and his eventual place in front of the camera as a potential beheading victim certainly elevates one's anxiety level, it does little more than that to really suck us into the film on a personal level. I have no idea who Adam is, what his personal problems are, or why I should really care about him (beyond the fact that I'm a huge Arrested Development fan).
Besides he's not really the one we're supposed to be identifying most with anyways���Jamie Foxx's Ronald Fleury is. But beyond a little moment with his son in the beginning, we really have no clue as to any personal baggage he may be carrying with him into this story. This is how you engage an audience's heart���by presenting them a character with which they can identify with, one they can have empathy for.
Secondly there is no opposing character with which to challenge Fleury's personal viewpoint. There is a character at the beginning of the film, the Saudi guard beaten for his apparent connection with the crime, who would have fit perfectly into this role. Yet for all the time spent setting his character up, he disappears for most, if not all of the second act. As such we are left with a very visceral yet disappointingly frigid connection with this film.
Many point to this film's subject matter as being the cause of its disappointing box office performance. While it may be true that it is a subject many are not yet ready to explore, I would advocate this lack of heart as the real reason audiences stayed away.
Danny Boyle's Sunshine (Written by Alex Garland) also suffers from this dilemma. And I have to say it comes as a huge disappointment to me as I loved the film���really really loved it. The visuals, the concept, the sound design, the music, all of it was just so perfect...yet there was still this lack of heart I had to contend with. There is absolutely zero time spent on Cillian Murphy's development. Zero! We have no idea who he is, where he came from, or why he makes the decisions he makes. We know he doesn't get along with Chris Evan's Mace, but their argument never moves beyond the purely physical "I don't like you" stage.
This film would've been a masterpiece if we had come to empathize with Capa's personal baggage; if we had somehow been brought into his story. Again, I loved the film, but it is not one I'm anxiously wanting to watch again because I know that emotional argument is missing. If only they had spent as much time developing his character as they did playing that awesome music whenever he jumps into his spacesuit, I wouldn't have been left as cold as the frigid space he so desperately tried to avoid.
Michael Moore's Sicko might seem like a strange film to examine in this context. After all it is a documentary and not a straight piece of fiction like The Kingdom or Sunshine (your definition of fiction may vary). Still, it is a fantastic example of a film that argues both logic and emotion effectively.
In Sicko director Michael Moore presents us with two arguments. The first is the argument that the American health care system doesn't work. This is the headline or objective story behind Sicko and the part of the film that provides the fodder for many a political argument . Moore, of course, has his own viewpoint and in a systematic and step-by-step manner argues the case for free universal health care.
The second argument, and the one that makes this piece so effective, is his argument that we're not taking care of each other. This becomes less easy to argue against. Notice the use of the word we. In the ultimate theory of visual storytelling, this is precisely the point of view one takes when examining the Subjective Story Throughline of a film. Contrast this with the impersonal They perspective that is used when looking at the Objective Story; as an audience member we are more emotionally attached to the former.
Consider how weak this documentary would have been without this emotional argument. Sure, we would've felt sympathy for the guy who had to choose which finger he wanted re-attached. And true, we still would've laughed at the confused expressions on the faces of Canadian and British patients when faced with the question of how much their hospital stay cost (If you haven't seen it, the answer is zero). But we would not have cared so much if he hadn't presented us with this argument of me vs. we.
Notice the pull on your heart when he asks, "When did we stop taking care of each other?"
It's a wonderful piece of propaganda to place us, the audience, at the center of the story. Each of us individually becomes the Main Character of the piece. At times, Moore assumes our position and asks questions that we might ask, but for the most part we are the central character of the film. Whereas we sorely missed the personal baggage present in Cillian Murphy or Jamie Foxx, we all came to Sicko charged with our own baggage connected to the idea of universal health care.
In a future article I'll go into more detail on how effective this documentary is from a structural standpoint, but for now it's enough to recognize the presence of both heartline and headline.
At first glance it might be an relatively easy concept to understand���stories must be argued both to the heart and to the mind. Unfortunately it more often than not is a concept that is drowned in the excitement that surrounds creating a motion picture. I'm sure this is what happened with Sunshine; so much attention was spent on creating the reality of a world suffering from a dying sun that they forgot to give the audience an emotional touch point. And the same with The Kingdom; there is so little we know about that corner of the world that the fascination with the unknown overcomes the emotional needs of an audience.
The most effective way to reach an audience is to provide them with both. Give them the logistics while also capturing their hearts with a fulfilling emotional argument. And while not every writer may be seeking to persuade an audience in the same fashion as a Michael Moore, I can guarantee you that many opposed to free universal health care had their minds changed by his film.
Regardless of what kind of story you are writing, there is still something you are trying to say, something you want to communicate���an argument you are trying to make.
Why not make it the best?
- Week 8 -
Project #19
Storyboard Test: Dysfunctional Dam
Using the script provided in class and character designs for reference, storyboard the short story in full. Keep in mind of how to display the shots and how the types of shots you use will help to tell the story.
Planning compositions for animated series or
film is known as staging, it is a storyboard
artist's job to stage the action as clearly as possible:
Storyboarding & Layout Tips
Basics on Angles & Composition for Storyboarding:
Planning shots involve using the fundamentals
of staging for your storyboards:
Basic Shapes
Hierarchy
Framing
Overlapping Forms
Clear Staging
Staging in Groups
Negative / Positive Space
Avoid Symmetry
Opposing Forces
Form Over Detail
Always Study Great Composition
Story Structure #17
The Most Important Event in a Story
When you come to the end of a story and you look back on everything that happened, what event could you call the most important? Was it the one at the end that brought everything to a satisfying close? Was it that tragic downturn that brought the Main Character to their lowest point? Or was it in fact, that event that started everything off; that event that, if removed, would erase the need for anything that came after it?
This "Most Important Event" is not a new idea; many refer to it as the Inciting Incident or the first Major Plot Point. My brother prefers to call it the "Exciting Incident." Whatever their favorite term, almost every writer/story guru recognizes the importance of the event as it gets the ol' story ball rolling. Often it puts the Main Character in instant jeopardy, increasing the conflict in such a way that a story must proceed.
But as with all things, a different perspective can you give a different understanding of story. Lets say you've written a story but you're not sure if you've got that Most Important Event in there; perhaps you have something, but you don't feel that it is quite strong enough. Well, coming from the usual perspective of looking at the beginning of your story it can be difficult to really tell if it is working correctly or not.
A different perspective can give you a different understanding.
But if you start at the end of your story and take a look back, you begin to see things differently. Is there an event there at the beginning, that if you took it out, would preclude any need for a story to follow? If you can't find one, then your story never really started in the first place. You've got to have that first event that really upsets the balance of things and sends all your characters into a tizzy.
Too many times, writers concentrate on the emotional aspects of a story at the expense of the logical portion of their narrative. Take Finding Nemo - some think that the Inciting Event of that story occurred when Nemo's mother was killed. Not true. Sure, it had a profound effect on the emotional makeup of Nemo and his father - but it had little to do with the logical part of the narrative. The story really started when Nemo left the safety of the Reef. Soon after he was caught by the dentist, therefore upsetting the status quo for everyone. And it's noteworthy that this event applies to all the characters in a story, not just one or two principal characters. When looking at where a story starts logically (from an objective standpoint), it's got to be something that upsets the balance for everyone.
What of Star Wars? Some think it has something to do with the plans. Well what about the plans? If Princess Leia hadn't stolen them, would there still be a story? I would think so; there's still quite a large inequity going on in that part of the galaxy. Turns out the Inciting Event of Star Wars occurs in the iconic opening scrawl with the creation of the Death Star. Without that titular event there would be no need for chasing droids, teaching ancient religions and bullseyeing womprats - there would be no story.
What about E.T.? Easy���E.T. gets left behind. Iron Giant? The Iron Giant crashes to Earth. What about something more serious, maybe even historical, like Hotel Rwanda? The murder of the Hutu president by Tutsi rebels sets off that explosive story. (I did a story analysis of Hotel Rawanda back in March of 2007.) Serious or light-hearted, it doesn't matter much; point is you've got to have that event that creates the inequity - for all the characters in a story.
What about something on the complete opposite side of the spectrum, like Breakfast at Tiffany's? Because there is such a huge emphasis on the emotional part of that story (after all, it is their romance that everyone remembers!), deciphering exactly where the story begins for all the characters can be a tricky process.
Think of it this way - the world of a story is a calm mountain lake with no breeze on a crisp cool autumn morning. There is the potential for great conflict, but it lies just beneath the surface, muffled and hidden out of sight. The narrative is at balance. Suddenly, a huge boulder drops out of the sky, breaking the surface of the once placid lake. Fish scatter. Sediment shivers. Waves, both large and small, ripple their way towards the shoreline. An inequity has been introduced; the narrative is now out of balance.
You've got to figure out what the boulder of your story is. You'll know when you've found it because your story will cease to exist without it. Without that giant boulder your work will remain a peaceful quiet lake, high in the mountains of Stories that never were.
Story Structure #18
The Story Limit
The Distance Needed to Develop a Meaningful Story
Why does it take so long to tell a meaningful story? Most movies require at least two hours. Novels sometimes need 500+ pages. Is there a reason why successful authors can't cut to the chase and simply tell an audience what their story is really about?
The Story Limit is a key element used towards the construction of meaningful stories:
The restricted amount of time or options that, by running out, forces the story to a climax...Running out of options is accomplished by an Optionlock; a deadline is accomplished by a Timelock. Both of these means of limiting the story and forcing the Main Character to decide, are felt from early on in the story and get stronger until the climax.
Once the options are gone or once time runs out, a story has to have its climax. If there was only one option or an unreasonably short deadline, the crisis would happen instantly!
A story requires this elbow room because there are many things that must be explored in order to arrive at a meaningful conclusion. The Main Character's point of view must be challenged in such a way that it is broken down or built up, the Objective Characters must come into conflict in order to help prove the validity of the thematic issue at hand, and an emotionally charged relationship, whether dwindling or growing, must be experienced. The Story Limit gives a story the space or time necessary to cover all this distance.
In Aladdin, the title character had to selfishly work his way through two wishes before he ultimately could figure out the best use for the third. In 3:10 to Yuma, Dan had until 3:10 that day to change his son's rather negative opinion of him. And in Se7en, Detective David Mills and William Somerset had to trudge through six deadly sins before that seventh could have any true meaning.
The Story Limit gives a story the breathing room necessary for a meaningful and emotionally compelling ending.
- Week 9 -
Project #20
Storyboard Test: The Diamond
Using the script provided in class and character designs for reference, storyboard the short story in full. Keep in mind of how to display the shots and how the types of shots you use will help to tell the story.
- Louie Del Carmen's Notes on Design & Composition
- Ron's Storyboard Cheatsheet v1.0
Factors to always remember when creating illustrations or doing photography:
Subject placement.
To hold the attention of the viewer, give your pictures a bold and
dramatic arrangement. Avoid putting your subject directly in the center of
the picture unless you are striving for a formal arrangement in which the
subject firmly commands attention.
Move it from the middle:
One of the most common mistakes of amateur photographers is placing the
subject smack dab in the middle of the frame. This makes a picture more
static and less interesting. That's why one of the most popular guidelines
in photography, painting and cinematography is the Rule of Thirds.
Imagine a tic-tac-toe board over your viewfinder and position the subject
along one of the lines or at one of the intersections. If your subject
fills most of the frame, position a focal point (like those smoldering
eyes) at one of the intersections.
With landscapes, keep the horizon along the lower third to give a feeling
of spaciousness. Position the horizon along the upper third to give a
feeling of nearness or intimacy.


Rule of thirds: In candid photographs of people as well as cinematography for filmmaking, it's often wise to follow the traditional rule of thirds. Imagine a pair of lines dividing the
picture into thirds horizontally and a second pair dividing it into thirds vertically. Place the most important visual element... usually the face
(or eyes in a close-up)-on one of the points where the lines intersect.
Frame the shot so that the main subject or even the horizon line is located at one of the points of intersection. People tend to find a picture more aesthetically pleasing when subjects are more towards one side. When storyboarding a scene, or picking up a camera for the first time, most people tend to try and center the subject. When you start to pay attention you'll realize this isn't always the best choice.The same principles are applied in illustration, animation, and pre-press / movie poster / book cover design.
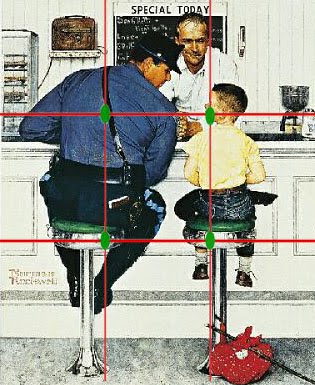
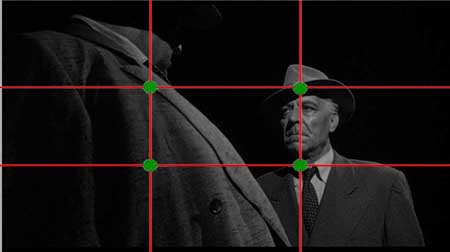
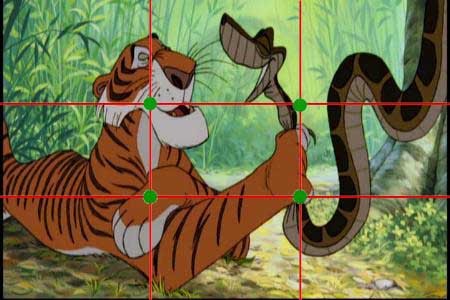

image can leave it feeling too heavy or complicated
in that section of the shot and other parts feeling empty.

Lines that lead.
Lines are everywhere around us. In people, trees, walls, shadows-you just
have to look for them. These natural lines can strengthen composition by
leading the viewer's eyes toward your subject. Diagonal lines can add
energy. Curved lines can add soft elegance. Using a road or path as a
leading line can add depth.
For Converging Lines: Interest at the point of convergence is the purpose, experiment with the positioning of your subject and your point of view to create a center of focus.


Create Depth.
Framing your subject with elements in the foreground can also add scale
and depth to pictures. Overhanging tree branches, doorways, anything that
covers at least two sides of the photo can give a three-dimensional effect
that invites viewers into the image.

Experiment with different angles.
Eye level is great for a lot of shots.
But if you want more from your photos, you have to explore. Get close and
fill the frame. Crouch down and shoot up at your subject or shoot along
the floor. Get up on a chair or table and shoot from above. Just be
careful or you might be icing your ankle while viewing the results.
Open space.
When a person moves across your camera's field of view, the final image usually has much more impact when the subject is off-center. Leave the open space in the direction in which the subject is headed. Similarly, if a subject is looking off to the side, it's best to leave more space in that direction.

Tracking a subject in motion causes your composition to change as you move
your camera to keep your subject in the frame.
Visual balance, focus and negative space are still important.
Let's pretend you are photographing skateboarders, here are some
elements to think about:
Simplicity
If there are a lot of things in the picture it is harder to draw attention
to the subject. When you're getting ready to shoot, become
conscious of what is in the frame and whether or not it's going to
distract the viewer from focusing on the subject. Watch for other
people, signs, trees, colorful objects, your camera bag (really bad),
poles, cars, and anything else that could steal attention away.
You don't always have to remove all of these things from the
photo, but you should make sure that they are secondary.
at with all of the leaves behind him, and there
is no depth to the shot. 
obstacle. That's all you really need. 
Standing and shooting a picture is just one point of view, and probably
the least interesting one. The angle and point of view you choose will
have a huge impact on your photo. Standing straight up and shooting
the skateboarder directly towards you will result in a flat
looking picture (unless you manipulate the depth of field), where as
getting down low and moving to the side may bring the photo to life.
An overhead view might offer the best perspective. Try a bunch of
different view points and angles before you shoot and see which one
looks best.
The space in front of a moving subject is called leadroom. It helps to
suggest which direction that the subject is moving in. Without proper
leadroom the viewer will feel as though the shot is cramped or
awkward. For proper leadroom you want to have more space in front
of the subject than behind them.
Noseroom is very similar to leadroom. It's more for close ups of a
person's head. It's particularly important when the person is talking
to someone who is off screen. Improper use of noseroom leads to the
shot feeling cramped and unbalanced.
These are important for moving subjects as well, they are naturally
occurring lines that direct the viewers eye and draw attention to certain
parts of the shot. If your shot has leading lines you want them to be drawing
attention towards the subject and the main focal point, not away from them. 
Diagonal elements help to add a more dynamic feeling to photos. 
Tangents occur when a foreground object aligns with a more distant object
in a way that causes them to seemingly blend together. Tangents
(also known as 'Mergers') are bad.
shot. Actually, the whole fence is, but that post is the main culprit.
This could have been avoided by choosing a different angle.
A low angle from the bottom of the stairs might have done the trick.
If the fence was still a problem, shooting down from the top of the stairs might have been a better choice.
Asymmetrical compositions often look better than symmetrical ones. Making
one side (top half or bottom half too) "heavier" can create some nice effects. 
Objects in the area may be used to create natural frames around your
subject. This will draw attention to the framed area.
Contrast is a great way to emphasize certain points in a picture.
Try a dark subject with a light background, or a light subject with a dark
background. This can also be done with colors.
A colorful subject amidst an otherwise dull background, for example. 
You can manipulate depth of field to help isolate your subject. Softening
the focus of elements in the photo allows you to keep background or
foreground details in the shot while avoiding a busy look. In this
example the crowd in the background is blurred, while the focus on the main subject.
When illustrating a storyboard for a scene, simulate this effect by
drawing in foreground, midground and background elements.
already been following a few of the guidelines. You'll probably also
notice how some of your shots could be improved. If that's the
case, great! That means you've learned something. Next time you're out
shooting you'll be better equiped to tell the story you want to tell.
Also remember that you'll come across instances where your shot will
look better by not following these guidelines. If it looks good, don't be scared to take the shot.
Project #21
Flash: Basic Flash Buttons & Functions
DOWNLOAD this set of instructions to create an instance in a Flash document for basic button "goto" operations.
Once complete send the SWF file to the instructor.
Project #22
Flash/Photoshop: Build a Self-Contained Flash Website
Applying Buttons, Movie Clips, Graphics, and Text, in addition
to Adding Scenes, Backgrounds, Resume, and Portfolio Content to Your Web Page Layout.
DOWNLOAD this set of instructions and create a self-contained Flash portfolio.
The contents and titles within your website are entirely up to you. Follow the instructions provided, but customize the text, graphics, and to your liking. Save... Label... and Send the final SWF and HTML files to the instructor.
Interested in learning more about the layout, coding and technical aspects of web page building? GO HERE.
Here's an E-Book on the art and business of storyboarding.
It's not just about animation storyboarding, it also covers live action, gaming, theme-Park boards, laser show boards and advertising storyboards. It reads somewhat like a textbook with a sense of humor. Exercises are grouped at the end of the book rather than with each chapter. It's not the best resources out there on the subject, but its worth browsing through.
Story Structure #19
Story Transformation
Stories Are Not Always About Transformation
At least, as far as the Main Character is concerned. They certainly can be, they just don't have to be.
There is a notion in scriptwriting and comicbooks that stories are always about transformation. This is a common misconception among storytellers that revolves around two similar, yet definably different aspects of character: growth and transformation. Transformation is defined as "a thorough or dramatic change in form or appearance." Metamorphosis, conversion, remake, overhaul.
Growth on the other hand is defined as "the process of developing or maturing physically, mentally or spiritually." Maturation, development, progress ...these are the terms that are closely related to the idea of growth.
Because a story is not a static entity, characters have to grow. The progress of time is an essential element towards the creation of a story, so yes, without a doubt that growth has to be prevalent.
But not every character has to transform. To categorically say stories are about transformation implies that if your Main Character doesn't undergo some major change in how they approach life, the story somehow doesn't work.
Characters need to grow certainly, but they do not need to transform.
Presently, the goal of brining people back into movie theaters is being met with promises of greater and greater advancements in technological presentation. "3-D Adventures of a Lifetime" are becoming so commonplace, they almost seem like cover-ups for bad storytelling. Believe it or not, they are even promising suits that shock you when someone on screen is shot. I doubt that jolt is what audiences everywhere are craving.
They want meaning and that meaning can be found in stories of growth. Transformation may occur, but it does not always have to happen within the Main Character. Sensory stimulation is window dressing.
In the end, audiences want the shock of a well-told meaningful story.
Story Structure #20
Subtext
1. The implicit meaning or theme of a literary text.
2. The underlying personality of a dramatic character as implied or indicated by an actor in performance.
3. An unfortunately dying artform.
Here's the ultimate example of "Subtext" demonstrated through HBO's "The Wire".
Warning contains coarse language and brief nudity.
- Week 10 -
Materials for Next Week's Exam:
Download and study these terms and theories for the in-class written test.
Story Structure #21
How To End a Story
There are basically four different ways you can end a movie: Happy, Sad, Bittersweet Happy, and Bittersweet Sad. Afraid that might be a little reductive? Not when you realize that there are a zillion different ways of presenting these endings.
So how do you determine exactly what ending a story might have? It's really quite simple.
To determine the type of ending you have to figure out the answer to two questions. Do the good guys win? Does the Main Character go home happy? That's it.
We'll start out with Happy Endings, which we can also call Triumphs.
Happy Movies
These are the kinds of movies that everyone thinks most stereotypical studio executives love. While I don't have any deep scientific research to prove why, I'm pretty sure it's because Happy Ending films have the biggest box office draws. The majority of people want to see a movie with a happy ending (Personally, I prefer something a little more complex, but we'll get to that in a different post).
The good guys win and the Main Character goes home happy. Plain and simple...
We start out with the super cheesy celebration of all things male, Top Gun. What does the clip above reveal? Well, if you look closely, you'll notice that the good guys are jumping up and down while they thrust their fingers in the air, proclaiming their victory over the Evil Empire. In the following scenes, Maverick (Tom Cruise) has finally resolved his personal issues concerning Goose and living under the shadow of his father. Tossing his buddy's dog tags into the ocean, he's now "free" to kick ass on his own terms.
The good guys have won and the Main Character heads back home... happy ��� Top Gun is the very definition of the Happy Movie.
What about something a little more sophisticated?
In the film "Amelie", the main character and her new love rip through the streets of Paris.
Amelie and her new love rip through the streets of Paris.
As wonderfully complex as Amelie is, it still ends the same way as the missiles and chicks flick. This time though, the good guys are less a force to be reckoned with than a group of people who successfully overcome their own problems with the help of the title character. Of course, even Amelie herself can't avoid a happy ending as she scooters her way through the streets of Paris, hugging her new-found love.
Personally, the reason I love this clip so much is the way in which Jean-Pierre Jeunet visually reveals this kind of ending with the kinetic camera work, i.e. using the medium to describe the emotion. Awesome.
The good guys win and the Main Character goes home happy
Lastly, we have the bawdy South Park movie. Satan is sent back to Hell, thus reverting the quaint Colorado town back to its idyllic roots. Stan, the main Main Character (the film actually has several main characters, as described here) also has resolved his personal issues with Wendy...albeit, a bit messier than she probably would have liked!
Stan professes his love for Wendy.
Stan professes his love for Wendy.
Good guys win. Main Character goes home happy.
Three completely different films. All with the same structural ending.
Of Ticking Clocks and the Ending of Stories
Stories come to an end for one of two reasons: the characters either run out of time or they run out of options. Being told that there are only two ways of bringing about the end of a story can seem very stifling to an author; how can you possibly reduce the entirety of narrative fiction down to an either/or choice? As with all things, a slight change in perspective can make all the difference.
It is true that when it comes to the Story Limit there are only two choices: a Timelock or an Optionlock. But there are different degrees of subtly that can be had when looking at this part of a story. It all comes down to where you place your focus on that Story Limit.
Timelocks
Take for instance, the Timelock. You can look at a Timelock as either a deadline or a duration of time. It's a subtle thing, but one that speaks to the elegance that can be had with a slight change of perspective.
Truman Explains the SituationThe first kind of Timelock, the deadline, has you focusing on what is lacking (the deadline that has not yet been met); the second, the duration of time, has you focusing on what is there (the hours that are quickly ticking away). Armageddon ((Used here as an easy example, NOT as an admission of great storytelling!)) has more of the latter: there are only 18 days left to save the Earth from ultimate destruction. While that could be viewed as a deadline, the true focus in that story is on the time that is quickly running out. Notice how many times Billy Bob Thornton's Truman peers through sweat-stained eyebrows at the glowing LCD clock slowly ticking away his own mortality - that's a Timelock focused on a duration of time. If the thought of Armageddon makes you cringe, think of 48 Hours with Eddie Murphy and Nick Nolte.
This is in contrast to movies that come to an end because of a deadline, like The Philadelphia Story starring Cary Grant. Here the focus is on the all-important wedding taking place at noon on Saturday. The characters focus their attention on that impending appointment rather than on the hours ticking away. High Noon would be another good example of this.
Both versions are Timelocks, yet as you can see, both have completely different ways of weaving that limit into the story.
Focus Determines Meaning
This shift in meaning reminds me of a helpful analogy that can be used when trying to determine the Main Character's Growth. For those unfamiliar with the concept, the Main Character's Growth (what is commonly referred to as their Character Arc) basically clarifies whether the Main Character is moving away from something or growing towards something in their personal growth. If they are moving away from the something their Growth is said to be Stop. Conversely, if they are growing towards something, their Growth is said to be Start.
It's a subtle difference, but one that can be made easier by imagining the Main Character's personal issue as being a cup half-filled with either sludge or coins. One kind of Main Character will have you focusing on what is there; the other on what is lacking. The cup filled with sludge resembles the Main Character who focuses on what is there and moves away from it. The cup filled with coins resembles a Main Character who focuses on what is not there and grows towards that emptiness.
As you can see, this analogy can be helpful in determining the kind of Timelock that exists in a story. The Timelock focused on a deadline has the characters focusing on what is lacking, like the cup half-filled with coins. The Timelock focused on a duration of time has the characters focusing on what is there, like the cup half-filled with sludge.
But what about Optionlocks?
Optionlocks
In an Optionlock story you either have a finite number of options that run out or you have a pre-determined amount of space from which to operate in. As with Timelocks, the difference lies completely in where you wish to focus your audience's attention.
Spacey in Seven
The first kind of Optionlock, the finite number of options, again has you focusing on what is there. This limit exists in movies like Seven. In that film, serial killer Kevin Spacey methodically works his way through the seven deadly sins. Morgan Freeman and Brad Pitt know that once that seventh and last sin is visited upon them, the story is officially over.
Rainman
The other kind of Optionlock Limit exists in stories that are defined spatially. Movies like Rainman or any other road movie where the characters work their way through a pre-defined limited space. In these films the characters can take as long as they want, but when they hit the end, it's all over for them. As opposed to the first kind of Optionlock which has a set number of objects, these kinds of stories have a set amount of spaces or places that the characters can go through.
Instead of checking things off, as characters would in the first kind of Optionlock, this second one has the characters focusing on how much space they have left; they're focusing on what is not there, like the cup half-filled with coins. It's probably more helpful to think of this kind of limit as more of a Spacelock rather than an Optionlock.
Binary Does Not Equal Boring
Spacelock...Optionlock...they both describe the same thing just seen from different angles. Your point of view determines the meaning of what it is you're looking at. While many of the choices you have to make in writing a story boil down to a seemingly black or white choice, like a Story Outcome of Success or Failure or a Main Character Resolve of Change or Steadfast, the degree with which you can temper that answer rests primarily in how you look at it.
The artistry of your own story lies within your use of the various shades of gray that exist between those choices.
Tragedies and Triumphs
Understanding the mechanics of what makes a story a tragedy or a triumph can go a long way towards insuring that every audience member ends their experience both satisfied and emotionally fulfilled.
A Theoretical Basis for Understanding
Happy Ending - The protagonist achieves the "outer" and "inner" goal. In other words, the hero gets the gold and becomes a better person. Bittersweet - The protagonist achieves the "inner" goal, but fails to get the "outer" goal. In Rain Man, Charlie doesn't get "ownership" of his brother, but he does grow from a self-centered narcissist to a more selfless brother. Cautionary Tale - The protagonist gets the "outer" goal, but fails to achieve the "inner" transformation. In Citizen Kane, Charles Foster gets the power and wealth (outer), but dies empty and unfulfilled ("Rosebud" represented the innocence and joy of his childhood). Tragic - The protagonist achieves neither the "inner" nor the "outer" goal, Leaving Las Vegas was, in my opinion, a tragedy (although, you could argue that the protagonist's goal was to "drink himself to death" ��� which he did accomplish).
Sound familiar?!
Two questions: Did the good guys win or lose? and Did the main character go home happy or sad? The sum of which adds up to a purposeful ending.
The Good Guys Win or Lose
When you talk about this half of the equation, what you are really focusing on is the Objective Story Throughline. Typically referred to as the "A" story line (or "outer" story), the Objective Story Throughline is that part of the story that involves everyone. It is labeled Objective because it is looking at the story's central problem from an objectified 3rd person point-of-view. Characters don't have names when taking this perspective, they have roles. So Mav in Top Gun becomes the "Hot Shot Fighter Pilot", Marge in Fargo becomes the "Plunky Sheriff", and Miranda in The Devil Wears Prada becomes the "Evil Magazine Editor" (of course there are other names you could call her, but let's keep it clean!).
It's a good trick because when you stop using character's real names, you tend to focus less on their own personal issues and more on how they function in the story. This is the part of the story where Protagonists, Antagonists, Sidekicks and Guardians reside. Again, function over the personal.
So when you ask the question, "Did the good guys win or lose?" you are in essence asking "Did the Protagonist's efforts to achieve the goal end up in success or failure?" The Protagonist, nine times out of ten, is someone the audience would interpret as the "good guy" and it is this interpretation that they use as a baseline when they want to know the logistical meaning behind a story's conclusion.
This is called the Story Outcome. Was it a Success (good guys win) or was it a Failure (good guys lose)?
The Main Character Goes Home
On the other side of the meaningful endings equation lies the Main Character. When asking whether they go home happy or sad, what you are really trying to establish is whether or not the Main Character resolves their own personal problems. These internal issues are the sole property of the Main Character; other characters may comment on it or be a part of it, but the heart of that emotional turmoil belongs to the Main Character. So Stan has his Wendy-induced anxiety, Detective Somerset wants to retire, and Charlie Babbitt has his daddy issues. The story these Main Characters inhabit serves as an opportunity for personal growth.
So when you ask the question, "Did the Main Character go home happy or sad?" what you are really asking is "Did the Main Character resolve their own personal angst?" The audience uses the answer to this question as a baseline for determining the emotional meaning behind a story's conclusion.
It is the Author's evaluation of the Main Character's efforts to work through his or her issues. Was it Good (main character goes home happy) or was it Bad (main character goes home sad)?
A Purpose to Storytelling
Choosing the answers to these two questions locks in the meaning of a story. A storyteller can only hope for confusion if he or she does not fully appreciate the concept between these two story structures. Audiences reach to stories for an explanation of why things are the way they are. Sure, there is a certain entertainment value that they may be seeking, and sadly, perhaps, even a thoughtless desire for distraction. But overwhelmed by the crushing flood of information and bite-sized video clips available from monitors and phones everywhere, audience members will quickly comment on anything less than purposeful as "Meh." They want more.
Giving them a meaningful ending overcomes all that noise.
A story provides the audience a welcome respite from the meaningless and a chance to ponder why.
Story Structure #22
Creating Complete Stories
Want know the secret to Pixar's success?
In their first fifteen years, Pixar Animation Studios has managed to provide the world with 11 monumentally successful films. Not only have they easily won their respective box office returns, these films have also won the hearts of audiences both young and old. Everyone loves a Pixar film.
The voice talent is unique and inspired, the character design rocks massive appeal, and the animation (particularly in Ratatouille) fans the flames of magic first ignited within the classic Disney animated films of the mid 20th-century.
But there is one ingredient that towers paramount over all of these.
It's a Matter of Perspective.
Most everyone who delves into the complicated world of storytelling eventually comes to the realization that in the end, stories are about solving problems. The concepts of story���character, plot, theme, and so on���were all developed as a means to communicate the appropriateness (or lack thereof) of the approach used in solving those problems. When done properly, an audience is provided with meaning.
All meaning is derived from context. The idea that "one man's trash is another man's treasure" is based on the chasm that exists between two opposing contexts. I may see the world differently than you, but from my perspective I am right. Likewise, from where you stand the way you see the world is correct. Meaning depends on the perspective we take.
There are four perspectives from which we can extract some meaning in our lives: I, You, We and They. As we go about our daily lives, we can easily shift perspectives from one context to the next, using whichever one will help us achieve our goals or make us feel better. The only thing we can't do is assume all four perspectives at once.
In our view of ourselves, we can take the I perspective and see what it is like to personally have a problem. We can also see a viewpoint opposite from ours (the You perspective) and have a relationship with others as well (the We perspective). But we cannot step outside and look at ourselves objectively. It's an impossibility.
Conversely when we look at others, we can view them objectively from the They perspective, we can have a relationship with them (the We perspective), and have an opposing view to theirs (the You perspective). But we cannot be them. We cannot simultaneously be both objective and subjective.
But Stories can be...
If you take the central problem in a story, you can see how that problem would appear different depending on what perspective was taken. The approach one character takes may seem an appropriate way to solve the story's problems while completely inappropriate to another character. It's only once we examine the central problem from all four perspectives that we are finally able to comprehend some truth to the matter and thus arrive at some greater meaning.
This is why stories have such a profound effect on us and why sometimes you can't help but read or watch the same stories over and over again. Stories offer us something we cannot get in real life, namely - meaning. When a story covers all four perspectives at once, it effectively has made a complete argument that an audience will be powerless to ignore. They'll have nothing to say because all the bases have been covered.
So how does a story go about exploring these four perspectives?
The Four Throughlines
The four perspectives correspond with the four throughlines found in every successful story. The I perspective matches up nicely with the Personal throughline. From this context an audience member can feel what it is like to personally deal with a problem. The You perspective matches up with the Opposition throughline, as in "You have a different way of seeing the world." The We perspective corresponds with the Relationship throughline of a story and finally, the They perspective matches up with the Big Picture throughline.
The Big Picture Throughline. This throughline is what most consider the main story, the plot, or if you prefer, the A-story line. A majority of screen-time is spent telling this throughline (at least in American cinema). This is the part of the story you describe when you're asked, "What was the story about?" From here, the audience gets to see the central problem from a bird's eye objective view.
The Personal Throughline. This throughline concerns itself with who the story is about. Most story experts agree that a successful story revolves around one central character, most often referred to as the Main Character. This throughline is also sometimes called the B-story line. From here, the audience gets to experience the central problem from a completely subjective personal viewpoint.
The Opposition Throughline. This throughline provides the opposing viewpoint necessary to force the Main Character to deal with their own issues. Most accurately referred to as the Impact Character, this character has also been labeled the personal antagonist. From here, the audience gets to experience a personal viewpoint of the problem that is not their own.
The Relationship Throughline. This throughline is the heart of every story. It concerns itself with the relationship created between the Main and Impact Character and whether or not that relationship is growing or dissolving. From here, the audience can gather some emotional meaning from the problem unavailable in any of the other throughlines.
Incomplete Stories exist when one of the throughlines is missing. When the Relationship Throughline is missing, you have a story without heart. In Monsters vs. Aliens, the Main Character Susan is left to deal with her personal problems on her own. Because of this, her change at the end seems forced and unbelievable. Main Characters need that Impact Character to help draw them out. Towards the beginning of the film there is a scene with Dr. Cockroach that seems like the beginning of a Relationship Throughline, but it is not followed through with.
This missing throughline is the primary reason for the poor performance of this film overseas. Audiences outside of America love stories with heart. Don't give it to them, and they won't show up.
When the Personal Throughline is missing, you end up with a story that is cold or uninvolving. In 9, we never learn who "9" is or what emotional baggage he brings to the story. This is why it becomes difficult to become emotionally involved with the film. Storytellers must provide this gateway into a story less they risk an audience checking out.
What if you leave out the Big Picture Throughline? In film, it is virtually impossible. Novels, not so much. The book version of Twilight suffers from an underdeveloped Big Picture Throughline. We know a lot about Bella, and Edward and their budding romance but we don't know anything about the big bad vampires until 3/4 of the way into the story.
This is why most men will toss the book aside after twenty pages or so. When you leave out the Big Picture Throughline, you end up with stories that don't make sense. This is also why, in the movie version, they sprinkled in bits with those three baddies from the very beginning. You need to have a sense that a story is going to make sense if you want to retain male viewers. Having a Big Picture Throughline goes a long way towards making this happen.
Complete stories are stories in which all four throughlines are present.
The Exceptions.
There are occasional exceptions to the failure of incomplete stories. This year we've been treated to three entertaining movies that fell short of supplying us with a convincing argument. Taken had neither the Opposition Throughline nor a Relationship Throughline. That's OK, because the purpose of that film was to show Liam Neeson kicking ass throughout Europe, not provide audiences with some deeper meaning.
Likewise, Inglorious Bastards from Quentin Tarantino missed the mark in the complete story department. The entertainment value that came from the uniqueness of the subject matter and some captivating performances superseded the audience's need for some greater understanding..
And finally, Coraline wasn't trying to be anything more than a beautiful tale (there is a difference between a tale and a story). If you've seen the film you know there's a scene towards the end that seems to come out of nowhere. Coraline's mother, constantly distracted by the pressures of her career, brings home a gift for her daughter. It feels like the right thing for her to do, but at the same time it feels awkward as she never really grew to that point. If they had developed the relationship between Coraline and her mother more (i.e., a Relationship Throughline), the story would have meant something more than simply beautiful character design and technically superior animation.
But they didn't, and the box office languished because of it.
Films suffer when a throughline is missing. Luckily, there is one studio who understands that.
The Pixar Secret.
As mentioned above, sure, you can get by with an incomplete story if you have fabulous production design, but you'll always be doing just that: getting by. Audiences crave meaning. It's why they go to movies and why they cherish the films they do. And you don't have to look much further than Pixar Animation to find films that people cherish.
Their secret?...
They write complete stories.
Of the eleven films produced at that studio in the last fifteen years, each and every one has a full and complete story. All four throughlines are present in each film. In fact, the greatest of them all, Finding Nemo, actually has two complete stories in it! We have the father/son story that focuses on, well, finding Nemo, and we have the secondary story with Nemo and Gil in the aquarium. The latter is less defined than the former, but it is still treated as a complete story. It's why the film feels so "full."
When reviewing a Pixar film, critics overwhelmingly point out the abundance of heart. This is because every single film has a meaningful relationship at the core. Woody and Buzz, Bob and Helen, Sully and Boo, Wall-E and Eve���these are all classic heart-felt relationships that will be remembered by audiences for years to come.
In addition, every film focuses on one central character from which the audience can experience the story. Cars has Lightning McQueen and Toy Story 2 has Woody. And every film has an opposition character that forces the Main Character to deal with their issues. Lightning has Doc, Woody has Jesse.
The presence of these four throughlines explains why audiences (particularly children) can watch them over and over again. They're getting something out of it that they can't get in real life. They're gaining meaning from solving problems both objectively and subjectively. When life seems pointless or confusing, these films can help supply comfort or greater understanding in the form of meaning.
And that's all there is to it.
Great Expectations.
As the world of fiction grows more fragmented and people become more and more distracted by the meaningless, the need for complete stories becomes apparent. If a writer wishes themselves to be heard and to have a profound effect on those who experience their story, they will have to provide them with a complete argument. Anything less, and those long hours at the keyboard will simply become fodder for the refuse pile that is Tweets and YouTube clips.
Audiences want complete stories. It's up to the authors of the 21st century to make it so.
Writing & Storyboarding "Complete Stories" can be the most challenging thing of all, especially if you want these stories to feel meanginful to its viewers.
Story Structure #23
The Development of Character & Story
The Difference Between Neo and Luke Skywalker
While a superficial understanding of story principles makes for a great YouTube video, it does nothing but further the confusion that can exist over effective character development. The greater the level of accuracy on the part of the writer, the greater the experience for the audience.

What Motivates a Character


A Solution For Every Problem

The Problem Defines the Story

The Right Man (or Woman) For the Job

The Need for Clarity in Storytelling

The Illusion of Change
Transformation is a process of letting go, a discarding of old ways with the hope that relief may come with new resolve. Growth of character, however, makes no such assumptions of metamorphosis.
Dueling Magicians

The Main Character Throughline

The Difference Between Resolve and Growth


Clarity of Character
Plot Points and the Inciting Incident
Plot points can sometimes be difficult to pick out, especially when there is confusion as to the purpose of such a device in a story. If one accepts the idea that stories are about solving problems, the reason for Inciting Incidents and Act Turns becomes all too clear.
The Exciting Incident

The Reason for Plot Points

Inciting Incidents and First Act Turns


Star Wars


The Matrix


Unforgiven


The Sixth Sense


Casablanca


The Lives of Others


The Incredibles
Not Just About Movies

HAMLET:
Let me not think on't! Frailty, thy name is woman���
A little month, or ere those shoes were old
With which she follow'd my poor father's body
Like Niobe, all tears ��� why she, even she ���
O God! a beast that wants discourse of reason
Would have mourn'd longer���GHOST:
A serpent stung me. So the whole ear of Denmark
Is by a forged process of my death
Rankly abused. But know, thou noble youth,
The serpent that did sting thy father's life
Now wears his crown.
HAMLET:
O my prophetic soul! My uncle!Problems, Energy, and Plot Points
Conclusion
Here's some essential links to save:
For Graphic Designers:
Tips for Charging Clients for Services
Setting Your Rates for Freelance Work
For Photographers:
How to Set the Price for Your Photo Work
3D/2D Animation & Design:
Setting Your Rates for Freelance Projects
For All Digital Artists:
A Guide to Creating & Applying Textures
A Basic Guide to Creating Custom Brushes
A Guide to Creating Adjustment Layers
A Guide to all Blend Modes
A Complete Guide to the Use and Manipulation of Brushes
Download Custom Brushes
A List of the Best Sites for Downloading Brushes
Everything you wanted to know about creating your own color palettes
Having trouble choosing nice color combinations?
Color Scheme Designer
Kuler Color Themes
Aviary Color Editor
Need to find some free textures?
DeviantArt: This is usually a good first stop when looking for some texture inspiration. It's nice because a lot of the textures on the site can't be found anywhere else.
Flickr: There are so many different textures on here it can be overwhelming at times, but a very good source of ideas and inspiration.
CGTextures: This site hosts all kinds of textures in an easy to browse format.
Zen Textures: A large assortment of high resolution textures.
QTextures: An ever growing stock pile of amazing textures.
Lost & Taken: A nice variety of detailed and colorful surface textures.
Mega-Tex: Over 7000 great quality textures.
Seamless Textures: A one stop resource for all of your seamless texture needs.
Texturebits: Royalty free photo textures, for personal or commercial use.
BittBox: A small but high-quality site for texture images.
PatternWall: A collection of a few hundred patterns.
Texture Warehouse and Texture Library are two simple sites with a few hundred textures of various types.
Traditional art values applied to digital painting:
Concept Art, Design, and Color Theory in Photoshop
How to install Custom Photoshop Brushes:
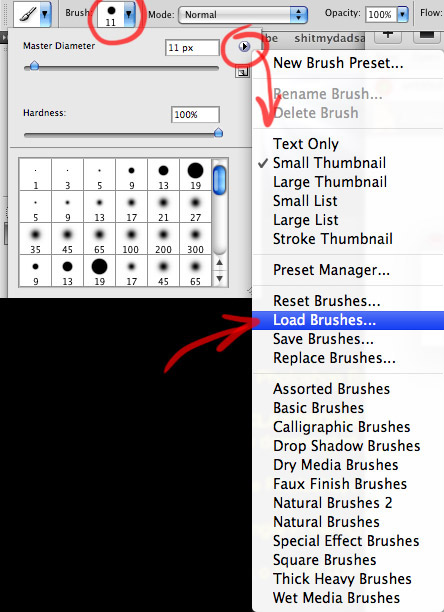
STEP 1 - Put the .abr file you've downloaded onto the DESKTOP. If they are in a ZIP file, open the zip file and drag the .abr files on to your DESKTOP.
STEP 2 - Open your Adobe Photoshop, select the Brush tool, go to option palette at the top of the screen and click on the icon next to "Brush:" to open the brush preset picker.
Then click on little triangle in the right upper corner.
Next on the list you choose 'Load Brushes'
In the dialog box, click on DESKTOP, and choose the .abr file you want to load and your new brushes appear in the Brush palette and are just ready to go. If there's mulitple Brush files to choose from, you may have to repeat the process to load them all one at a time.
To store all your Brushes in the one default folder:
[On a Mac] Put the .abr file you've downloaded into this folder: Users/{username}/Library/Application Support/Adobe/Adobe Photoshop CS3/Presets/Brushes
[on Windows] C:\Program Files\Adobe\Photoshop\Presets\Brushes.
Ever wish there was a decent pencil brush in Photoshop? You can make one.
1. Press F5 and start with this brush. It's one of the standard Photoshop brushes.
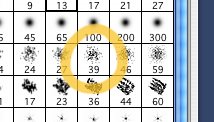
2. In the Shape Dynamics section of the Brushes palette, set the Size Control to Pen Pressure and set the Angle jitter to 100%.
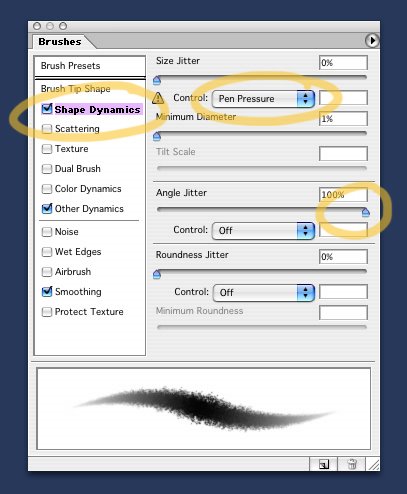
3. Next, in the Brush Tip Shapes section, set the Spacing to something like 20%. Spacing will control what looks like paper-grain.
(Note: as with all brushes, if the spacing is set too low, you run the risk of bogging down the speed performance of the brush...especially with large brushes.)
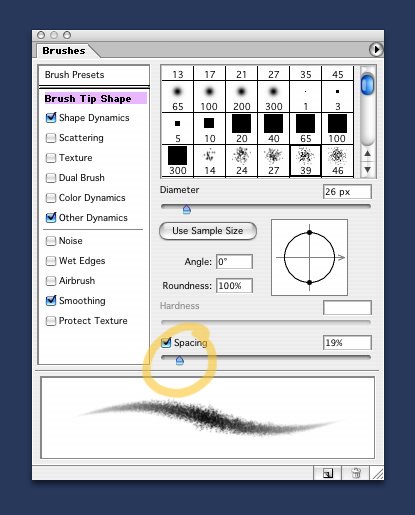
This is the basic brush, but you can always add other dynamics. I'll often add an opacity control to the brush (found in "Other Dynamics"), so I can get the effect of a light touch.

Remember, these dynamics can be adjusted depending upon your needs. For instance, if you don't want your pencil to come to a sharp point at low pressure, turn down the Size Control (from step 1). Or turn it off entirely.
Here's a few pencil / marker and texture brushes I use for storyboarding.
OK, that's pretty much it. Fire up that Wacom tablet/Cintiq, and go draw!

